GasGit
For the past few years, I’ve been using gasGit (any many of you have too Getting your apps scripts to Github) to get all my public stuff to github. I have over 150 Apps Script repos now. Earlier this year, clasp for Apps script was introduced which is a great way to build scripts for Apps Script using your own development environment.
However, you may want to stick with GasGit completely or partially.
- Migrating hundreds of projects can be daunting
- You may still prefer to use the Apps Script IDE, for some or all of your projects, yet still want them to be on GitHub
- You may be working on an older Chromebook with no way to run Linux locally, or simply prefer to keep all your work on the cloud
- GasGit automatically generates dependency documentation that can be useful
- GasGit automatically commits the source code of all (your own) libraries referenced by your project to GitHub
All that stuff is pretty handy, but clasp is great too, so I’ve updated GasGit to be inter-operable.
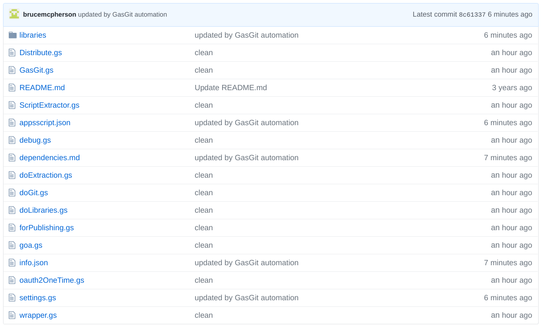
A GasGit repo
Gasgit creates and maintains github repos that look like this – this is the one for the GasGit script itself.
The libraries used by the script have also been copied to the repo, just in case you prefer to keep the code locally in your project

The dependencies are automatically documented
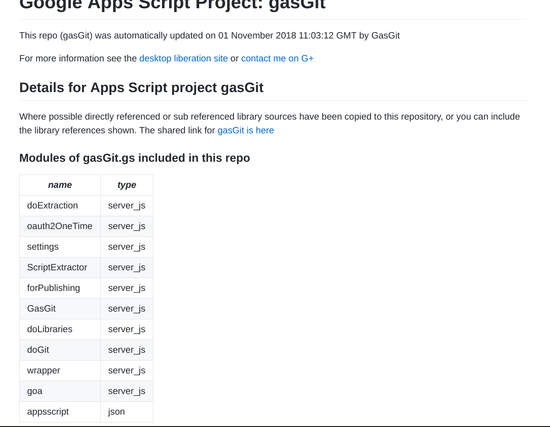
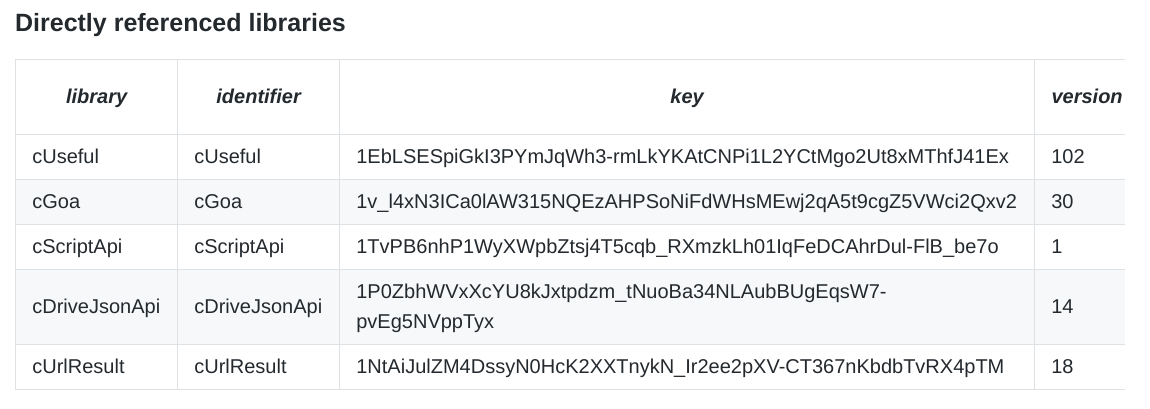
As are the libraries referenced
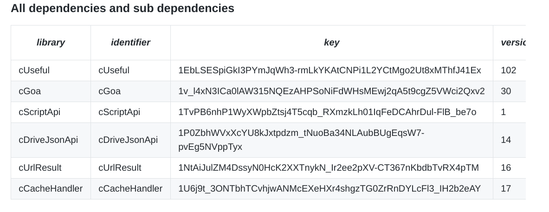
As well as any libraries that these libraries reference
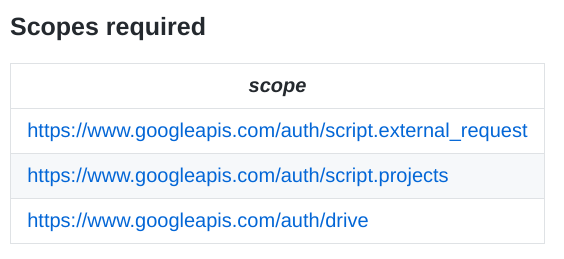
And any advanced services that are enabled

and any scopes required
Finally, and info.json file is created containing everything that GasGit has discovered about the script, that can then be used for further documenting or analysis or visualization.
Getting GasGit
There are a number of ways
- Make a copy of script using the IDE – you’ll find it in the dependency.md.

- clone it using clasp
clasp clone 1TphrUjRcx5sGlhgkfjB2R9MOZe3cPF7wK1LV8yVNoFCAwRTeNyXVsDFd
- get it from Github and use clasp to create a project
git clone git@github.com:brucemcpherson/gasGit.git
cd gasGit
clasp create myGasGit
clasp push
What if you don’t have a desktop and you want to use git and/or clasp
Just get on to the cloud console, and spin up a cloud shell

Install clasp
npm i @google/clasp -g
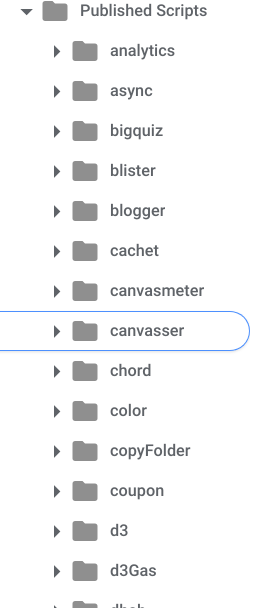
The main point of GasGit is to push your latest scripts to GitHub. You can run it as a timed trigger, or now and again as required. If there’s nothing to do it won’t do anything, and only changes are processed. I organize all my public scripts on drive in various folders. A single folder can contain multiple scripts, or subfolders containing scripts, as required. Anything other than scripts is ignored. Here’s a little snapshot of how this looks on Drive.
Every time GasGit runs, it looks through all this folder structure to see what’s changed and pushes them off to Github. If a library changes, then any projects that reference that library are updated (since library code is copied to the project’s repo too). Each Script file found gets its own Github repo.
Staging area
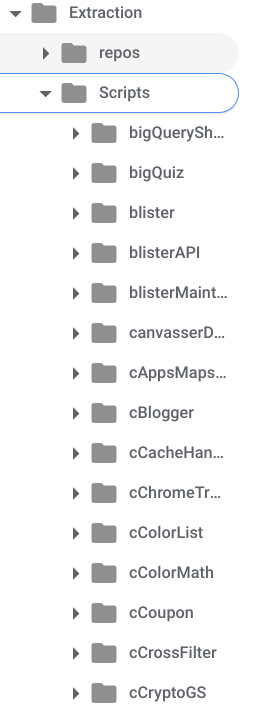
GasGit uses another area on Drive to extract source code to, ready to be pushed to GitHub later. It does this multi-stage approach so that library references (including libraries that reference other libraries) can all be resolved before pushing everything to the repo. Here’s a snip of my staging area. There’s one folder for each managed repo, and folders are created automatically as required.
GasGit settings
Gasgit knows where to look and where the staging area is (as well as how to write things to GitHub) in the Settings module. You should tweak that to however you want to get organized, and set up your GIT settings
OAUTH
You can use Goa for both the Google Oauth required for Drive and the ScriptAPI as well as for Github, but it’s simpler to just use the Apps Script API token and Goa for Github. The manifest file you’ll have either copied or cloned will set everything up for you, including libraries – but you’ll still have to
- enable the Apps Script API in the cloud console
- set up your GitHub credentials
- first get your clientId and secret from the GitHub developer console. Forget about the callback URL for now.
- modify and run the onetime function in the project with them. You can delete this after if you like.
function oneTimeSetProperties () {

   // used by all using this script
  var propertyStore = PropertiesService.getScriptProperties();


  cGoa.GoaApp.setPackage (propertyStore , {
    clientId : "76xx0c",
    clientSecret : "31xx8d",
    scopes : [
      'gist',
      'repo'
    ],
    service: 'github',
    packageName: 'gasgit'
  });

}
- publish your app as a webapp, and you’ll get a dialog with a callback URL. Paste that into the GitHub developer console callback URL
- complete the authorization process. You can unpublish the app after that if you want.
Running
You should now be able to run Gasgit.
function triggerBatch(){
  doExtraction();
  doLibraries();
  doGit();
}
Simple migration of repos from previous versions of GasGit
If you already use Gastgit, the repo structure has been changed a little so it can support clasp. The simplest way to reorganize your repos is
- to make a list of all the folders in the staging area, or some other way of enumerating all the repos you need to patch
- to create this script (cleaner.sh). The easiest place to do it from is the cloud console.
- to make a script from the list of repos to patch calling this script for each one
- to delete your entire staging area and run gasgit again. Note that you may want to set
ALL: truein settings to encourage it to re-commit files that haven’t been modified lately. Remember to set it back later to optimize your regular gasgit runs.
Using clasp with gasgit
Assuming you’ve now got all your projects on github, it’s pretty easy to clone a project using clasp. Of course the easiest is just to clasp clone scriptId, but if you want to pull in the library code to your project, then do this (this example pulls the GasGit project, but of course any project will do).
That creates a new project that looks like this. Note that the code for all the libraries is present in the project should you prefer to use them directly.
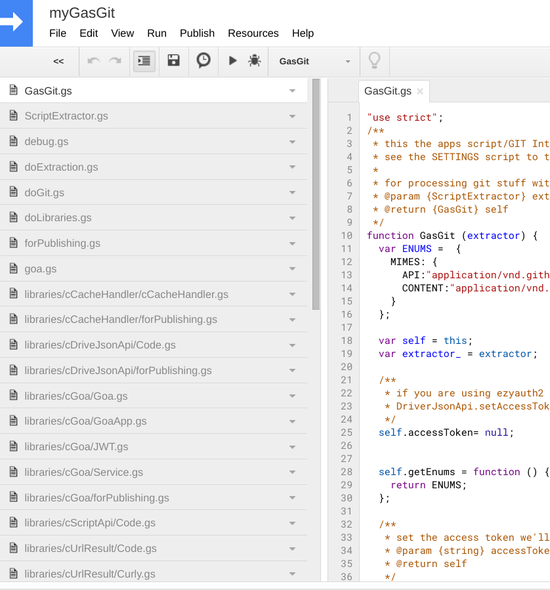
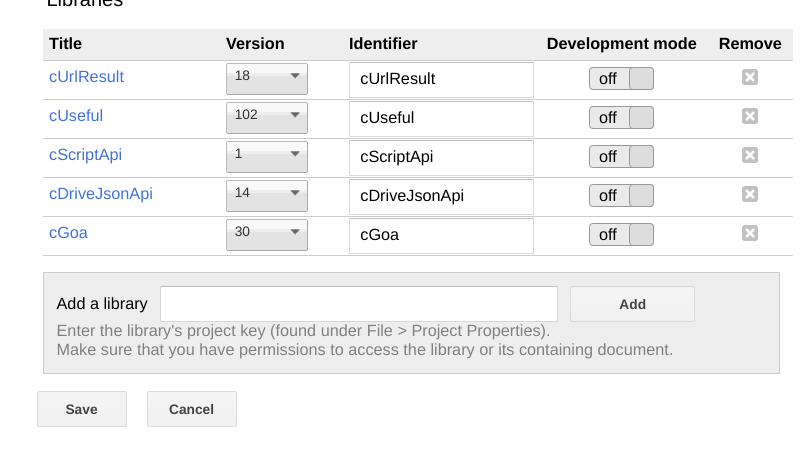
They are also automatically inserted into the resource section.
Library warning
If you just want to use the libraries in the resource section (not pull in the library code), then just delete the library folder before clasp push. Various reasons you might want to do that are
- The code that gets pulled in is the latest repo for that library (not necessarily the version referred to in the resource section
- Because the libraries are not encapsulated in a namespace when local, then there may be name collisions between the libraries themselves, or with your code.
- If in doubt, delete the library folder before pushing with clasp.
In a later process, I’ll show you how to automatically create namespaces to partition off the libraries so they can more safely be incorporated locally. That’s it for now.
Return to Drive SDK to learn more about the next topic
For help and more information join our community, follow the blog or follow me on Twitter