I recommend that you save your commands in various scripts so you can repeat them or modify them later.
In this article – we’re doing this.
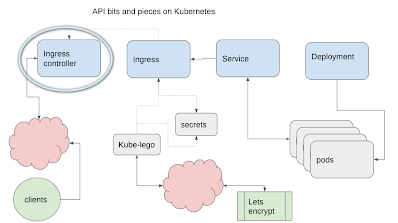
Ingress
An ingress is used to load balance and route requests from the outside to a service running on the cluster – in our case, playback-service created in Creating a microservice on Kubernetes, but we’re not quite ready to make that yet.
Ingress controller
Kubernetes runs on platforms other than Google Cloud Platform, and Ingress methods vary across platforms. Using an ingress controller helps to provision the right kind of ingress, provides control over their behavior and ultimately exposes the external IP address that your service will be available on. For now, we’ll use whatever IP address gets assigned, but it’s also possible to assign a static one – more of that later.
Helm, Tiller, Helm charts
These cheesy nautical references are another new concept I’ll need to touch on before continuing. I’ll keep it minimal, just enough to install what we need for this and the next step in this journey. Feel free to read more about them.
- A helm chart is a package format to describe a package that refer to a set of Kubernetes resources that together do something useful and are dependent on each other.
- Helm is the CLI component to orchestrate their installation and management.
- Tiller is the backend piece that takes command from helm and passes them to Kubernetes.
Why we need them is because they can be used to install prepackaged configurations – in this case, an ingress controller.
Installing the ingress controller
First, we need to get Helm, as the controller comes prepackaged from the helm repository. This script installs helm, tiller, then the ingress controller package. Helm uses something called “releases”.
make-ingress-controller.sh
echo "make sure we have helm installed"
curl https://raw.githubusercontent.com/kubernetes/helm/master/scripts/get | bash
helm init
echo "install nginx ingress controller"
helm install stable/nginx-ingress -n kube-system
rbac
It may be that your cluster will be unhappy with the permissions that tiller (the backend part of helm) needs. If you get a tiller permissions error, you can try to assign tiller permissions like this
## rbac problems
kubectl create serviceaccount --namespace kube-system tiller
kubectl create clusterrolebinding tiller-cluster-rule --clusterrole=cluster-admin --serviceaccount=kube-system:tiller
kubectl patch deploy --namespace kube-system tiller-deploy -p '{"spec":{"template":{"spec":{"serviceAccount":"tiller"}}}}'helm init --service-account
tiller --upgrade
If you hit a permissions problem with the deployment itself, you can try appending this to the helm install line.
--set rbac.create=true
Here’s the deployments created in these tutorials now. You’ll notice that there’s both an ingress controller and a default backend. If you haven’t created a back end yet, then this default can be used to test that the controller is working – however we have ours already written – so we’ll move on to that shortly.
kubectl get deployment
NAME                                        DESIRED   CURRENT   UP-TO-DATE   AVAILABLE   AGE
kube-system-nginx-ingress-controller        1         1         1            1           1d
kube-system-nginx-ingress-default-backend   1         1         1            1           1d
play-around                                 1         1         1            1           1h
playback                                    2         2         2            2           23h
and here’s the pods
kubectl get pod
NAME                                                         READY     STATUS    RESTARTS   AGE
kube-system-nginx-ingress-controller-6946898d6b-t8n6m        1/1       Running   0          1d
kube-system-nginx-ingress-default-backend-55d86879fc-8w4jz   1/1       Running   0          1d
play-around-5cb4cf76df-h9pq6                                 1/1       Running   2          1h
playback-cb6dd9dfb-l2qrq                                     1/1       Running   0          23h
playback-cb6dd9dfb-tmmrn                                     1/1       Running   0          23h
and the services
kubectl get service
NAME                                        TYPE           CLUSTER-IP     EXTERNAL-IP     PORT(S)                      AGE
kube-system-nginx-ingress-controller        LoadBalancer   10.3.250.50    35.225.99.100   80:31124/TCP,443:30554/TCP   1d
kube-system-nginx-ingress-default-backend   ClusterIP      10.3.254.193   <none>          80/TCP                       1d
playback-service                            ClusterIP      10.3.251.79    <none>          80/TCP                       19h
Note that the controller has provisioned an external IP address (it might take a while to appear). This is the IP address we’ll use to access the service. The next step will be to provision a certificate to access it securely – so at this point – head over to your domain name provider and create an “A” DNS record for that IP address since it’ll take a little while to proagate.
Getting a .yaml from a resource
Helm created these various resources, so we didn’t have to specific define them. However, it is possible to generate a yaml file from a resource. Here’s the configuration for the controller service. Pay attention to the selector – we’ll be using that later.
kubectl get service kube-system-nginx-ingress-controller  -o yaml
apiVersion: v1
kind: Service
metadata:
  creationTimestamp: 2018-03-20T17:21:46Z
  labels:
    app: nginx-ingress
    chart: nginx-ingress-0.9.5
    component: controller
    heritage: Tiller
    release: kube-system
  name: kube-system-nginx-ingress-controller
  namespace: default
  resourceVersion: "944467"
  selfLink: /api/v1/namespaces/default/services/kube-system-nginx-ingress-controller
  uid: 2abb986c-2c63-11e8-9843-42010a8000cd
spec:
  clusterIP: 10.3.250.50
  externalTrafficPolicy: Cluster
  ports:
  - name: http
    nodePort: 31124
    port: 80
    protocol: TCP
    targetPort: 80
  - name: https
    nodePort: 30554
    port: 443
    protocol: TCP
    targetPort: 443
  selector:
    app: nginx-ingress
    component: controller
    release: kube-system
  sessionAffinity: None
  type: LoadBalancer
status:
  loadBalancer:
    ingress:
    - ip: 35.225.99.100
Next step
Next we have to figure out how to make certificates to allow secure access to the service via ssl to the ingress. See Getting an API running in Kubernetes for how.