Now we know how about Hiding data in Excel Objects, Excel JSON conversion and Dynamic Forms let’s combine all that as an enhancement to the Roadmap Generation project. The objective is to embed traceability data in the generated roadmap shapes so that we can bring up a dynamic form, allow changing of the data that made it, and write that back to the originating cells.
Embedding roadmap data in roadmap shape
In previous articles I covered the roadmap project, where powerpoint ready roadmaps can be generated from simple excel input data. By making use of Data Manipulation Classes and Excel JSON conversion data can be easily embedded into the generated shapes for future reference. Using the following data

Our roadmapper generates this
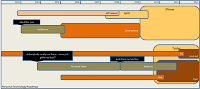
In addition though, it also encodes the associated data in jSon format in the .alternativeText property of each generated shape. So for example, in the ‘iphone’ shape’, this has been encoded into the alternativeText field – a jSon representation of the data, as well as some traceablity items.
{"shapeTraceability":{
"details":{"created":"01/08/2011 12:38:37", "user":"bruce","version":"2.0","id":"iphone"},
"data":{"activate":"1-Jan-10","deactivate":"","description":"iPhone","id":"iphone", "target":"","custom":"stream","cost":"360","callout":""},
"location":{"activate":"\'InputData\'!$A$11",
"deactivate":"\'InputData\'!$B$11",
"description":"\'InputData\'!$C$11",
"id":"\'InputData\'!$D$11","target":"\'InputData\'!$E$11",
"custom":"\'InputData\'!$F$11","cost":"\'InputData\'!$G$11",
"callout":"\'InputData\'!$H$11"},
"shape":{"type":"0","frame":"_rm_Rectangle 371_372_InputData"},
"parameters":{"location":"Parameters"}}
}
Now that we have all this, there is a direct link between the collection of shapes and the data that was used to create it, which can easily be accessed through a cJobject class. For example the activate data can be addressed as cjObject.Child(“data”).Child(“activate”).Value and its location as cjObject.Child(“location”).Child(“activate”).Value
Creating dynamic forms
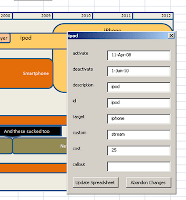
I covered this topic in Dynamic Forms but it’s worth looking at this again in the context of the roadmap shape collection. The objective here is to be able to click on a shape, in this case the one labeled ‘ipod’, and bring up a form showing the original data, allow it to be changed, and write it back to the original cell.
This presents a few technical problems. Here is how to do it.
Assigning an action to the shape
Firstly, when the shape is created the data is serialized and hidden, then we need to assign an onAction event handler so that it reacts to a click on the shape later.
Public Sub setTraceability()
    With psc.Shape
        .AlternativeText = jObject.Serialize
        procTraceAbility cProc, psc
     End With
End Sub
The formatting of the onAction property of the shape is kindof funky, so here is a general procedure (makeCallString) to do it along with how to use it (procTraceability)
Public Sub procTraceAbility(proc As String, sc As cShapeContainer)

    With sc.Shape
        .Name = .Name & "_" & .ID & "_" & sc.dSets.DataSet("data").Where.Worksheet.Name
        .OnAction = makeCallString(proc, .Name)

    End With

End Sub


Private Function makeCallString(whichProc As String, ParamArray args() As Variant) As String
    Dim s As String, v As Variant

    For Each v In args
        s = s & """" & CStr(v) & """" & ","
    Next v
    If Len(s) > 0 Then
        s = left(s, Len(s) - 1)
    End If
    makeCallString = "'" & whichProc & " (" & s & ")'"

End Function
All this does is to eventually assign the procedure named in the constant cProc, to the onAction property of psc.Shape. This causes the following procedure to be called when the shape is clicked. Since I have included the shape name in the call string, shapeFutzing receives the name of the clicked shape. Once the corresponding shape object is found we just deserialize the jSon encoded data and either show the form, or replot the roadmap if the roadmap background is clicked as below.
Public Sub shapeFutzing(sName As String)
    Dim sr As cShapeTraceability, s As Shape, cj As cJobject

    ' now deal with the shape selected
    Set sr = New cShapeTraceability
    Set s = findShape(sName)

    If Not s Is Nothing Then
        Set cj = sr.getTraceability(s)
        With cj
            If .isValid Then
                If .Child("shape.type").Value = sctframe Then
                    actRoadMapper (.Child("parameters.location").toString)
                Else
                    If showData(s, cj) Then
                       actRoadMapper (.Child("parameters.location").toString)
                    End If
                End If
            Else
                MsgBox ("Problem with traceability for " & s.Name)
            End If
        End With
    Else
        MsgBox ("Couldnt find shape " & sName & " on current sheet")
    End If
End Sub
Showing the form
I am starting with an existing, but empty userform. The textboxes and so on are all build dynamically from the contents of the deserialized .alternativeText property of the clicked shape. However there is a fundamental problem to be resolved, which is where to plot it. As you may know, positioning userforms can be complex, but in this case i want to position it more or less where the mouse was clicked. Userforms are calculated in points, whereas mouse positions are expressed in pixels, so to do that we need to find the mouse position, examine the dpi of the current display, and convert. Here is a set of API procedure calls to do all that. The convertMouseToForm function will take care of it all and return the left and top positions you would need to specify to position a form at the current mouse position. It still needs a little modification though, since the Application.ActiveWindow might not be maximized, and a userForm will ignore top and left property settings unless its .StartUpPosition property is set to manual (0).
Option Explicit
' these are special function to get device specific things

Declare Function GetDC Lib "user32" (ByVal hwnd As Long) As Long

Declare Function GetDeviceCaps Lib "Gdi32" (ByVal hDC As Long, _
     ByVal nIndex As Long) As Long

Declare Function ReleaseDC Lib "user32" (ByVal hwnd As Long, _
     ByVal hDC As Long) As Long

Const LOGPIXELSX = 88
Const LOGPIXELSY = 90

' we need to be able to find cursor position where mouse was clicked
Public Type tCursor
    left As Long
    top As Long
End Type

Private Declare Function GetCursorPos Lib "user32" (p As tCursor) As Long

Public Function pointsPerPixelX() As Double
    Dim hDC As Long
    hDC = GetDC(0)
    pointsPerPixelX = 72 / GetDeviceCaps(hDC, LOGPIXELSX)
    ReleaseDC 0, hDC
End Function

Public Function pointsPerPixelY() As Double
    Dim hDC As Long
    hDC = GetDC(0)
    pointsPerPixelY = 72 / GetDeviceCaps(hDC, LOGPIXELSY)
    ReleaseDC 0, hDC
End Function

Public Function WhereIsTheMouseAt() As tCursor
    Dim mPos As tCursor
    GetCursorPos mPos
    WhereIsTheMouseAt = mPos
End Function

Public Function convertMouseToForm() As tCursor
    Dim mPos As tCursor
    mPos = WhereIsTheMouseAt
    mPos.left = pointsPerPixelY * mPos.left
    mPos.top = pointsPerPixelX * mPos.top
    convertMouseToForm = mPos
End Function
Plotting the form in the right place then can be expressed as follows
Private Function showData(s As Shape, cj As cJobject) As Boolean
    Dim cf As croadmapitemform, cd As cJobject, cc As cCell
    Dim mPos As tCursor
    ' this gets the mouse position and converts it from pixels to points
    mPos = convertMouseToForm
    Set cf = New croadmapitemform
    With cf
        .init mPos.left, mPos.top, cj
        .uShow
        showData = .Dirty
    End With
    Set cf = Nothing
End Function
Creating the dynamic forms controls
I have created a cRoadmapItemForm class to handle all aspects of dealing with the creation and handling of the form events. This is just really busy work except for a couple of points.
- We are going to use a further 2 classes for dynamic event handling – cHandleItemFormEvents for dealing with textbox events and cHandleFormExit for dealing with command button events
- When you create these of event handling classes, you need to ensure they dont get cleaned up by VBA garbage collection while they are still needed. To ensure that we maintain a reference to them and keep them safe from the garbage guy, i always add them to a collection in the calling procedure. You will see that in the following long and boring procedure.
Public Function init(mouseLeft As Long, mouseTop As Long, cj As cJobject) As croadmapitemform
   ' show data items that have been deserialized into cj
    Dim cdc As cJobject, cd As cJobject, cbHandler As cHandleFormExit
    Dim iTop As Long, iLeft As Long, h As Long, w As Long, lb As Control, tb As Control
    Dim cHandler As cHandleItemFormEvents
    Set pJobject = cj
    Set cd = pJobject.Child("data")
    ' we'll need this later
    ' finding out the h&w needed for form title/border etc.
    h = uForm.Height - uForm.InsideHeight
    w = uForm.Width - uForm.InsideWidth

    iLeft = cLeft
    iTop = cTop

   'set up array of labels and tables
    If cd.Children.Count > 0 Then
        'set up control events since we are going to allow editing
        Set ptbEvents = New Collection
        Set pcbEvents = New Collection
        ' populate form
        uForm.Caption = cj.Child("details.id").toString
        For Each cdc In cd.Children
        ' create an event handler for each one
            Set cHandler = New cHandleItemFormEvents
            ptbEvents.add cHandler
            If pSelectedHandler Is Nothing Then Set pSelectedHandler = cHandler

        ' create a label
            Set lb = uForm.Controls.add("forms.label.1", lbName(cdc))

        ' create a textbox
            Set tb = uForm.Controls.add("forms.textbox.1", tbName(cdc))
            ' size and position it
            With lb
                .top = iTop
                .left = iLeft
                .Height = cTextBoxHeight
                .Width = cLabelWidth
                castLb(lb).Caption = cdc.Key
                tb.Value = cdc.Value
                tb.top = .top
                tb.Height = .Height
                tb.Width = cTextBoxWidth
                tb.left = .left + .Width + cbGap
                iTop = .top + .Height + cGap
            End With

            ' create a handler for this textbox and add to collection
            With cHandler
                Set .lb = castLb(lb)
                Set .tb = castTb(tb)
                Set .jObject = cdc
                Set .roadMapItemForm = Me

            End With
        Next cdc
    End If
    With uForm
        ' add a submit and cancel button
        Set pcbSubmit = .Controls.add("forms.CommandButton.1", "cbSubmit")
        Set pcbCancel = .Controls.add("forms.CommandButton.1", "cbCancel")
        With pcbSubmit
            .top = iTop
            .Height = cTextBoxHeight
            .Width = (cLabelWidth + cTextBoxWidth - cbGap - cbGap) / 2
            .left = iLeft
            With castCb(pcbSubmit)
                .Caption = "Update Spreadsheet"
            End With

            Set cbHandler = New cHandleFormExit
            pcbEvents.add cbHandler
            With cbHandler
                Set .roadMapItemForm = Me
                Set .cb = castCb(pcbSubmit)
            End With
        End With
        With pcbCancel
            .top = iTop
            .Height = pcbSubmit.Height
            .Width = pcbSubmit.Width
            .left = iLeft + pcbSubmit.left + cbGap + pcbSubmit.Width
            With castCb(pcbCancel)
                .Caption = "Abandon Changes"
            End With
            Set cbHandler = New cHandleFormExit
            pcbEvents.add cbHandler
            With cbHandler
                Set .roadMapItemForm = Me
                Set .cb = castCb(pcbCancel)
            End With
            iTop = .top + .Height + cGap
        End With

        ' normally it would ignore left and right - so set startuppositio to manual
        .StartUpPosition = 0
        ' adjust form so that all this stuff fits
        .Height = iTop + h
        .Width = cTextBoxWidth + cLabelWidth + cGap + cbGap + cLeft + w
        .left = mouseLeft + cGap + Application.ActiveWindow.left
        .top = mouseTop + cbGap + Application.ActiveWindow.top

    End With
    Set init = Me
End Function
Dealing with Dynamic control events
With dynamic controls, you do not have the full suite of events that you have with IDE created controls. I’ve no idea why this is, but there it is. That means that you have to do a little more work than normal when, for example, noticing if a control has lost focus, or has changed its value. Here are the 2 classes used for handling the events associated with the dynamic controls we have created on the data form. The key thing to note here is that ‘Private WithEvents’, tells VBA to allow you access to certain event processing or that type of control.
Option Explicit
Private WithEvents pCb As MSForms.CommandButton
Private pRoadMapItemForm As croadmapitemform
Public Property Get cb() As MSForms.CommandButton
    Set cb = pCb
End Property

Public Property Set cb(p As MSForms.CommandButton)
    Set pCb = p
End Property

Public Property Get roadMapItemForm() As croadmapitemform
    Set roadMapItemForm = pRoadMapItemForm
End Property

Public Property Set roadMapItemForm(p As croadmapitemform)
    Set pRoadMapItemForm = p
End Property

Private Sub pCb_Click()
    pRoadMapItemForm.closeForm cb

End Sub
Option Explicit

Option Explicit
Private WithEvents pTb As MSForms.TextBox

Private pLb As MSForms.Label
Private pJobject As cJobject
Private pRoadMapItemForm As croadmapitemform
Private pDirty As Boolean
Public Property Get roadMapItemForm() As croadmapitemform
    Set roadMapItemForm = pRoadMapItemForm
End Property
Public Property Set roadMapItemForm(p As croadmapitemform)
    Set pRoadMapItemForm = p
End Property
Public Property Get Dirty() As Boolean
    Dirty = pDirty
End Property
Public Property Let Dirty(p As Boolean)
    pDirty = p
End Property
Public Property Set tb(p As MSForms.TextBox)
    Set pTb = p
End Property
Public Property Get tb() As MSForms.TextBox
    Set tb = pTb
End Property
Public Property Set lb(p As MSForms.Label)
    Set pLb = p
End Property
Public Property Get lb() As MSForms.Label
    Set lb = pLb
End Property
Public Property Get jObject() As cJobject
    Set jObject = pJobject
End Property
Public Property Set jObject(p As cJobject)
    Set pJobject = p
End Property
Private Sub ptb_Change()
    pDirty = True
End Sub

Private Sub ptb_MouseDown(ByVal Button As Integer, ByVal Shift As Integer, ByVal x As Single, ByVal y As Single)
    pRoadMapItemForm.gotFocus Me
End Sub
Since we have a cut down set of controls, I have passed the major processing of events back to the calling procedure as follows
Public Sub gotFocus(han As cHandleItemFormEvents)
    clearFocus
    Set pSelectedHandler = han
End Sub

Private Sub clearFocus()
    ' changing text box means that we need to store any changes made
    If Not pSelectedHandler Is Nothing Then
        With pSelectedHandler
            If .Dirty Then
                pDirty = True
                ' double check we are on the right one
                Debug.Assert .jObject.Key = .lb.Caption
                .jObject.Value = .tb.Value
                .Dirty = False
            End If
        End With
    End If
End Sub

Private Sub flush()
    Dim ch As cHandleItemFormEvents, i As Long, r As Range
    clearFocus
    ' if there was a change then clear everything
    If pDirty Then
        For Each ch In ptbEvents
            With pJobject.Child("data").Child(ch.lb)
                'double check we are in the right column
                Debug.Assert .Key = castLb(ch.lb).Caption
                Set r = Range(pJobject.Child("location").Children(.ChildIndex).toString)
                r.Value = .Value
            End With
        Next ch
    End If
End Sub

Public Sub closeForm(cb As MSForms.CommandButton)
    With cb
        If .Name = "cbSubmit" Then
            flush
        Else
            Debug.Assert .Name = "cbCancel"
        End If
    End With
    Unload uForm
End Sub
Summary
You can find the full code associated with this in the downloads section – roadmapper.xlsm. There are a large number of techniques together in this example.
For help and more information join our forum, follow the blog or follow me on Twitter