Deprecated
Google has now stopped its Earth API and Maps API is a paid for API nowadays. Some capabilities have also been either removed or changed. Therefore, I had to remove all examples of VizMap applications I had created. I didn’t remove the entire topic as I thought some of the code may still be useful with some modifications.
Page Content
hide
javaScript: Flying around and asynchronicity in google Earth
This relates to Data Driven Mapping applications and the Javascript HowTo section
Google Earth Api
You will find tons of content on Google Earth , most of which is described much better than I can. In this section I will cover the small items of interest that I found to be hard to track down when I was developing this application (now deprecated)
Checking if the the Google Earth Plugin is installed
Not everyone will have the google earth plug-in. Here is how to check whether it is installed
// mcpherEarth

   if (google.earth.isInstalled()){
    return this;
   }
   else {
    alert("you need to install the google earth plug-in");
    return null;
   }
Creating an Instance
Because I am using the same code for google maps and google earth, I have some wrapper objects so I can add extra properties. In this case mcpherEarth is my wrapper object for the Earth Instance.
mcpherEarth.prototype.createInstance  = function (div) {
  var ve=this;
  var vm = this.vMap;
  ve.container = div;
  vm.statusUpdate('..creating google earth instance',true,null);
  google.earth.createInstance(ve.container,
    initCallback, failureCallback);
 };
I had originally planned for the success and failure callbacks to be methods of this wrapper object but I just could not get that to work, so i created a couple of regular functions which in turn called back the methods I had originally wanted to use.
function initCallback (instance) {
  vMap.ve.success(instance);
 }
 function failureCallback (errorCode) {
  vMap.ve.failure(errorCode);
 }
Success Callback
In the google maps version of the application, it’s okay to create a bounding box and leave it to the user to select which marker to go to. On Google Earth it’s not so practical, so I decided to zoom into the the first data spot as the initial view.
mcpherEarth.prototype.success  = function (instance) {
  var ve = this;
  var vm = ve.vMap;
  // the first spot
  var spot = vm.spots[0];
  ve.ge = ge = instance;
  ge.getWindow().setVisibility(true);
  // add some layers
  ge.getLayerRoot().enableLayerById(ge.LAYER_BORDERS, true);
  ge.getLayerRoot().enableLayerById(ge.LAYER_ROADS, true);
  ge.getLayerRoot().enableLayerById(ge.LAYER_BUILDINGS, true);
  ge.getNavigationControl().setVisibility(ge.VISIBILITY_AUTO);
  vm.statusUpdate('..google earth successfully created',false,null);
  vm.spotEverything();
  // go to the first spot
  ve.showLookAt(spot);

 };
Creating a lookAt
This is the position that we will look at, and will be associated with a placemark.
mcpherEarth.prototype.makeLookAt = function (spot) {
  var ve= this;
  var ge = ve.ge;
  var vm = this.vMap;
  // look at something
  var lookAt = ge.getView().copyAsLookAt (ge.ALTITUDE_RELATIVE_TO_GROUND);
  // Set the position values
  lookAt.setLatitude(spot.lat);
  lookAt.setLongitude(spot.lng);
  lookAt.setRange(parseFloat(vm.control.range));
  lookAt.setTilt(parseFloat(vm.control.tilt));
  return (lookAt);
 };
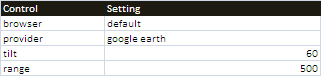
Note that the range and tilt have been supplied as part of the control framework
"control":{
         "browser":"default",
         "provider":"google maps",
         "tilt":"60",
         "range":"500"
      },
Creating a placemark and using a custom icon
Each spot in our input data will get a marker placed on google earth. Each placemark is associated with a ‘lookAt’. I also provide the capability to change the marker to a link specified in the input data.
mcpherEarth.prototype.makePlacemark = function (spot) {

  var ge= this.ge;
  var vm = this.vMap;
  var uItem = vm.items[spot.usingIndex];
  var marker = vm.spotControl['earth marker'];

  var placemark = ge.createPlacemark('');
  placemark.setName(spot.title);

  // Create style map for placemark
  if(marker){
   var image = uItem.cJobject[marker];
   if (image) {
    if (mcpherIsImage(image)){
     var icon = ge.createIcon('');
     icon.setHref(image);
     var style = ge.createStyle('');
     style.getIconStyle().setIcon(icon);
     // make marker bigger than usual
     if (vm.control.placemarkscale){
      var x;
      if(x=mcpherToNumber(vm.control.placemarkscale)){
       style.getIconStyle().setScale(x);
      }
     }
     placemark.setStyleSelector(style);
    }
    else {
     alert (image + ' is not a valid image link to use as a marker');
    }
   }
  }
The marker image is specified in the spots framework
"spots":{
         "earth marker":"Venue Photo",
         "maps marker":""
      }
Venue Photo refers to an entry in the VizMap Dictionary that will be used as the marker.
Putting all that together
Each spot in the input data needs a placemark and a lookAt
mcpherEarth.prototype.plotSpot = function (spot) {
  var ve = this;
  spot.lookAt = ve.makeLookAt(spot);
  spot.placemark = ve.makePlacemark (spot);
  return(spot);
 };
Viewing the LookAt
The final step is to view the lookAt.
mcpherEarth.prototype.showLookAt = function (spot) {
  var lookAt = spot.lookAt;
  this.ge.getView().setAbstractView(lookAt);
  return (lookAt);
 };
Marker click event
When one of my markers is clicked I bring up a tabbed infowindow. Tabbed infowindows are not supported directly by Google Maps V3. See Creating a tabbed Google Mapping InfoWindow for how to do this.
However, I also added a doubleclick event that caused me many problems. So much so I decided to create a sectino all of its own, see Click events in Google Earth
Creating a balloon
In the case of both Maps and Earth, it is possible to assign a div element to the content of a balloon or infoWindow. It is this capability that has allowed this application to embed controls, visualizations and other content in these info windows. Earth is simpler than Maps, in that we don’t need to deal with the domready event.
mcpherSpot.prototype.createInfoWindow = function (startTabIndex){
  //default is the first tab
  var vm = this.parent;
  var spot=this;
  var gMap = spot.parent.map;
  var uItem = vm.items[spot.usingIndex];
  var infoTab = uItem.infoTabs[startTabIndex];

  vm.statusUpdate('..creating info for '+spot.title,true);
  // select the appropriate tab
  uItem.fillDiv(infoTab);
  // set the content
  var iDiv = document.createElement('div');
  this.container = iDiv;
  iDiv.appendChild (uItem.container);
  iDiv.className = vm.cssShow + ' ' + vm.cssInfoWindow;

  switch (vm.provider){
  case 'maps':
   var iw = spot.infoWindow = new google.maps.InfoWindow ();
   iw.setContent (iDiv);
   iw.open(gMap,spot.marker);
   var s= '..plotted info for '+spot.title;
   google.maps.event.addListener(iw, 'domready', function() {
    vm.statusUpdate(s,false,null);
   });
   break;

  case 'earth':
   var ge = vm.vEarth.ge;
   var iw = spot.balloon = ge.createHtmlDivBalloon('');
   var s= '..plotted info for '+spot.title;
   iw.setFeature(spot.placemark);
   iw.setContentDiv(iDiv);
   ge.setBalloon(iw);
   vm.statusUpdate(s,false,null);
   break;

  default:
   alert ('createinfowindowinstanity');
   break;
  }
  return (iw);
 };
Deleting a balloon
In Maps, closing an infowindow deletes it. This is an action performed on the infoWindow. For Earth you use an instance level method – setBaloon(null)
mcpherInfoTab.prototype.gotoAnotherSpot = function (spot,newSpot) {
        var vm = spot.parent;
  if (newSpot.spotIndex != spot.spotIndex ){
    vm.statusUpdate('change spot from '+
      spot.title + ' to '+ newSpot.title,true,null);
   switch (vm.provider){
   case 'maps':
    spot.infoWindow.close();
    break;
   case 'earth':
    var ve = vm.vEarth;
    ve.ge.setBalloon(null);
    ve.showLookAt(newSpot);
    break;
   default:
    alert('dealwithinsanity');
    break;
   }
   vm.statusUpdate('changed spot from '+
     spot.title + ' to '+ newSpot.title,false,null);
  }
 };
As usual questions, feedback and comments are welcome at our forum. Now lets take a look at more javaScript snippets from this application
For help and more information join our forum, follow the blog, follow me on Twitter