Implementing an asynchronous timer for Excel Get it now
If you just want to use a ready made one, then start here.
Option Explicit


Dim shpInner As Shape
Dim shpOuter As Shape
Dim ptimer As cProgressTimer
Sub shapeCountdownExecute()
    Set ptimer = New cProgressTimer
    createShapes
    With ptimer
        .init shpInner, "shapeUpdate", "shapeCountDownOutOfTime", 15
        .Start
    End With
End Sub
Implementation basics
 |
 |
 |
Progress Bar or Countdown Timer
Testing and demonstration
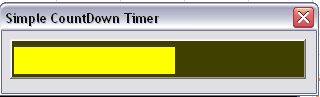
Let’s start by looking at the general structure of a simple countdown timer, implemented on a form. This example is executed by the button “Show simple countdown timer” in the downloadable workbook.
A simple countdown timer
The first step is to create an instance of a the class, initialize, then start it. Also since this example is being implemented on a userform, you will need to create a userform with a label on it that will be used as the template for the timer. The minimum arguments required are shown here – the object that will be used to display the timer, the name of the procedure to call when an update is due, and the procedure to call when time is up. All the other arguments are optional and have a sensible default. Note: It is important that you create these in a regular Module (not a sheet or form module). This is because the class uses Application.Ontime to schedule update events, and these can only be called if they are in a regular module.
dim pTimer as cProgressTimer
SubsimpleCountdownExecute()
' start the timer - called by activating the simple form
SetpTimer =NewcProgressTimer
  WithpTimer
   .init fSimpleCountdown.lbBar,"simpleUpdate","simpleCountDownOutOfTime"
   .Start
EndWith
EndSub
Next we will need the update procedure, which is called each time the timer is updated. In this case, we need do no special processing since the .Update method of the cProgressTimer class does all the necessary object updating, and also schedules the next update. You may of course do some other processing here if you wish.
PublicSubsimpleUpdate()
' this is an indirect call to a method because application.ontime cannot access within a class
IfNotpTimerIsNothingThen
  pTimer.Update
EndIf
EndSub
Finally we need to handle the case where the timer runs out of time. In this case, the example illustrates how to extend the time using the current timer with the use of the .RatioElapsed</ property. Setting this to 0.5 allows the same time again that has already passed, and .Restart</ starts the timer off again. The only mandatory process required here is to execute the .calloutExecuted method to indicate that the procedure has indeed been handled, and it should be followed by a .destroy to release up the resources if a .Restart is not required.
PublicSubsimpleCountDownOutOfTime()
' this is an indirect call for what to do when out of time
IfNotpTimerIsNothingThen
      WithpTimer
' you must include this to mark that you have been called and have executed
       .calloutExecuted
' take some action for being out of time.. give it a bit longer and restart it
       IfMsgBox("You have run out of time.. wait some more?", vbYesNo) = vbYesThen
             .ratioElapsed = 0.5
             .reStart
       Else
             pTimer.Destroy
            Set pTimer = Nothing
            Unload fSimpleCountdown
       EndIf
      EndWith
    EndIf
EndSub
Obviously in your project you will also be waiting for some event on the form to take place before the timer runs out. If it does, you will need to handle closing down the timer there. This should be done by .Destroy and setting the object to Nothing, just as in the out of time example.
A simple progress Timer
The countdown timer was used to wait for some user input in the example above. In the case of the progress timer, we want to execute some long running process and show how it is progressing. We’ll take a look at the example “Show simple progress bar” for how that is done.
As before we need to create a form with a label to be used as a template, then create, initialize and start an instance of cProgressTimer. In this case I have supplied a few extra of the optional arguments to .Init. The first True identifies that this is a progress timer rather than a countdown timer (meaning that the bar will expand rather than contract over time), and the second True indicates that I’d like to see a %age progress reported. The final given argument is an array of colors to override the defaults. The color of the bar will change as time passes according to the colors in your list. The default is array(vbGreen, vbYellow, vbRed).
Since the progress timer is to report on how far along we are, you need to adjust .ratioElapsed from time to time. In this case, using the percentage of the total number of loops that have been executed so far. Note that this does not replot the timer. It simply fine tunes the estimate of how much longer there is to go by examining how much has been done in the time passed so far. The timer is updated asynchronously according to the interval specified as one of the initialization arguments (by default every second) and is independent of this synchronous activity.
Finally when processing is completed you need to handle wrapping up. .Flush will bring the timer up to date if we are between updates (essentially bringing it to 100%) , followed by destoying the timer and unloading the form.
Sub simpleProgressBarExecute()
    Dim i AsLong
    Const nTestLoop = 5000000' start the timer - called by activating the simple form
    Set pTimer = New cProgressTimer
    With pTimer
       .init fSimple.lbBar, "simpleUpdate", "simpleProgressOutOfTime", , True, , , , , True, , _
          Array(RGB(180, 23, 90), RGB(90, 23, 180))
       .Start
EndWith' do whatever processes we are timing
    For i = 1 To nTestLoop
       doSomethingComplicated
' if this happens then the form has been closed down in the middle of processing
       If pTimer IsNothingThen Exit Sub
' update how much of the task is completed and bar will adjust itself on next update
       pTimer.ratioElapsed = CDbl(i) / nTestLoop
    Next i
' wrap up    pTimer.Flush
    MsgBox "Completed task in " & Format(pTimer.timeElapsed, ".##") & " seconds"
    simplepTimerDestroy
    Unload fSimple
End Sub
As before, we need to create procedures to handle the update and out of time events. The update is the same as for the countdown timer, and the out of time just automatically extends the time. Remember that we automatically adjust the time every loop anyway using pTimer.ratioElapsed = CDbl(i) / nTestLoop.
PublicSub simpleProgressOutOfTime()
' this is an indirect call for what to do when out of time
    IfNot pTimer IsNothingThen
      With pTimer
' you must include this to mark that you have been called and have executed
           .calloutExecuted
' take some action for being out of time.. give it a bit longer and restart it
           .ratioElapsed = 0.9
           .reStart
      EndWith
    EndIf
End Sub
Seconds remaining, Elapsed and Pausing.
There are other capabilities that were required as part of the design. which have also been implemented and can be seen through the example ‘Show complete test”. The initialization for this is as follows, and takes many of the parameters from the Test Form so you can try out various options before implementing them in your project.
With fProgressBar
    pTimer.init .lbContainer, _
    "progressUpdate", "progressOutOfTime", _
    .tbSeconds.Value, _
    .obReverseCountDown.Value, _
    .tbTimeRemaining, _
    .tbTimeElapsed, _
    .tbPause, .tbUpdateInterval.Value, _
    .obShowPercentage.Value, _
      "#", _
    Array(vbGreen, vbYellow, vbRed)    pTimer.Start
End With
Init Method
Each cProgressBar needs to be initialized and it is this initialization process that defines the type of timer and its behavior. Below is the complete list of arguments along with their default values.
PublicSub init(formBar As Object, _
    procToCall As String, _
    procOutOfTime As String, _
    Optional timeTarget As Double = 30, _
    Optional aProgressBar As Boolean = False, _
    Optional countDownText As Object = Nothing, _
    Optional elapsedText As Object = Nothing, _
    Optional pauseToggle As MSForms.ToggleButton = Nothing, _
    Optional updateInterval As Double = 1, _
    Optional showPercentage As Boolean = False, _
    Optional secondFormat As String = "#", _
    Optional barColors As Variant = Empty, _
    Optional barVertical As Boolean = False, _
    Optional barCenter As Boolean = False)' constructor for countdown - called once to set up options for progress bar
    Set pTimer = New cGeneralObject
    pTimer.init formBar, barVertical, barCenter ' the object to show progress    pTimeEstimate = timeTarget ' estimated time of task
    pSize = pTimer.Size ' remember the original length of the label    paProgressBar = aProgressBar ' whether to increase or decrease length to show progress
    pUpdateInterval = updateInterval ' how often to update
    pScheduledUpdateProcess = procToCall ' which provedure to call when time to update
    pActiveScheduled = ""' which procedure is current scheduled
    pWhenOutofTime = procOutOfTime ' procedure to call when time is up
    Set pbutPause = pauseToggle ' optional toggle button to allow pausing
    pShowPercentage = showPercentage ' whether to chow percentage on progress bar
    psecondFormat = secondFormat ' format to use when showing time in textboxes' these are the default colors for the count down bar
    If IsEmpty(barColors) Then
      pTimerColors = Array(vbGreen, vbYellow, vbRed)
    Else
      pTimerColors = barColors
    EndIf
    pOriginalFill = pTimer.Fill
' we're going to need this for task scheduling to fully qualify application.
' otherwise multiple excel instances seem to be able to screw up the application. object
    Set pxlApp = GetObject(, "Excel.Application")
    IfNot countDownText IsNothingThen
      Set pCountDown = New cGeneralObject
      pCountDown.init countDownText
      pCountDown.Value = Format(pTimeEstimate, psecondFormat) ' initialize with initial task estimate
    EndIf    IfNot elapsedText IsNothingThen
      Set pElapsed = New cGeneralObject
      pElapsed.init elapsedText
      pElapsed.Value = Format(0, psecondFormat) ' initialize with initial task estimate
    EndIfEnd Sub
Using shapes instead of forms
In the examples so far, each of the template shapes has been implemented on a Userform. One of the design requirements was to be able to use any excel shape as a template. That would mean the ability to show a timer without a userform, and would also open up the possibility of circular or other more exotic timers. One of the problems with this is that form controls have entirely different properties than Excel shapes, so to keep the timer code as clean as possible, I have introduced another class, cGeneralObject. The objects that are designated as shape templates or progress report text are are all recast as this new type in the cProgressTimerclass. This means that the vagaries of the particular object types and so can be hidden from the progress timer, and new objects can be implemented later without having to change it. The only exception is the Pause button, which if present, is expected to be a toggleButton Control.
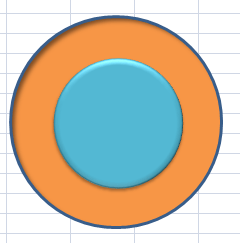
Here is an example of using an Oval shape on a worksheet as a timer template. In this case the Oval is actually a circle, and when i created it I have set its properties to “lock aspect ratio” to True, so that when it changes size it will shrink in both height and width. The “True” in the .Init method below indicates that the timer should resize around its center rather than from the top left.
Sub ovalshapeCountdownExecute()
 Set pTimer = New cProgressTimer
 With pTimer
          .init Sheets("Sheet1").Shapes("Oval 1"), "shapeUpdate", _
  "shapeCountDownOutOfTime", 20, , , , , , , , , , True
          .Start
 EndWith
End Sub
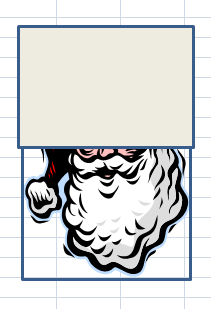
I also recommend creating a slightly larger, contrasting shape behind the timer template shape. As the timer shrinks (or expands), the background shape shows the size it is to grow to. Another interesting technique demonstrated in the example workbook is the uncovering of a picture as the timer reduces in size.
cGeneralObject class
You will find this class in the downloadable workbook. It has an .init method as follows, and takes the object to be recast as its first argument, Optionally you can specify whether it needs to be resized vertically (as opposed to the default horizontally), and whether it should be resized around its center (as opposed to being anchored with top and left properties)
PublicSub init(o As Object, Optional bVertical As Boolean = False, _
  Optional bCenter As Boolean = False)
    Set pObject = o
    pVertical = bVertical
    pCenter = bCenter
End Sub
The properties of interest are as follows, and allow the harmonization of access to properties when objects are of different types.
Public Property Get isaShape() As Boolean
Public Property Get Object() As Object
Public Property Get Size() As Double
Public Property Get Height() As Double
Public Property Get Width() As Double
Public Property Get Value() As String
Public Property Get Fill() AsLong
Public Property Get Visible() As Boolean
Public Property Get gTypeName() As String
Public Property Get toShape() As Shape
Public Property Get toControl() As Control
Public Property Get toLabel() As MSForms.Label
Public Property Get toTextBox() As MSForms.TextBox
An example of one of these properties is given below and demonstrates how the calling procedure can use .Value regardless of the underlying object property structure.
Public Property Get Value() As String
If isaShape Then
  Value = toShape.TextFrame.Characters.Text
ElseIf gTypeName = "Label"Then
  Value = toLabel.Caption
Else
  Value = pObject.Value
EndIf
End Property
The use of Application.Ontime
Since this is an approach to showing progress that relies on scheduled events rather than processing events, it makes use of Application.Ontime. This allows you to schedule the running of a procedure at some stated time in the future. Since it is an application level method, it can continue even after your form has been closed or even your sheet has been closed. Care must be taken then to ensure that all requests are cancelled when the timing activity is over. Earlier we dealt with ensuring that the outOfTime and the Update events were handled correctly. This is the code implemented in the cProgressTimerclass that schedules and cancels updates.
PrivateSub cancelScheduledUpdate()
'cancel any scheduled updates
    If pNextUpdate <> 0 Then      pxlApp.Application.OnTime pNextUpdate, pActiveScheduled, , False
      pNextUpdate = 0    EndIfEndSub
PrivateSub scheduleUpdate()

' in case there are any outstanding - we only need one
    cancelScheduledUpdate

    If isOutOfTime Then
      If pActiveScheduled = pWhenOutofTime Then
       MsgBox ("Programming Error - Out of time call to " & pActiveScheduled & " was already scheduled     but not executed")
       pActiveScheduled = ""
      Else
       pActiveScheduled = pWhenOutofTime
      EndIf
    Else
      pActiveScheduled = pScheduledUpdateProcess
    EndIf

    If pActiveScheduled <> ""Then
      pNextUpdate = Now + TimeSerial(0, 0, pUpdateInterval)
      pxlApp.Application.OnTime pNextUpdate, pActiveScheduled

    EndIf

End Sub
It is worth mentioning a couple of things about application.Ontime, which is really rather picky
- If you cancel a scheduled event you have to know the exact time it was scheduled for, as well as the name of procedure that was to run. That is why you should never use Now + timeserial(..) as an argument to application.Ontime (since Now will change when you try to call it again), but rather store the target time separately, then use the result as an argument.
- You should never use on Error Resume Next when dealing with Application.Ontime (or anywhere else for that matter), since you really need it to fall over on a problem otherwise you risk the spreadsheet just bombing out of control.
- The application object is one of those objects that does not need to be fully qualifed. Normally Application.Ontime should do just fine. However, if you have multiple instances of Excel running, it sometimes forgets what object Application is. To avoid this it is worth specifically identifying the Excel Object at initializing time , Set pxlApp = GetObject(, “Excel.Application”), and fully qualifying the application object, pxlApp.Application.OnTime pNextUpdate, pActiveScheduled
- Application.Ontime calls a procedure you name. This procedure has to be a public procedure in a regular Module. It cant’s be in a class module, a worksheet module or a form module. This means that you need to provide an update procedure that calls the class back in order to do the update work. The benefit of this is that it does allow for some additional, customized processing at update time if that is required.
DoEvents and .ratioElapsed
Doevents is something that needs to be called from time to time in order to update shapes and also to execute the application.Ontime queue. When there is a lot of processing going on as is normally the case for a progress bar, you wont see progress shown unless doEvents is executed. The problem is that you dont want to execute it a lot, since it is rather resource hungry. This is where a timer based progress bar really comes in to its own compared to one that is updated as part of a loop, but on the other hand it presents a complex problem. The only time that doEvents needs to be called really is when there is something to report. But as mentioned before, the scheduled event that you would expect to call doEvents (ie the Update process), won’t actually be called if the processor is tied up. The solution lies in the ratioElapsed property. Since .ratioElapsed is updated during a processing loop as in this example, pTimer.ratioElapsed = CDbl(i) / nTestLoop, we can check to see if any update is past due, and if so flush it out with a doEvents. This minimizes the number of times that doEvents is called, yet ensures that updates are made regularly.
Public Property Let ratioElapsed(ratioTaskComplete As Double)
' need to reset the timeallowe dmid flight
' note this actually updates the TimeEstimate property
    If ratioTaskComplete < 1 And ratioTaskComplete > 0 Then
      pTimeEstimate = timeElapsed / ratioTaskComplete
      eventsFlush
    EndIf
End Property
PublicSub eventsFlush()
' when not idle, the appilcation on time event is not serviced
' if there is an outstanding scheduled event this will generate a doevents
' using this minimizes the use of doEvents to only when they are essential
    If pNextUpdate <> 0 Then
      If pNextUpdate < Now Then
                   DoEvents
      EndIf
    EndIf
End Sub
Properties and methods of interest in cProgressTimer
PublicSub init(formBar As Object, _
procToCall As String, _
procOutOfTime As String, _
Optional timeTarget As Double = 30, _
Optional aProgressBar As Boolean = False, _
Optional countDownText As Object = Nothing, _
Optional elapsedText As Object = Nothing, _
Optional pauseToggle As MSForms.ToggleButton = Nothing, _
Optional updateInterval As Double = 1, _
Optional showPercentage As Boolean = False, _
Optional secondFormat As String = "#", _
Optional barColors As Variant = Empty, _
Optional barVertical As Boolean = False, _
Optional barCenter As Boolean = False)
PublicSub Update()
PublicSub Start()
PublicSub reStart()
PublicSub calloutExecuted()
PublicSub Pause()
PublicSub Destroy()
PublicSub Flush()
Public Sub eventsFlush()
Public Property Get isOutOfTime() As Boolean
Public Property Get ratioElapsed() As Double
Public Property Get timeElapsed() As Double
Implementing form and other events
As mentioned previously, the procedures called by application.ontime have to be in a regular module. It is better then to minimize the code in form or sheet modules that handle related events. Here is the code implemented for the events associated with the “show full test” example. You can see that they are simply stub event catchers that are implemented in the main handler module. One thing to note is that you should certainly implement a userform_terminate() handler that destroys the timer to ensure that any outstanding Application.Ontime scheduled events are cancelled.
Option Explicit
PrivateSub cbLaunch_Click()
     pTimerLaunch
EndSub

PrivateSub tbPause_Click()
     pTimerPause
EndSub

PrivateSub tbRatioComplete_Exit(ByVal Cancel As MSForms.ReturnBoolean)
     pTimerChangeRatioComplete
EndSub

PrivateSub UserForm_Activate()
     pTimerActivate
EndSub

PrivateSub UserForm_Terminate()
     pTimerDestroy
End Sub
Implementation details
| Show Progress of a task against an estimated time |
A template object size is changed as time passes |
| Modify the estimated time if necessary during the process |
The eventual estimated time can be reset at any time either directly or by resetting the %age of the task that is complete. |
| Provide asynchronous progress updates |
The bar is updated regularly according to a specified interval |
| Generate an event when a bar update is ready to occur |
The procedure specified is called every time the bar is ready to be updated |
| Generate an event when the task has exceeded the estimated time |
The procedure specified is called when time is up |
| Allow the bar to either extend (progress bar) or reduce (countdown timer) |
The resizing characteristics can be selected by a parameter |
| Optionally show percentage complete |
Whether to show percentage complete is selected by a parameter |
| Optionally show time elapsed |
If elapsed time is needed it will be shown in a template object specified as an optional parameter |
| Optionally show time remaining |
If time remaining is needed it will be shown in a template object specified as an optional parameter |
| Optionally provide a means of pausing the timer |
If this is required a toggle button will be used to start and stop the timer. When paused, any time that passes will not be counted |
| Change color of progress bar depending on how much time is left |
By default the bar will change color as there is less time left. These colors and behaviors can be modified by the use of an optional list of colors to use. |
| The class should be able to use any excel shape. | Any excel shape can be used as the basis for the timer. If a shape such as an oval is used, the shape’s lock aspect ratio should be set if it is expected to shrink (or grow) proportionally. An option is also available to keep the item centered as it changes size. |
| Vertical (thermometer style) progress is required as an option | An optional parameter specifies whether height or width is adjusted to show progress. |
Summary
Now that this we have created a framework for a countdown timer, we will go ahead and implement this in the Sudoku project. This article was previously published in Egghead Cafe. Acknowledgement for the original version of the microtimer procedure to Charles Williams, Decision Models Limited