In the various sections in Badges I showed the detail behind creating a badge environment. Now, let’s say you wanted to implement your own badge issuing environment. You can use some or all of the xLiberation environment, or host other parts of it yourself. Here are some options. I’ll order them in such a way that you can progressively apply them step by step, rather than having to do the whole lot all in one shot.
Use the xLiberation environment as is.
<iframe src="https://storage.googleapis.com/toasty/s/badgemanager.html?panelset=xliberation_panel" style="borders: none;height:300;width:300"></iframe>
Create your own scriptDB for badges
- Make your own copy of this spreadsheet, which should be private to you.
- Create your own badgeOrganizer script by copying this one and renaming it to something – this will be your google apps script badge organizer/manager. The ScriptDB associated with it will be the one in which you store your badge environment. This script should be private to you. Take a note of the project properties associated with this script as we are going to include this as a library in the spreadsheet script.
- Save a version in manage versions, and deploy your badgeOrganizer as a web app, public, even anonymous. Run testGet to authorize it. This is the badgeOrganizer web app URL and it will be needed later.
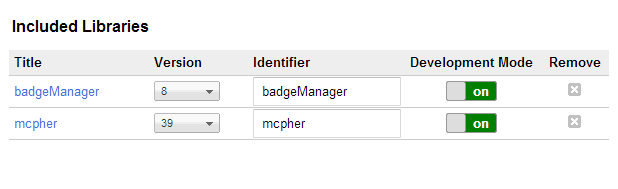
- In the copy of the spreadsheet you made. open the script editor, go to manage resources and add a reference to your badgeManager/badgeOrganizer project properties, first deleting the one that is already there. Leave the reference to mcpher library in place.
- You’ll see this function below. Change ‘badgeOrganizer’ to whatever you have called the library you added the reference to. Now go to the first sheet and hit the button to transfer all the badge data in the sheet – the message will tell you if all went well.
function makeMyBadgeData() {
 // this would be if you were populating a scriptdb in some other script
  mcpher.makeBadgesFromSheet(badgeOrganizer.publicStuffDb());
}
Use the xLiberation hosted files.
https://storage.googleapis.com/toasty/s/badgemanager.html?panelset=xliberation_panel&badgeOrganizer=your encoded uri
Creating your own badges
https://storage.googleapis.com/toasty/s/badgemanager.html?panelset=your panel set&badgeOrganizer=your encoded uri
<iframe src="https://storage.googleapis.com/toasty/s/badgemanager.html?panelset=your panel set&badgeOrganizer=your encoded uri" style="borders: none;height:300;width:300"></iframe>
Creating your own awards infrastructure
- Take a copy of the award/assertionOrganizer script, go to manage resources and include a reference to your own badgeOrganizer library, replacing the one that is there. This will allow the award organizer to access the scriptDB that is managed by your badgeOrganizer script.
- You’ll need to setup your own defaults. At the very least modifying the reference to whatever you have called your badgeOrganizer library. See the code below
- You’ll need to publish this and get the published URL
https://storage.googleapis.com/toasty/s/badgemanager.html?panelset=your panel set&badgeOrganizer=your encoded badge organizer uri&awardOrganizer=your encoded award organizer url
Hosting your own html & php.
$.extend(o, {
  panelset : "xliberation",
  badgeOrganizer:
   "https://script.google.com/macros/s/AKfycbzc0yBs8FfUZyJP1IhGpeTx-MsC288Ml6VYHjnqN9B9Kl3phHuh/exec",
  awardOrganizer :
   "https://script.google.com/macros/s/AKfycbxZYXHPZrXkxJzeTiz7PJ-5th0g0w7s0DmxXR3o1v4AVSlmwBM/exec",
  proxy :
   "http://xliberation.com/s/proxyphp.php",
  signin :
   "http://xliberation.com/persona/signin.php",
  signout :
   "http://xliberation.com/persona/signout.php"
}, p);
- badgeOrganizer : this is the URL of your published GAS badge organizer webapp.
- awardOrganizer: the URL of your published GAS award organizer webapp.
- proxyphp: this is a proxy to deal with cross domain cross requests.
- signin: manages signin to persona
- signout: manages signout from persona
Directory structure
s/badgemanager.html
s/proxyphp.html
s/img/ all badge .png
s/css/badge.css
persona/signin.php
persona/signout.php
persona/css/persona-buttons.css
These are open source libraries I am hosting. You can find them on some other public cdn, or copy them over and host them yourself.
cdn/js/CryptoJS.js
cdn/js/purl.js
This is a google analytics link. You can leave it, delete it, or substitute your own tracking code.
ga.gs
For help and more information join our forum, follow the blog or follow me on Twitter .