javaScript: creating tabbed content
This relates to Data Driven Mapping applications and the javaScript ‘howTo’
section.
For this example I had created a Concerts/Venues example that is now deprecated. The complete workbook (googlemapping.xlsm) can be downloaded (above) and the example Parameter WorkSheet is called VenuesParameters.
How to create a tabbed InfoWindow
Prior to Google Mapping V3, there was a built in way to do this that seems to have now disappeared. Here is how to use javaScript and CSS to created a tabbed infoWindow (or any other tabbed web element for that matter.
Here’s an example screenshot from this example application.
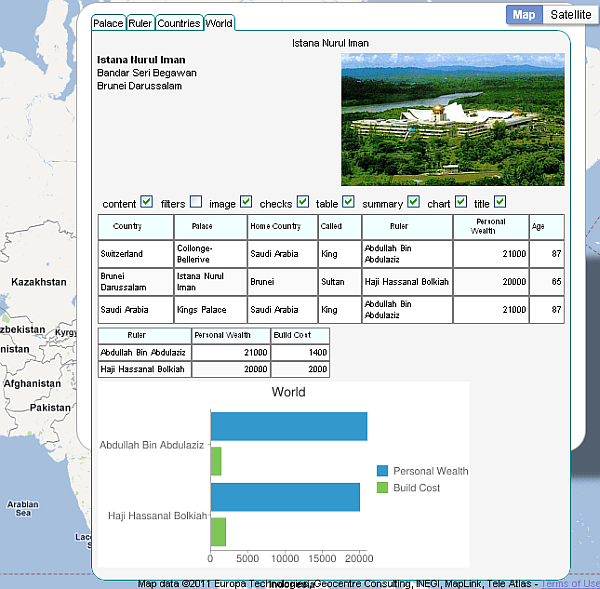
The CSS
The use of css styles makes this whole process quite straightforward. The 2 key attributes are
- Borders. Changing the borders gives the impression that a particular tab has been ‘selected’
- Hiding elements. Changing the visibility of each tab blocks allows you to show the selected content.
- mcli. This class is applied to each element that makes up the list of tab names, for example <li class=’mcli’>World</li>. They key items here are ‘inline’ to keep it all on the same line, and the rounded top right and top left corners (browser permitting). This gives us this effect
- mctabselected. When one of the tabs is selected we show that by removing the border from the tab and making it appear to merge into the tab content. You can do this by simply changing the background color and the bottom border color to the same as the background color of the tab content.
- mchover. This class is applied to the hover state of each of the tab elements to give this effect as the mouse passes over

- mcselected. This class is applied to a selected tab content element. each of the corners apart from the top left are given a rounded corner (browser permitting). This allows the tab border and the top left corner to merge.
- mchide and mcshow. These are applied to the tab content elements when they are selected.
.mcli {
 display: inline;
 border: 1px solid Teal;
 padding: .2em;
 padding-bottom: 0px;
 background-color: Azure;
 border-top-left-radius: 5px;
 -moz-border-radius-topleft: 5px;
 border-top-right-radius: 5px;
 -moz-border-radius-topright: 5px;
}
.mctabselected {
 background-color: WhiteSmoke;
 border-bottom: 1px solid WhiteSmoke;
}
.mchover:hover {
 background-color: LightSeaGreen;
}
.mcselected {
 background-color: WhiteSmoke;
 margin: 0px;
 padding: .3em;
 border: 1px solid Teal;
 border-bottom-left-radius: 15px;
 -moz-border-radius-bottomleft: 15px;
 border-bottom-right-radius: 15px;
 -moz-border-radius-bottomright: 15px;
 border-top-right-radius: 15px;
 -moz-border-radius-topright: 15px;
}
.mchide {
 display: none;
}
.mcshow {
 display: block;
}
The javaScript
The javascript to make this happen are part of a larger application, but you can extract the intent from the snippets below
set up the class names for later use
this.cssLi = 'mcli';
     this.cssTab = this.cssLi + ' mchover';
     this.cssTabSelected = this.cssTab + ' mctabselected';
     this.cssSelected = 'mcselected';
     this.cssHide = 'mchide';
     this.cssShow = 'mcshow';
     this.cssChart = 'mchart';
when you create a tab, add a click event to call a function that changes content and class
mcpherAddEvent (this.tab,"click",function(){ mm.fillDiv(conTab);},false ,true) ;
when a tab is selected – change its tab and content class
mm.infoTabs[i].tab.className = mm.parent.cssTabSelected;
    mm.infoTabs[i].divContainer.className = mm.parent.cssShow + ' ' +
           mm.parent.cssSelected;
when a tab is not selected – change its tab and content class
mm.infoTabs[i].tab.className = mm.parent.cssTab;
    mm.infoTabs[i].divContainer.className = mm.parent.cssHide;
browser independent add event function you’ll need
function mcpherAddEvent (o,e,f,b,complain){
 // because IE is different
 if(o.addEventListener)
  return(o.addEventListener(e, f, b));

 else
  if (o.attachEvent)
   return(o.attachEvent('on' + e, f));

  else
     if (complain)
            alert ('browser doesnt support events');

     return(null);

}
add to infoWindow .. Maps and Earth Version are not too different, except we need to be concerned with asynchronicity with Earth.
switch (vm.provider){
  case 'maps':
   var iw = spot.infoWindow = new google.maps.InfoWindow ();
   iw.setContent (iDiv);
   iw.open(gMap,spot.marker);
   google.maps.event.addListener(iw, 'domready', function() {
    vm.statusUpdate(s,false,null);
   });
   break;

  case 'earth':
   var ge = vm.vEarth.ge;
   var iw = spot.balloon = ge.createHtmlDivBalloon('');
   iw.setFeature(spot.placemark);
   iw.setContentDiv(iDiv);
   mcpherPlotBalloon(spot, iw );

   break;

  default:
   alert ('createinfowindowinstanity');
  break;
  }
  return (iw);
 };
As with Flying around with Google Earth things going on in the Google Earth viewport, such as building layers in progress, can destablize the plotting of a balloon. Although IE and Chrome seemed to be able to handle this ok, Firefox would always hang. To get round this, we are going to handle the viewchangeend event to minimize this happening.
function mcpherPlotBalloon(spot, iw ){
  var vm = spot.parent;
  var ge = vm.ve.ge;
  vm.statusUpdate ('..waiting for view to settle down',true);
  google.earth.addEventListener(ge.getView(),
    'viewchangeend', mcpherBalloon(spot,iw));
 }
 function mcpherBalloon(spot, iw ){
  var vm = spot.parent;
  var ge = vm.ve.ge;
  if(spot.timer) clearTimeout(spot.timer);
     spot.timer = setTimeout( function(){
         ge.setBalloon(iw);
         vm.statusUpdate ('..information balloon set for ' + spot.title,false);
         }, 100);
 }
As usual questions, feedback and comments are welcome at our forum. Now lets take a look at more javaScript snippets from this application