Import, export and mix container bound and standalone Apps Script projects
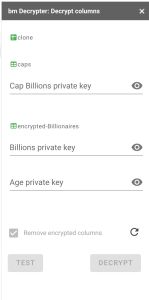
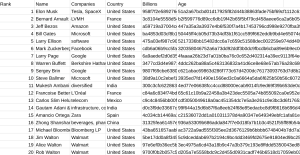
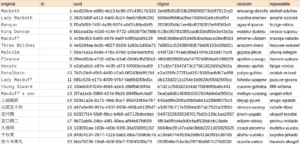
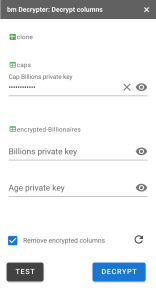
This article covers how to pull scripts from multiple projects and import them into another project. You can even use this to make container bound script standalone, or visa versa. My initial motivation for this was connected to another set up posts related to Merging sheets from multiple sources and encrypting selected columns and Add-on for decrypting columns in Google Sheets. This creates a spreadsheet with encrypted columns, and the add-on decrypts them.
I didn’t want to go to the bother of publishing add-ons, but I did want be able to create a spreadsheet and push the add-on to it as a container bound script instead. Of course there are plenty of other uses, but distributing new spreadsheets with container bound apps already embedded was my initial objective. This article will cover the library that does all that, along with various other usage examples – for example, pulling in code snippets from or libraries, merging manifests, or testing add-ons.
This version of the library uses the Apps Script API to pull code from Scripts to which you have access. I’ll add other script sources if there’s a demand, for example, GitHub.
You can read about the underlying Apps Script API here. The library uses the the project section to manipulate project content. The Apps Script API needs to be enabled in the cloud project associated with the Apps Script project it is running under – but more of that later. You’ll find the id for the bmImportScript library in the links section at the end of this article.
Initializing an instance
The library will need you to enable these oauth scopes
And because it is dependency free from Apps Script services you’ll need to pass it the token service, the UrlFetch service, and optionally, a cache Service. Here’s the simplest instantiation.
 // get a sapi instance
  const sapi = bmImportScript.newScriptApi({
    tokenService: ScriptApp.getOAuthToken,
    fetcher: UrlFetchApp.fetch,
  })
simple instantiation
Getting a project
You can collect metadata about a project
  // get the project we'll clone
  const sourceProject = sapi.getProject({scriptId:'1Byrtnr_uuAt3BiZ6_qh6T8vBZq-YdgnDaqoJ64Ss7kM4q2XE-XGPcmCi' })
  console.log(sourceProject)
  if (!sourceProject.success) {
    throw sourceProject.extended
  }
get project metadata
GotResponse
All api calls return the same format. The simplest way to describe it is using its jsdoc typedef
/**
 * @typdef {GotReponse}
 * @property {boolean} success whether it worked
 * @property {object|string} data the parsed data if it was an object or bare data if not
 * @property {number} code the http status code
 * @property {Error} extended error info
 * @property {boolean} parsed whether it was parsed successfilly
 * @property {object} headers the http headers
 * @property {string} content the unparsed content
 * @property {boolean} cached whether it came from cache
 */
gotresponse
Typically you’ll be access response.success (to see if it worked) and response.data (to get the data returned from the API)
Getting a project’s content
The content is the source files in the project
  // and its source - including its manifest
  const source = sapi.getProjectContent({
    scriptId: sourceProject.data.scriptId
  })
  if (!source.success) throw source.extended
getting content
Creating a project
To create a project, you need to supply a title, and if its a container bound project the parentId – the Drive id of the document to which it should be bound
  // create a new project/ using the title of the source project
  const project = sapi.createProject({ title: `clone of ${sourceProject.data.title}`})
  if (!project.success) throw project.extended
  console.log(`Created ${project.data.scriptId} (${project.data.title})`)
creating a project
Adding files to a project
Adding files to a project combines the new list of files to those that are already there. However it’s likely that you’ll want to modify the default behavior. The ‘collision property describes how to react when there are 2 files of the same name and type.
  // add content from the source project, including its manifest - so we'll use replace for collisions
  const content = sapi.addFiles({
    scriptId: project.data.scriptId,
    files: source.data.files,
    collision: 'replace'
  })
  if (!content.success) throw content.extended
adding files
Collision values and behavior
If a collision occurs and the content of the ambigous files is exactly the same, the new file causing the collision is just ignored – so this behavior occurs only when there is a change to the content of files with the same name and type
abort: throw an error
replace: replace the existing file content with the new content
skip: leave the existing file intact and skip the new file
rename: rename the new file by adding a suffix to the name (eg Code becomes Code_0, Code_1, …etc)
Clearing all existing files
You can completely clear out any existing files and replace them with the new ones using clear: true as an argument to addFiles
Putting that together
We can combine all that and clone a project like this
const cloneProject = () => {
  // get a sapi instance
  const sapi = bmImportScript.newScriptApi({
    tokenService: ScriptApp.getOAuthToken,
    fetcher: UrlFetchApp.fetch,
  })

  // get the project we'll clone
  const sourceProject = sapi.getProject({scriptId:'1Byrtnr_uuAt3BiZ6_qh6T8vBZq-YdgnDaqoJ64Ss7kM4q2XE-XGPcmCi' })
  console.log(sourceProject)
  if (!sourceProject.success) {
    throw sourceProject.extended
  }

  // and its source - including its manifest
  const source = sapi.getProjectContent({
    scriptId: sourceProject.data.scriptId
  })
  if (!source.success) throw source.extended

  // create a new project/ using the title of the source project
  const project = sapi.createProject({ title: `clone of ${sourceProject.data.title}`})
  if (!project.success) throw project.extended
  console.log(`Created ${project.data.scriptId} (${project.data.title})`)

  // add content from the source project, including its manifest - so we'll use replace for collisions
  const content = sapi.addFiles({
    scriptId: project.data.scriptId,
    files: source.data.files,
    collision: 'replace'
  })
  if (!content.success) throw content.extended

  console.log(`cloned ${source.data.files.length} files from ${sourceProject.data.title} to ${project.data.title}`)

}
a simple clone
Creating a container bound script from another project
Here’s how you waould take a template script and turn it into a container bound project. It’s exactly the same process, except this time you provide the id of the drive file (spreadsheet, doc etc..) to receive the script
const cloneContainerProject = () => {

  // get a sapi instance
  const sapi = bmImportScript.newScriptApi({
    tokenService: ScriptApp.getOAuthToken,
    fetcher: UrlFetchApp.fetch
  })

  // get the project we'll clone
  const sourceProject = sapi.getProject({scriptId:'1Byrtnr_uuAt3BiZ6_qh6T8vBZq-YdgnDaqoJ64Ss7kM4q2XE-XGPcmCi' })
  if (!sourceProject.success) throw sourceProject.extended

  // and its source - including its manifest
  const source = sapi.getProjectContent({
    scriptId: sourceProject.data.scriptId
  })
  if (!source.success) throw source.extended

  // create a new project/ using the title of the source project
  const project = sapi.createProject({
    title: `container clone of ${sourceProject.data.title}`,
    parentId: '1lNLIpJwvz_GllYnloVBX02vOomZ68cP4Y2KZoPyi7Gg'
  })
  if (!project.success) throw project.extended
  console.log(`Created ${project.data.scriptId} (${project.data.title})`)

  // add content from the source project, including its manifest - so we'll use replace for collisions
  const content = sapi.addFiles({
    scriptId: project.data.scriptId,
    files: source.data.files,
    collision: 'replace'
  })
  if (!content.success) throw content.extended

  console.log(`cloned ${source.data.files.length} files from ${sourceProject.data.title} to ${project.data.title}`)

}
creating a container bound script
When an Add-on isn’t an Add-on
Cloning as a container bound script is hassle free way to distribute Add-ons specific to a particular document when you can’t be bother actually publishing the Add-on as an Add-on, or when you don’t want the recipient of the document to bother installing one. Editor Add-on code can be inserted into a container with absolutely zero changes and they still show up in the Add-on menu. This is also a simple way to have collaborators test Add-ons as an alternative to the test option from the deployment menu.
Here’s a repeat of cloning and encrypying the input sheets, with the addition of a section to clone an Add-on as a container bound script.
const runnerEncrypt = () => {
// create a new spreadsheet, cloning each of the masters, and encrypting the given columns const spreadsheet = SpreadsheetApp.create('clone') console.log('created new spreadsheet ', spreadsheet.getId()) const clone = { id: spreadsheet.getId(), // will create any missing sheets (but the spreadsheet must exist) createIfMissing: true, // this method generates a new public key for the spreadsheet // this example will make a random one, but yu can make anything you want here generatePublicKey() { return bmCrypter.randomString() } }
// collect all these sheets, andencrypt the given columns const masters = [{ id: '1cTRN6mGvH_vnWO2ehEFJkWi7Dpw9HcPNvg8zjrWKh4g', sheets: [{ name: 'Billionaires', // wildcards are accepted so this just copies all columns copy: ['*'], // and encrypts these encrypt: ['Age', 'Billions'], // this generates a private key for each column - this generates a random one, but you can do what you like // for example use the same key for all columns // the params are for convenience in case you want some logic for key generation generatePrivateKey(masterId, sheetName, columnName) { return bmCrypter.randomString() }, // if null rename the same as source get renameAs() { return 'encrypted-' this.name } }, { name: 'caps', copy: ['*'], encrypt: ['Cap Billions'], generatePrivateKey(masterId, sheetName, columnName) { // in this case we'll just have a fixed password return 'cap password' } }] }] // if this is specified it'll also add a container bound project const containerProject = { // this is the bmCrypter Addon key scriptId: '1Byrtnr_uuAt3BiZ6_qh6T8vBZq-YdgnDaqoJ64Ss7kM4q2XE-XGPcmCi', title: 'bmCrypterAddon: cloned by bmImportScript' }
// these can be distributed to those with accesss console.log(JSON.stringify(privateKeys, null, '\t'))
// now add some code to the sheet! if (containerProject) { const container = cloneSheetProject({ scriptId: containerProject.scriptId, parentId: clone.id, title: containerProject.title }) console.log(`created container project ${container.data.scriptId} (${container.data.title})`) } }
cloning a sheet and inserting an add-on
and here’s the code to clone the Add-on
const cloneSheetProject = ({ scriptId, parentId, title }) => {

  // get a sapi instance
  const sapi = bmImportScript.newScriptApi({
    tokenService: ScriptApp.getOAuthToken,
    fetcher: UrlFetchApp.fetch
  })

  // get the files from the source project
  // and its source - including its manifest
  const project = sapi.getProjectContent({
    scriptId
  })

  if (!project.success) {
    console.log(project)
    throw project.extended
  }

  // create a new container bound project
  const source = sapi.createProject({
    title,
    parentId
  })

  // add the files to the newly created project, overwriting the default manifest
  sapi.addFiles({
    scriptId: source.data.scriptId,
    files: project.data.files,
    collision: 'replace'
  })

  if (!source.success) {
    console.log(source)
    throw source.extended
  }

  return source
}
clone the Add-on
The above example inserted my Add-on for decrypting columns in Google Sheets into a spreadsheet and it showed up in the spreadsheet’s Extensions menu like this, just like an installed Add-on, with no modification or installation required.
Fiddling with the manifest
If you are merging multiple projects, you may need to fiddle with the final manifest. This example takes the manifest from the template project, but adds a couple of required oauthscopes so it can be authorized as a spreadsheet Add-on
const cloneContainerProjectFiddle = () => {

  // this example takes the code of an addon/converts it to a menu item in a container bound file
  // and adds a couple oauth scopes to the manifest

  // get a sapi instance
  const sapi = bmImportScript.newScriptApi({
    tokenService: ScriptApp.getOAuthToken,
    fetcher: UrlFetchApp.fetch,
    // we don't really need cache here so i won't bother
    cacheStore: null
  })

  // get the project we'll clone
  const sourceProject = sapi.getProject({scriptId:'1Byrtnr_uuAt3BiZ6_qh6T8vBZq-YdgnDaqoJ64Ss7kM4q2XE-XGPcmCi' })
  if (!sourceProject.success) throw sourceProject.extended

  // and its source - including its manifest
  const source = sapi.getProjectContent({
    scriptId: sourceProject.data.scriptId
  })
  if (!source.success) throw source.extended

  // create a new project/ using the title of the source project
  const project = sapi.createProject({
    title: `container clone of ${sourceProject.data.title}`,
    parentId: '1lNLIpJwvz_GllYnloVBX02vOomZ68cP4Y2KZoPyi7Gg'
  })
  if (!project.success) throw project.extended
  console.log(`Created ${project.data.scriptId} (${project.data.title})`)

  // now we need to play with the manifest file to add a couple of scopes and dedup incase they are there already
  const manifest = source.data.files.find(f=>sapi.isManifest(f))
  if (!manifest) throw new Error('Couldnt find manifest file')
  const parsedManifest = JSON.parse(manifest.source)
  parsedManifest.oauthScopes = (parsedManifest.oauthScopes || [])
    .concat([
      "https://www.googleapis.com/auth/spreadsheets",
      "https://www.googleapis.com/auth/script.container.ui"
    ])
    .filter((f,i,a)=>a.indexOf(f)===i)
  // push that back
  manifest.source = JSON.stringify(parsedManifest)


  // add content from the source project, including its manifest - so we'll use replace for collisions
  const content = sapi.addFiles({
    scriptId: project.data.scriptId,
    files: source.data.files,
    collision: 'replace'
  })
  if (!content.success) throw content.extended

  console.log(`cloned ${source.data.files.length} files from ${sourceProject.data.title} to ${project.data.title}`)

}
fiddling with the manifest
Merging manifests
Another case could be where you need to merge manifests from multiple projects. This example merges the library requirements from an existing project with those from another and also selects one file (Examples) to insert back into the project.
// get the files from the source project // and its source - including its manifest const source = sapi.getProjectContent({ scriptId: SOURCE_ID, noCache: true }) if (!source.success) throw source.extended
// we're going to merge the manifests here so that they get any dependencies and oauths requried const target = sapi.getProjectContent({ scriptId: TARGET_ID, noCache: true }) if (!target.success) throw source.extended
// get the manifs const sourceManifest = source.data.files.find(f=>sapi.isManifest(f)) const targetManifest = target.data.files.find(f=>sapi.isManifest(f)) const ps = JSON.parse(sourceManifest.source) const pt = JSON.parse(targetManifest.source)
// add the oauth scopes from the source pt.oauthScopes = (pt.oauthScopes || []) .concat(ps.oauthScopes || []) .filter((f,i,a)=>a.indexOf(f)===i)
// just put that all back targetManifest.source = JSON.stringify(pt)
// we only want one of the source files const sourceFiles = source.data.files.filter(f=>f.name === "Examples" && f.type === "SERVER_JS")
console.log(sourceFiles, targetManifest)
// we can now write all that back - important that we replace so the updated manifest gets popped in sapi.addFiles({ scriptId: TARGET_ID, files:sourceFiles.concat([targetManifest]), collision: 'replace' })
}
merging files and manifests
Useful utilities and options
The library takes a couple of handy options to minimize messing about with manifests and files which you may use to save a bit of work
keepManifest
If you use .addFiles({collision:’replace’,…}) you’ll end up replacing the target project’s existing manifest from the source project. You could fiddle with the files to remove it so it doesn’t get replaced, but if you use .addFiles({collision: ‘replace’, keepManifest: true,…}) the script files will be replaced as normal, but the original manifest will be retained.
skipManifest
Another way to fine tune control over which manifest to use is to skip importing the manifest in the first place from one or more of the projects being merged using .getProjectContent({skipManifest: true,…}).
isManifest
The library provides isManifest(file) to test if a file is actually a manifest. The argument is a member of getProjectContent().data.files[]
  isManifest ({name, type}) {
    return name === 'appsscript' && type === "JSON"
  }
isManifest
sameFile
This checks if two files are the same type and name.
It’s possible if you’re doing lots of this in a bulk way, you might hit the API rate limit. The library has caching and exponential backoff built in as a couple of strategies to mitigate this. The caching methodology requires you to pass over a cache service to use (most likely this will be your user cache service), and you can also mess with the cache lifetime and selectively turn off and on caching.
Similarily you may want to change the lifetime of a single item. All get* methods take noCache and cacheSeconds arguments to be applied to that single get
This library uses the Apps Script API to pull code from Scripts to which you have access. This API is neither an Advanced Service nor a built in service of Apps Script so we first have to enable it in the cloud project associated with the Apps Script project you’re running this from. Officially, you’d create (or reuse) a cloud project you’ve created in the cloud console, turn on the Apps Script API, and then change the GCP project in your Apps Script project settings to the project number of the GCP project. You may also have to enable billing when you do that (although the use of the API is currently free)
Unofficially though, I’ve found you can just let it fail and you’ll get a link that’ll take you to your Apps Script managed project and use that to get the secret cloud project, then turn on the API in that one. You should also remember the project ID somewhere as it’s always hidden in the Apps Script settings. It also means you don’t have to enable billing which is nice.
Once you’ve enabled the API, you’ll need these scopes in your appsscript.json
You’ll be messing about with actual script projects so I can’t emphasize enough – TAKE A COPY OF YOUR SCRIPTS – if you will be updating projects in place.
What’s next
When I get round to it, I’ll add some more script sources such as Github, implement a project list method (which is strangely missing from the Script API). This is a particular problem in dealing with documents that contain multiple container bound projects. Anything else – ping me.
bruce mcpherson is licensed under a Creative Commons Attribution-ShareAlike 4.0 International License. Based on a work at http://www.mcpher.com. Permissions beyond the scope of this license may be available at code use guidelines