In Merging sheets from multiple sources and encrypting selected columns I published some code for selectively copying columns from multiple input spreadsheets/sheets to create summary sheets, and optionally encrypting columns. The idea was to distribute the same sheet to multiple people, along with private key(s) to decrypt columns to which they should have access. This seems a pretty handy thing to make into an Editor Add-on. I’m too impatient and life’s too short to bother getting into the Add-on publishing process, so I haven’t offcially released this one personally, but here is a fully functional decryption Add-on that any of you are welcome to fiddle with and publish yourself.
Background
Although the Add-on UI is fairly trivial, I have used Vue and Vuex as its basis, so it’s in good shape for fancying up if you feel like it. To use this Add-on, you’ll need to have encrypted particular columns and distributed private column keys as described in Merging sheets from multiple sources and encrypting selected columns. The technique I’ve used for integrating Vue and Vuex into Apps Script is taken from How to use Vue.js, Vuex and Vuetify to create Google Apps Script Add-ons and Improve Vue.js Apps Script add-ons with a Vuex store
Behind the scenes, I’m also using a few of libraries such as those described in Super simple cipher library for Apps Script encryption and decryption, Handly helper for fiddler, Fiddler: A functional approach to fiddling with sheet data and Merging sheets from multiple sources and encrypting selected columns.
Creating practise sheets
For the purposes of this article I’m using a couple of input spreadsheets to create a summary sheet with some encrypted columns. I’ve made the input sheets public so you can just run your own script on them to create a summary sheet for testing, or of course you can use your own.
The Add-on references the bmCrypter and bmPreFiddler libraries. Their details in the Links section towards the end of this article.
You’ll also need to provide the id of one of your own spreadsheet (it can be empty, but it must exist) into which the input spreadsheets will be summarized and encrypted.
And here’s the code – if you’re using your own sheets then modify the settings as required. These point to my input testing spreadsheets.
When that’s done, you should have a log of private keys to distribute along with the encrypted summary sheet.
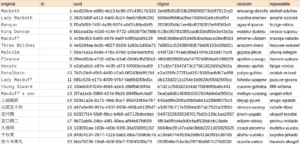
The private keys
Here’s an example of private keys you can distribute. The encryption code shown previously will display these on the console. By design, they are not stored anywhere, so if you’ve asked the crypter to generate random keys for you, you’ll need to capture them at time of encryption. Alternatively, you can use static pass phrases if you like. In the settings above, you should notice that one of the columns has a static pass phrase.
The receiver of the key will need to enter the private key into the UX of the Add-on for each column he has access to.
The Add-on
I won’t go through all the code in this article as it’s available in the IDE and on github via the links at the end of this article. Let’s start by looking at the UI and discuss how it works.
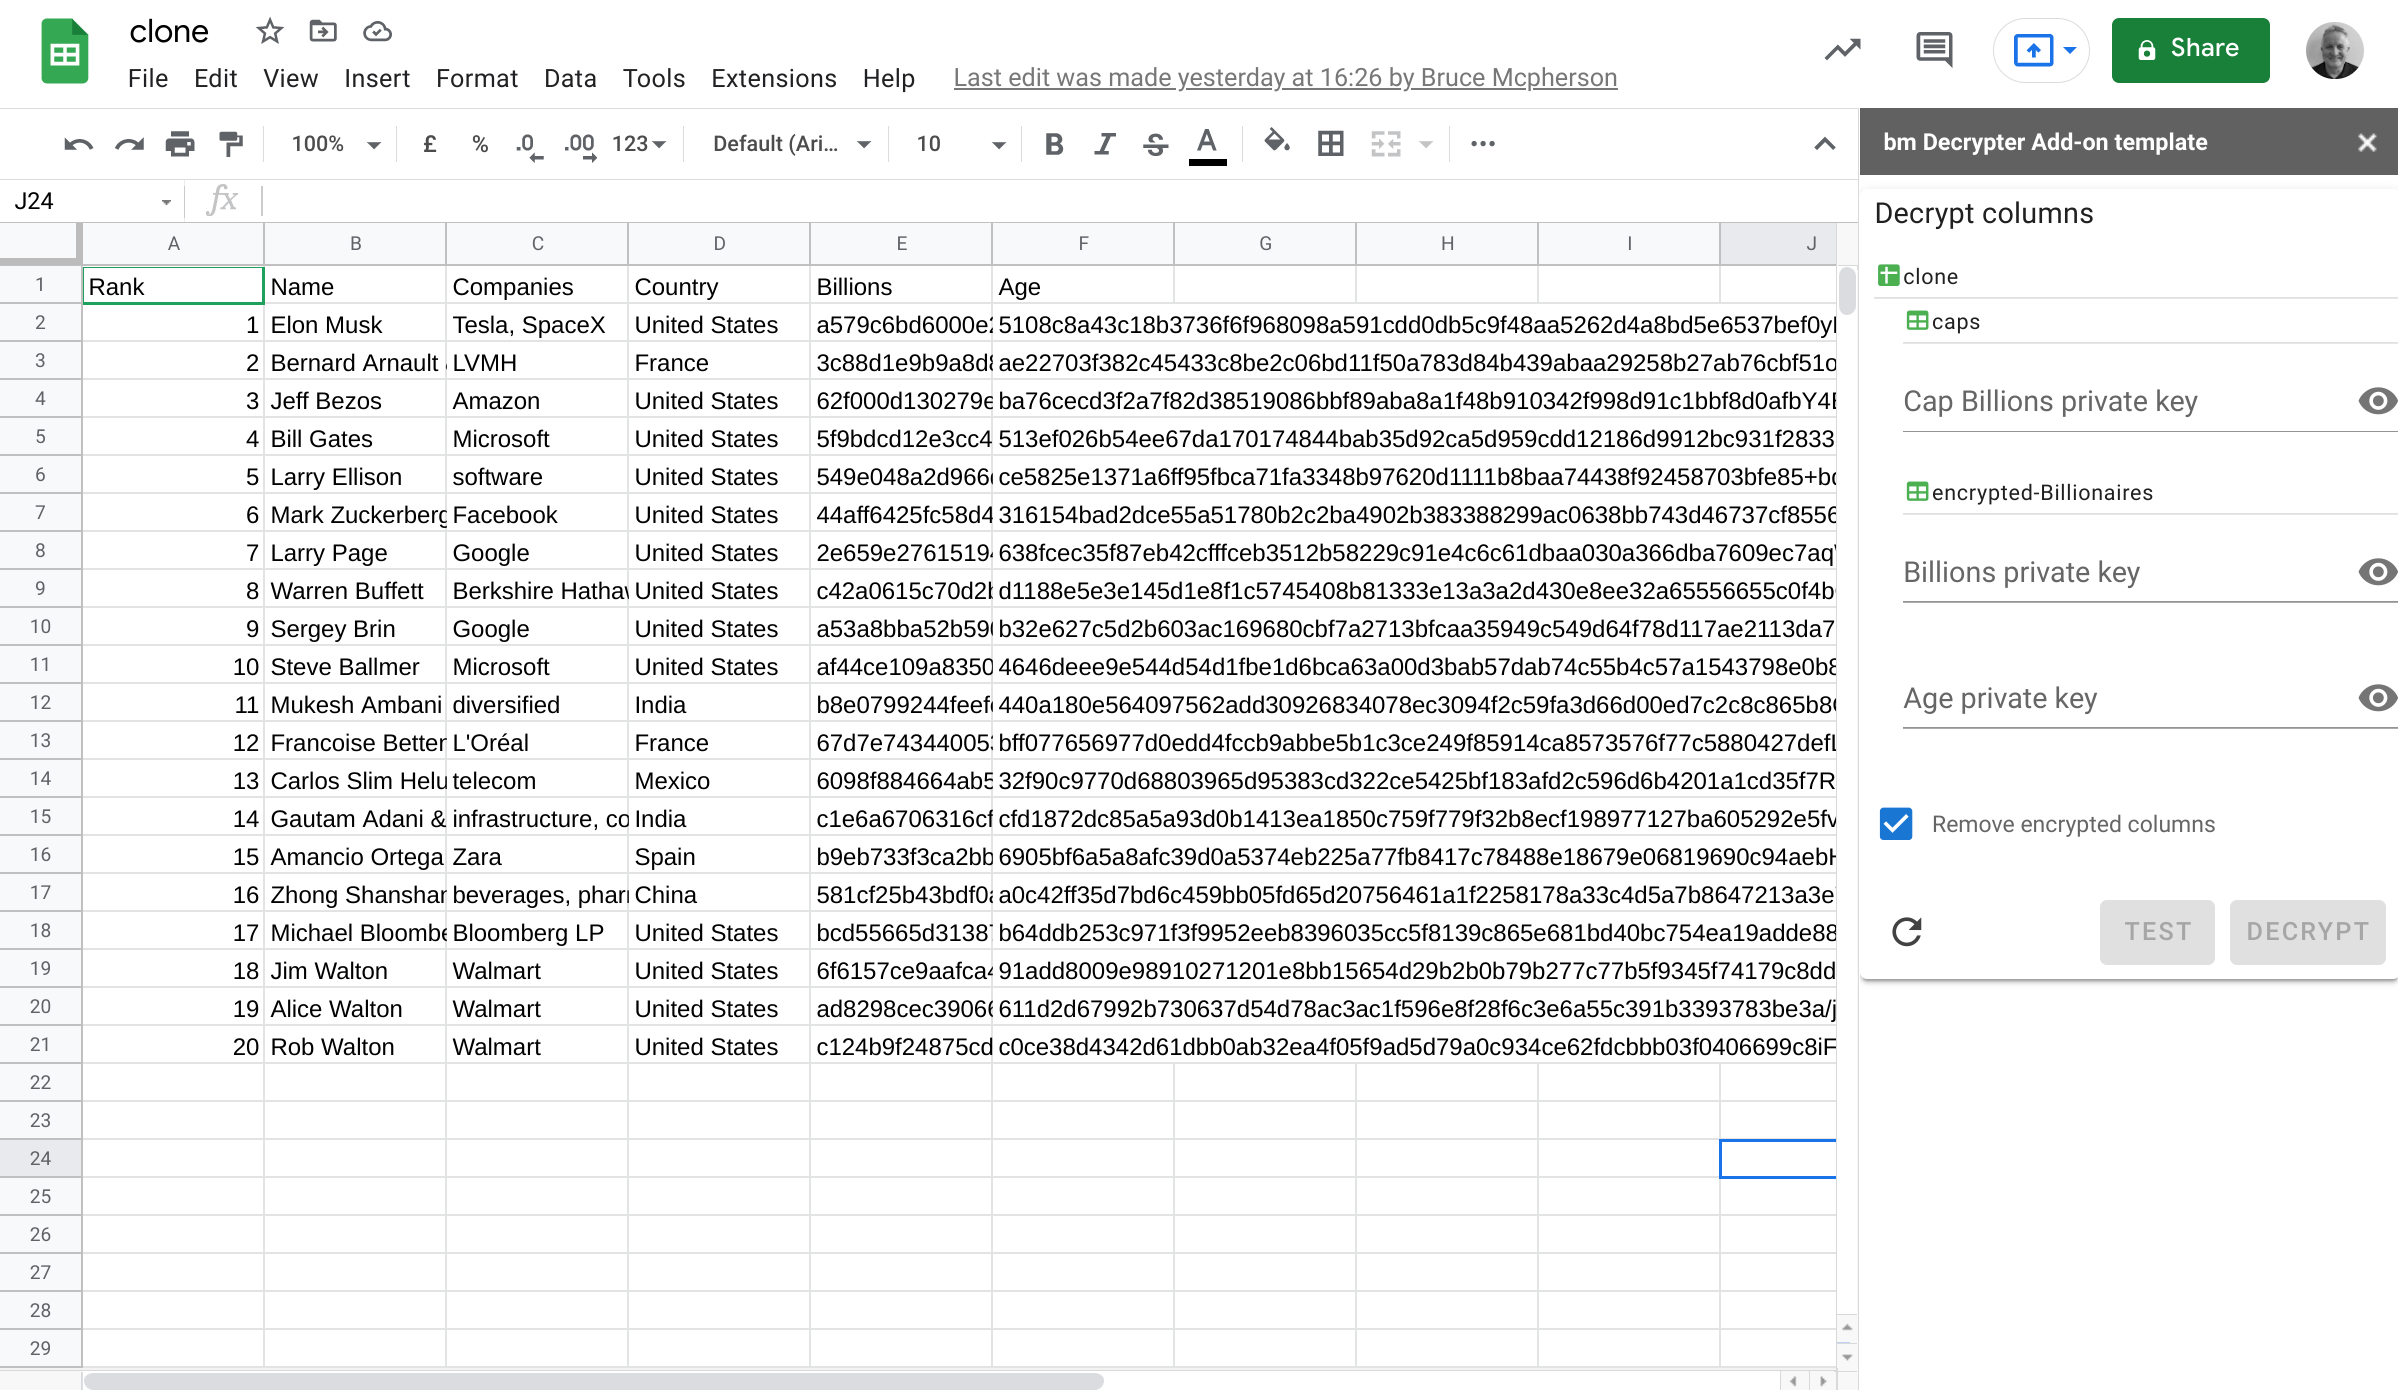
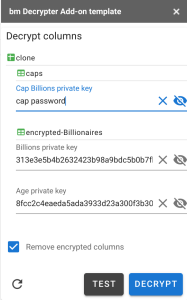
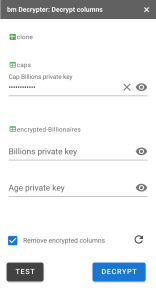
The clone spreadsheet has 2 tabs in it created by the encryption process. There are 3 encrypted columns in total. When the Add-on kicks off it detects which columns are encrypted, lists them in the UI and allows the user to enter any private keys he has for those columns.
Decryption
In normal operation, you’ll probably remove the original encrypted columns once decrypted. The Add-on will do this by default, but first we’ll untick that option.

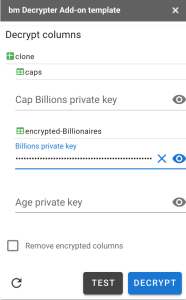
Only the columns for which you’ve entered a private key will be decrypted. Lets’ do just the Billions column for now by inputing it’s private key. Entering any key enables the Test and Decrypt buttons. Test will just check the validity of the key(s), whereas Decrypt will go ahead and process the columns.
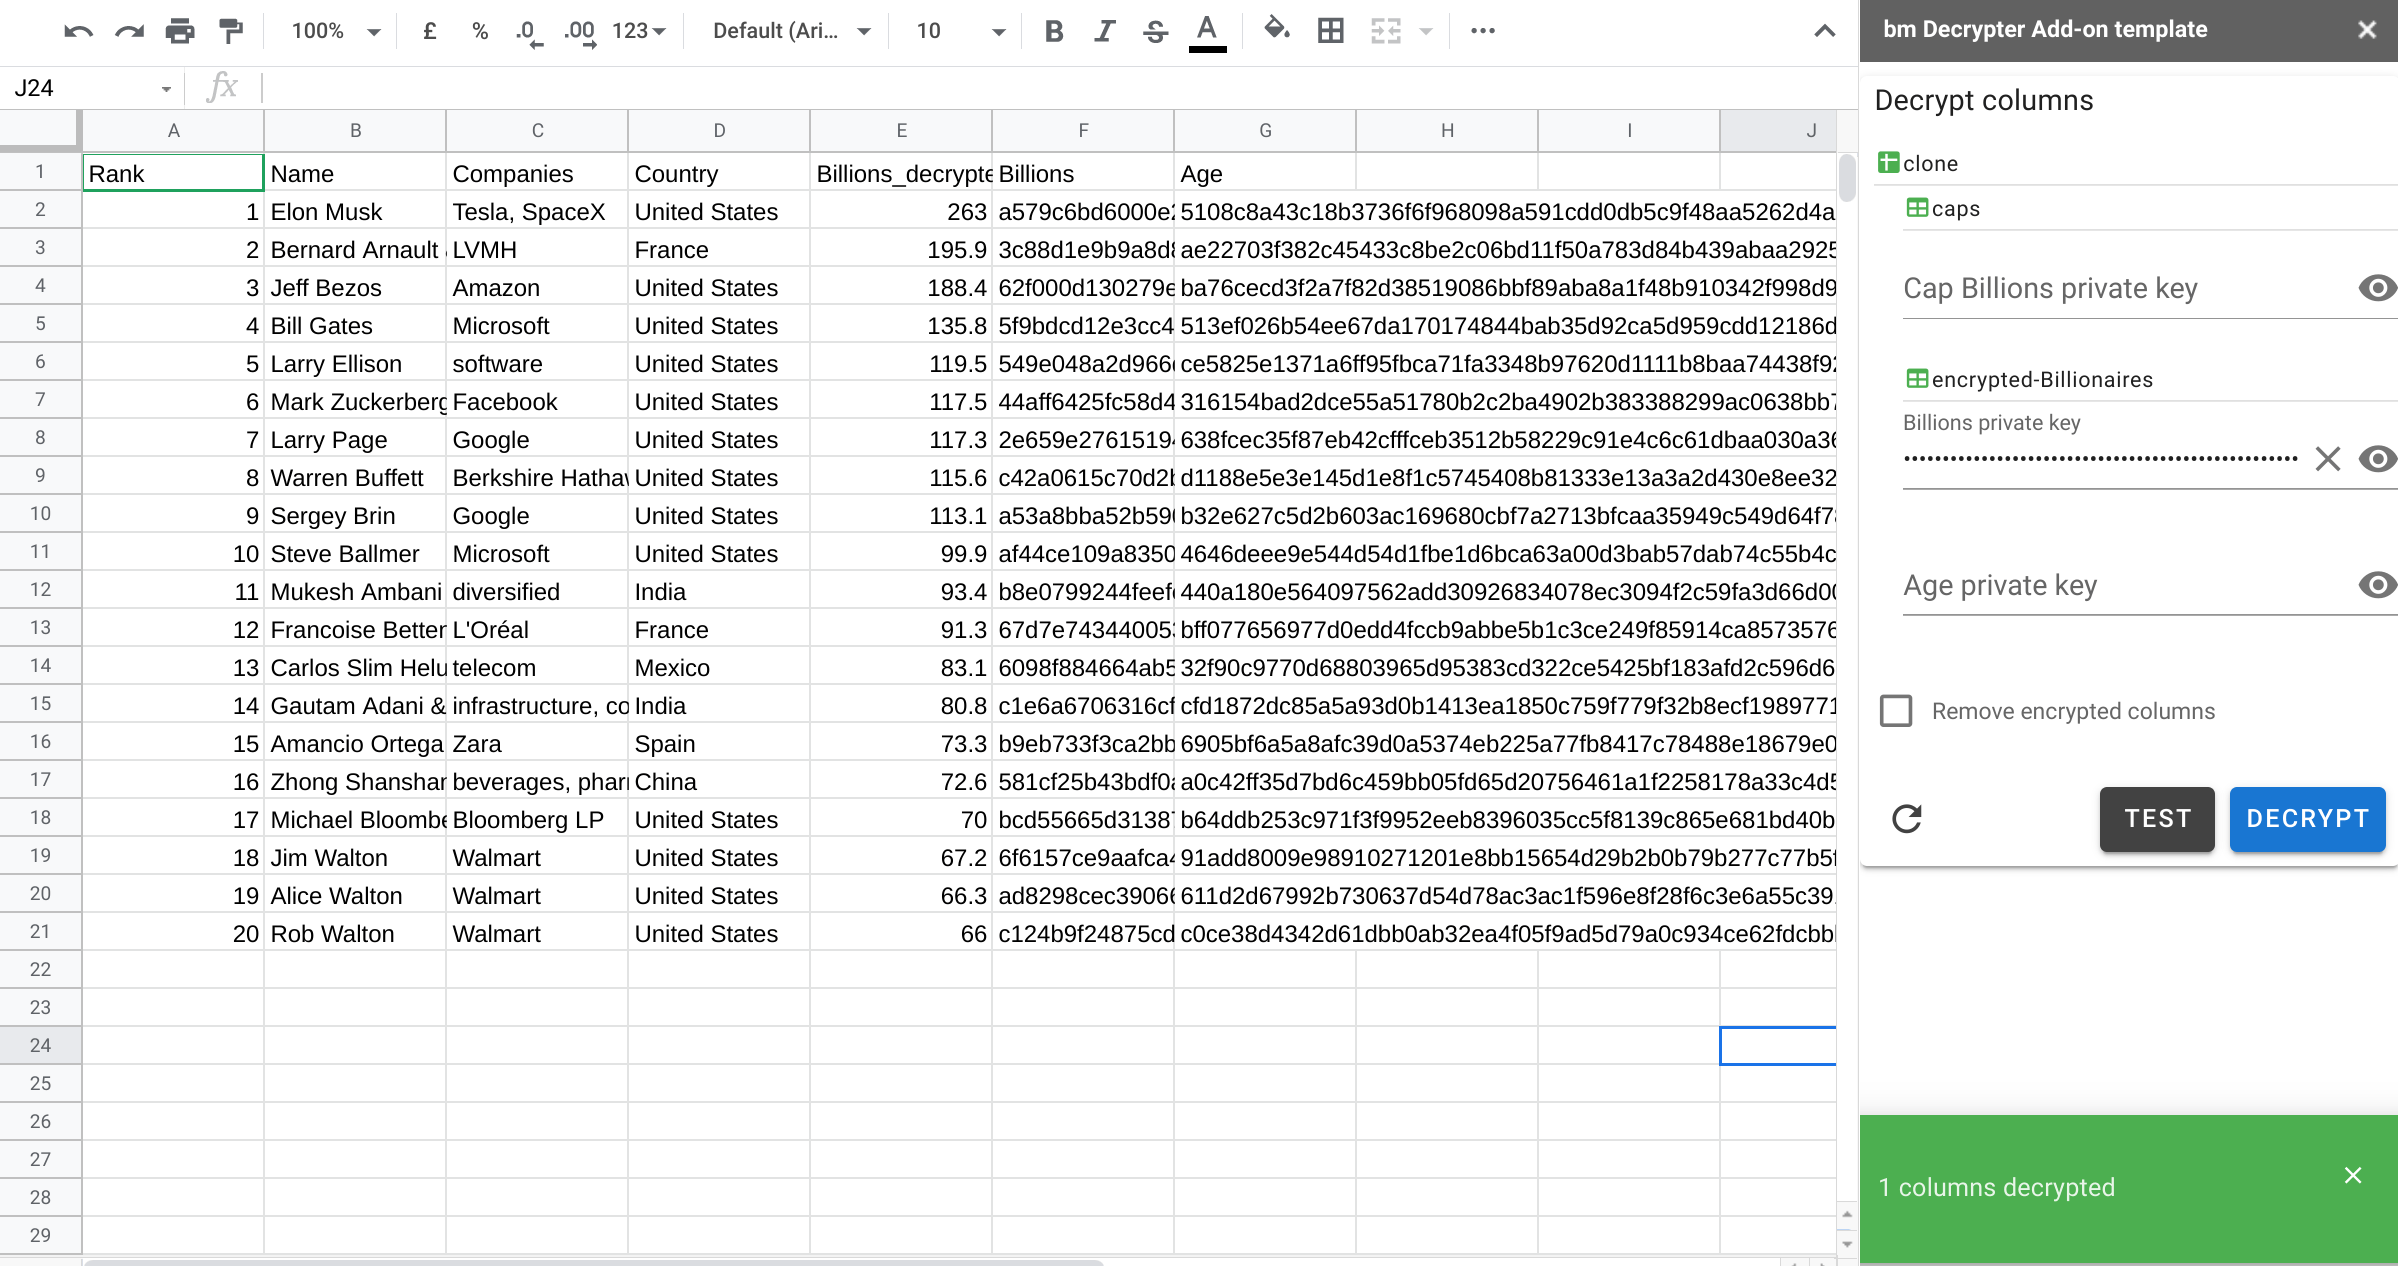
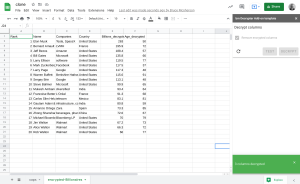
Decrypted column
Now there’s a new column, with the decrypted data. Note that the Add-on still notices that the encrypted version of the Billions column is still present.
Removing encrypted columns
In real life you’ll probably want to just get rid of those noisy encrypted columns, so let’s repeat the operation and decrypt everything. Note that any private keys supplied will be stored in the Add-ons user properties store until the column to which they apply is removed. This allows you to restart the add-on and rerun without bothering to enter the key each time. Since it’s in the User store, the key will be associated with a specific authenticated user, rather than the document as a whole.
I’ve unmasked the keys here so you can see how they related to the sample private keys earlier in the article.
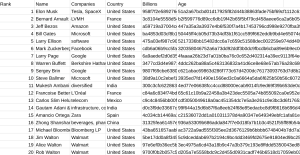
The decrypted sheets
Now we have a clean spreadsheet with all of the decryption complete and the original encrypted columns removed. The Add-on also detects that are no longer any encrypted columns.
Developer info
The Add-on is written using Vue/Vuex. I’ve described these in other articles on this site, but it’s probably worth a quick recap of some tips on how to both develop and test using this framework.
Combining the source code
I like to write the client side code using the IDE as if it were a server side script file (when it doesn’t use any specific browser code). It also allows sharing common code between server and client. The Include module referenced in the index.html of the App allows the inclusion of all types of files client side. Here’s the index.html of the add-on.
Vue components
If you enhance this Add-on, you’ll probably want to create some more Vue components. Put each component in a seperate html file in your project named yourcomponent.vue. It should look like this.
Store.js
The vuex store, the prep for mapping its getters, state, methods and acctions, and the management of Vue components all happens in Store.js . It’s best to keep all that stuff there.
main.js
If you keep everything laid out as described earlier, your main app can be minimal and standard between similar Add-ons. Include.gs can also handle importing Es6 modules, but I don’t have any of those here so the code for that is excluded. If you need to do that too, then see How to use Vue.js, Vuex and Vuetify to create Google Apps Script Add-ons
Provoke, Expose, Server and whitelisting
As a simple wraper for google.script.run I use provoke.js.
This will run promisify and run a Server side function, even if part of a namespace (so it avoids lots of stuff in the global space). It calls Expose.js – which is its server side counterpart.
The whitelist
Expose refers a list of functions than can be called from the client side. This ensures you have well controlled structure in client/server communications. I generally put all of the functions that will be called Server side in a namespace called Server.gs. In the example I’ve added something in the global space, just so you can see how it’s done compared to the examples in a namespace.
Calling server side functions
Once Expose is set up, we can easily call whitelisted server side functions asynchronously from the client using Provoke. It’s generally simplest to centralize all that in the actions (because they are asynchronous) section of your vuex store and commit any returns values to the Vuex state. Here’s an example vuex action to call a server side function
Server.gs
This namespace contains any function that will be called from the client side. Here’s the function that’s called in the example above.
Testing server side
It’s pretty tricky to find errors when you try to debug an Add-on as a whole. I always recommend getting the server side running initially in Apps Script by emulating calls that would be sent from the client. For example – this runs Server.decrypt as if it were being called from the client. I’ve left my test.gs script in the repo for some useful server side tests
Testing client side
The first problem is to find syntax errors which are not able to be flagged in the IDE. The chrome console won’t help that much as the code is uglified, but at least you can see if there is an error.
That’s another reason I like to write the code that isn’t relying on browser functions (at least initially) as .gs files and either converting to html later, or using Include.gs to incorporate them into the final htmlservice code. There’s no need to put <script> tags in as Include will insert them if required.
Eventually though you have to put it all together. I usually log the html content, copy it into something like codePen to identify and fix any syntax errors then update the code in the IDE. Here’s where to log the html content.
A note on libraries
The recomendation from Google is not to use libraries in Add-ons, but rather to copy the code into your Add-on. The reason given is that libraries are slower to load, but I can’t see any difference – see this analysis Measuring library load speed
However there are other reasons not to want libraries in your add-on, not least that they might disappear at some point if they are not under your control, so you might want to consider pulling in the code for each library from github. The code for any libraries they themsleves access wil be in their repos too under the libraries folder.
What’s next
Now we have a way to selectively encrypt columns, distribute the spreadsheet to multiple people, each of whom can use this add-on to reveal only the columns for which they have the private key. However it still means that now they could potentially have a sheet with decrypted sensitive data that they could save and if you’ve been careless with sharing options, others could see it too.
An enhancement I could suggest would be to create a new spreadsheet private to the decrypter with the decrypted data in it, rather than updating the distributed summary sheet.
Another interesting idea could be to use an ephemeral way of displaying decrypted data than writing it to a spreadsheet. Watch this space for a solution based on this idea.
Links
The Add-on
bmDecryptAddon 1Byrtnr_uuAt3BiZ6_qh6T8vBZq-YdgnDaqoJ64Ss7kM4q2XE-XGPcmCi
Crypter library
bmCrypter (13EWG4-1cBN2gAhvhG4vQTPL04V363DaL19TbHRMydR1pVfn2Wju6PuypdukZAFK)
Handy fiddler wrapper
bmPreFiddler (13JUFGY18RHfjjuKmIRRfvmGlCYrEkEtN6uUm-iLUcxOUFRJD-WBX-tkR)
All are also on github in their respective repos at github.com/brucemcpherson
Related
Merging sheets from multiple sources and encrypting selected columns

Super simple cipher library for Apps Script encryption and decryption
Obfuscate text with Apps Script

Import, export and mix container bound and standalone Apps Script projects
Add-on for decrypting columns in Google Sheets