Cockroachdb is a PostgreSQL compatible SQL database. It’s architecture is somewhat like Google Spanner, but you need to install it on your own infrastructure. This article will give a brief overview of how this stuff is deployed on Google Cloud platform, and is aimed at novices who just want to try it out – like me. Using the Cloud platform console is always an adventure, so I’m writing this as I’m doing it for future reference.
You can find more on this in detail at Cockroachdb site.
Docker
Nowadays I use Docker for stuff like this, as it makes it easier to bring up and down and configure instances. Since I’m just playing around, I’ll run multiple nodes as containers on the same VM.
Setting up a VM instance.
You’ll have set up a project and enabled billing, and be ready to create an instance. I recommend you go for the free instance to start with. Here’s the selections I’ve made, including preloading the cockroachdb image.
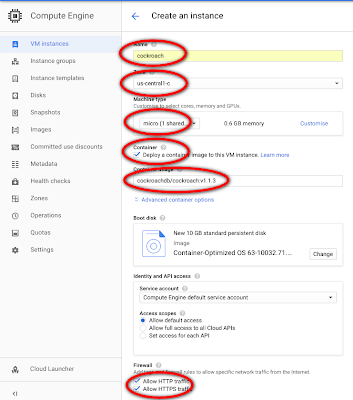
There’s an option to translate that into a command line that you can use in the cloud console – it’s always useful to capture that in case you need to repeat or automate it. Your instance should be up and running and look like this. Next you can connect to it using the ssh option. Note that a container-vm label as been automatically attached to it.

Containers, networks and nodes
After connecting to the VM, you can make sure the cockroach image has been installed.

In this first attempt, I’ll be running 3 container instances of this image, acting as the 3 nodes you’d find in a regular cockroach deployment. Normally these would be spread across multiple machines, perhaps being controlled using Kubernetes, but using Docker means you don’t care about for now. However, the containers do need their own little network to communicate with each other.
bn.sh
docker network create -d bridge cockroachbridge
Starting the nodes
I’ll do this in a shell script, as it’ll be needed later. Note how each node is connected to the same network created earlier. Here’s the script to start up the 3 nodes. Also, remember, this is an “insecure” deployment, since it’s just for playing around. st.sh
docker run -d
--name=c1
--hostname=c1
--net=cockroachbridge
-p 26257:26257
-p 8080:8080
-v "${PWD}/cockroach-data/c1:/cockroach/cockroach-data"
cockroachdb/cockroach:v1.1.3 start --insecure
docker run -d
--name=c2
--hostname=c2
--net=cockroachbridge
-v "${PWD}/cockroach-data/c2:/cockroach/cockroach-data"
cockroachdb/cockroach:v1.1.3 start --insecure --join=c1
docker run -d
--name=c3
--hostname=c3
--net=cockroachbridge
-v "${PWD}/cockroach-data/c3:/cockroach/cockroach-data"
cockroachdb/cockroach:v1.1.3 start --insecure --join=c1
and while I’m at it, here’s a script to stop and remove them all rc.sh
docker container stop c1 c2 c3
docker container rm c1 c2 c3
docker network rm cockroachbridge
Testing
We’re ready to go. The cockroach image has a built in sql client, and you can enter the commands interactively, but for repeatability, I’m going to use an SQL script, executed like this. ex.sh
docker exec -i c1 ./cockroach sql --insecure < test.sql
test.sql
DROP DATABASE IF EXISTS airports CASCADE;
CREATE DATABASE airports;
CREATE TABLE airports.locations (
 name STRING NOT NULL,
 latitude_deg FLOAT NOT NULL,
 longitude_deg FLOAT NOT NULL,
 elevation_ft INT NOT NULL, iso_country STRING(2) NOT NULL,
 municipality STRING NOT NULL, scheduled_service BOOL,
 iata_code STRING(3) PRIMARY KEY NOT NULL);
INSERT INTO airports.locations VALUES
('Port Moresby Jacksons International Airport',-10.443380356,147.2200012,146,'PG','Port Moresby',TRUE,'POM'),
('Edmonton International Airport',53.30970001,-113.5800018,2373,'CA','Edmonton',TRUE,'YEG'),
('Halifax / Stanfield International Airport',44.88079834,-63.50859833,477,'CA','Halifax',TRUE,'YHZ');
SELECT name,iata_code,elevation_ft FROM airports.locations ORDER BY elevation_ft DESC;
and, it works!
bruce@cockroach ~ $ docker exec -i c1 ./cockroach sql --insecure < test.sql
DROP DATABASE
CREATE DATABASE
CREATE TABLE
INSERT 3
name iata_code elevation_ft
Edmonton International Airport YEG 2373
Halifax / Stanfield International Airport YHZ 477
Port Moresby Jacksons International Airport POM 146
# 3 rows
Exposing externally
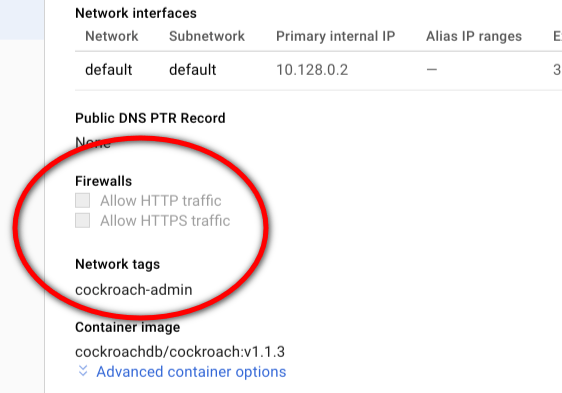
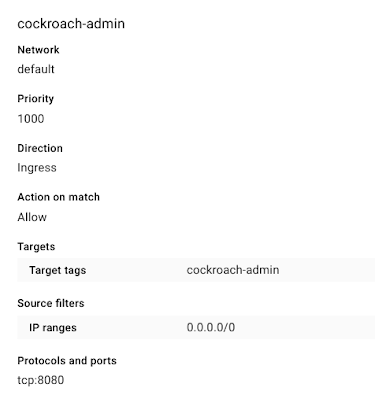
Cockroach comes with an admin console, but to get to it we need to have port 8080 exposed. Assigning a tag to the VM and creating a Firewall rule for that tag is the best way to accomplish this. I’ve added a tag of cockroach-admin to the VM, and removed the default http and https tags.
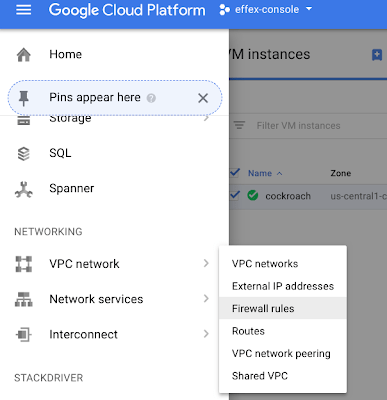
Over in Firewall rules under network of the cloud console,
Set up this rule (here it allows connecting from any IP address 0.0.0.0/0 – but you may want to restrict that)
Admin console
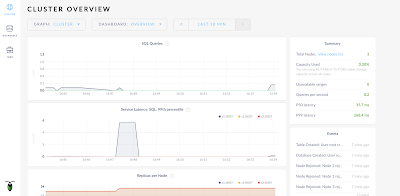
If you got all that right, go to the cloud console to find the external ip address of your VM and connect to http://the.ip.address:8080, and you’ll see something like this
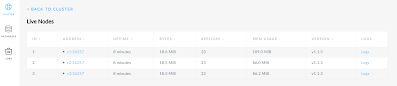
You’ll see the 3 nodes
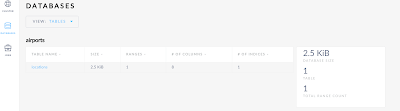
And of course the database
Automating
Since I may need to do this a number of times, and I don’t want to go through all that again, here’s a few extra scripts to pull it all together. The best way to do this is to use the cloud shell, and copy the scripts over once the new instance is created. new.sh runs from the cloud shell associated with your project, where all the scripts mentioned above are in /cockroach/docker in the cloud shell.
new.sh
## create instance
sh ci.sh
## create firewall rule
sh fw.sh
## copy files to new instance
gcloud compute scp ~/cockroach/docker/*.sh cockroach:~/ --zone us-central1-c
gcloud compute scp ~/cockroach/docker/*.sql cockroach:~/ --zone us-central1-c
fw.sh
gcloud compute --project=effex-console firewall-rules create cockroach-admin --direction=INGRESS --priority=1000 --network=default --action=ALLOW --rules=tcp:8080 --source-ranges=0.0.0.0/0 --target-tags=cockroach-admin
ci.sh
gcloud beta compute --project "effex-console" instances create "cockroach" --zone "us-central1-c" --machine-type "f1-micro" --subnet "default" --metadata "gce-container-declaration=spec:u000a containers:u000a - name: cockroachu000a image: 'cockroachdb/cockroach:v1.1.3'u000a stdin: falseu000a tty: falseu000a restartPolicy: Alwaysu000a" --maintenance-policy "MIGRATE" --service-account "945638777525-compute@developer.gserviceaccount.com" --scopes "https://www.googleapis.com/auth/devstorage.read_only","https://www.googleapis.com/auth/logging.write","https://www.googleapis.com/auth/monitoring.write","https://www.googleapis.com/auth/servicecontrol","https://www.googleapis.com/auth/service.management.readonly","https://www.googleapis.com/auth/trace.append" --min-cpu-platform "Automatic" --tags "cockroach-admin" --image "cos-stable-63-10032-71-0" --image-project "cos-cloud" --boot-disk-size "10" --boot-disk-type "pd-standard" --boot-disk-device-name "cockroach"
When complete, connect to the newly created instance, and you’ll find the set of .sh and .sql files have been copied over, then execute whole.sh.
whole.sh
## create network
sh bn.sh
## start cockroach
sh st.sh
## test db
sh ex.sh
which should give something like this
33609bc8682be4c662ed7c0977ad49ee7d208bee20e82e818d238c31398c01e8c8
0c190eee04122ddbf6509912628c549dc76ad167f0ba5a375d9a01464a7119
f5e5d8516f027d55ee98725bc186360df3a6ae2134a39e3b08f7ad31c8e7dd09
ce0b225c5f68df47eb37dab5d34d5ed90d48b93fa5d9633cd4c8695190300d25
DROP DATABASE
CREATE DATABASE
CREATE TABLE
INSERT 3
name iata_code elevation_ft
Edmonton International Airport YEG 2373
Halifax / Stanfield International Airport YHZ 477
Port Moresby Jacksons International Airport POM 146
# 3 rows
and that’s it – a repeatable cockroachdb docker/gcp installation.
Sizing
The free VM doesn’t have enough memory to do anything much with this, so once you’re ready you may need to get a bigger one, or in real life – several. You’ll likely see something like this, even with a small load – but that’s for another day.
For more like this, see React, redux, redis, material-UI and firebase
Why not join our forum, follow the blog or follow me on Twitter to ensure you get updates when they are available.
kubectl get deployment
NAME                                        DESIRED   CURRENT   UP-TO-DATE   AVAILABLE   AGE
kube-system-nginx-ingress-controller        1         1         1            1           1d
kube-system-nginx-ingress-default-backend   1         1         1            1           1d
play-around                                 1         1         1            1           1h
playback                                    2         2         2            2           23h