Implement a popup form at the mouse position get it now
Now that we know How to position a userform on the mouse, here’s a simple example of an implementation that uses such a form to show detailed information about the closest cell and allows you update it from the form.
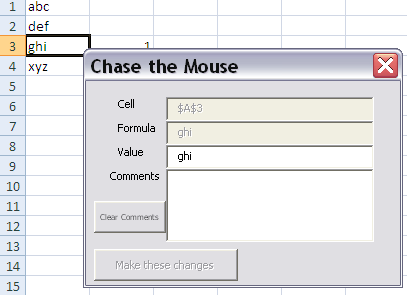
The form
This form will pop up whenever you click on a cell, and will be positioned close to where the mouse was when you clicked. It is a ‘non modal’ forms, which means it stays on the screen and allows you to do other things whilst it is there. It also means that you can click from cell to cell without having to close the form and it will follow the mouse as you click
The form code
The code local to the form is very simple – we just need to be able to record that a field has changed and therefore enable the ‘Make these changes button’, and of course react to the ‘clear comments’ and ‘submit’ command buttons.
Private Sub cbCancel_Click()
    Me.tbComments = vbNullString
    Me.cbSubmit.Enabled = True
End Sub
Private Sub cbSubmit_Click()
    chaseCommit
End Sub
Private Sub tbComments_Change()
    Me.cbSubmit.Enabled = True
End Sub
Private Sub tbValue_Change()
    Me.cbSubmit.Enabled = True
End Sub
The worksheet code
The code required in the worksheet context is even simpler. All that is required here is to react to the change in active cell, and call a procedure similar to the one discussed in the previous article, How to position a userform on the mouse
Private Sub Worksheet_SelectionChange(ByVal target As Range)
   mouseChase target
End Sub
The module code
There are 3 main functions here
- Fill the form with data from the cell
- Position the form at the current mouse position
- Commit any changes that have been made via the form
Option Explicit
Dim pTarget As Range
Public Sub mouseChase(ByVal target As Range)
    fillForm target
    positionForm
End Sub
Private Sub positionForm()
    With fChase
        .StartUpPosition = 0
        .left = convertMouseToForm.left
        .top = convertMouseToForm.top
        .show False
    End With
End Sub
Private Sub fillForm(ByVal target As Range)
    With fChase
        .tbCell.Value = target.Address
        .tbComments.Value = vbNullString
        .tbValue.Value = vbNullString
        .tbFormula.Value = vbNullString
        If target.Cells.Count = 1 Then
            Set pTarget = target
            .tbValue.Value = target.Value
            .tbFormula.Value = target.Formula
            If Not target.Comment Is Nothing Then
                .tbComments.Value = target.Comment.text
            End If
        Else
            Set pTarget = Nothing
        End If
        .cbSubmit.Enabled = False
    End With
End Sub
Public Sub chaseCommit()
    If Not pTarget Is Nothing Then
        With fChase
            pTarget.ClearComments
            If .tbComments.Value <> vbNullString Then pTarget.AddComment .tbComments.Value
            pTarget.Value = .tbValue.Value
            fillForm pTarget
        End With
    End If
End Sub
Summary
Although this example is probably not very useful in itself, it does demonstrate how to put what we learned in How to position a userform on the mouse to some practical use. The example can be found in the GettingStarted Series download and as always comments, questions and feedback can be communicated at our forum.