Deprecated
Google has now stopped its Earth API and Maps API is a paid for API nowadays. Some capabilities have also been either removed or changed. Therefore, I had to remove all examples of VizMap applications I had created. I didn’t remove the entire topic as I thought some of the code may still be useful with some modifications.
Tailoring the look of your VizMap application
This relates to Data Driven Mapping applications For this example I had created a Concerts/Venues example that is now deprecated. The complete workbook (googlemapping.xlsm) can be downloaded (above) and the example Parameter WorkSheet is called VenuesParameters. Here you can learn how to reformat the data in your Google Map popup InfoWindows by changing the contents of the given css classes.
How to modify the CSS classes that control the style of your infowindow contents
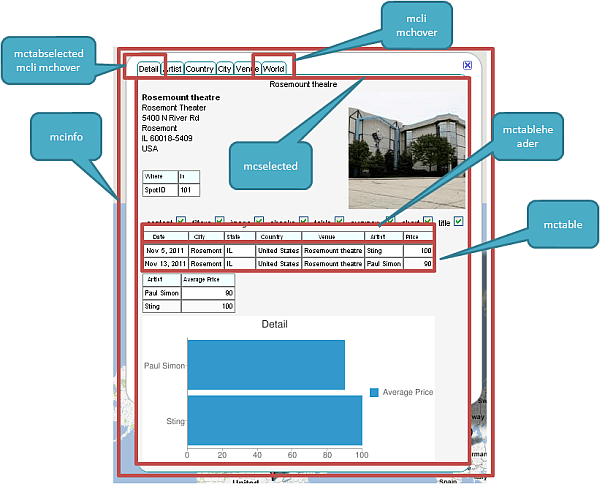
Below is a pop up info window. Each of the highlighted elements calls out the name of the classes that are used to determine the format to be used. In addition to repositioning (or not showing) certain of the elements (VizMap Element positioning) you can also change their display styles through CSS styling simply by modifying the definition of any of the classes shown below. Any added since this was written may not be shown on the image below, but their function will be clear from their name.
Default Styles
These are defined in the generated application html file as follows, but they originate from a parameter block in your application specific parameter sheet. If you are going to change these it’s best to play around with the generated file till you get the look you want before committing them back to the parameter sheet. That way you can always just generate another clean one if it all messes up.
.mcinfo {
 margin: 0px;
 font-family: sans-serif;
 font-size: 0.7em;
 padding: 0px;
 background-color: #0;
 vertical-align: top;
}
.mcelementtd {
 vertical-align:top;
 align-text:left;
}
.mcli {
 display: inline;
 border: 1px solid Teal;
 padding: .2em;
 padding-bottom: 0px;
 background-color: Azure;
 border-top-left-radius: 5px;
 -moz-border-radius-topleft: 5px;
 border-top-right-radius: 5px;
 -moz-border-radius-topright: 5px;
}
.mctabselected {
 background-color: WhiteSmoke;
 border-bottom: 1px solid WhiteSmoke;
}
.mchover:hover {
 background-color: LightSeaGreen;
}
.mcselected {
 background-color: WhiteSmoke;
 margin: 0px;
 padding: .3em;
 border: 1px solid Teal;
 border-bottom-left-radius: 15px;
 -moz-border-radius-bottomleft: 15px;
 border-bottom-right-radius: 15px;
 -moz-border-radius-bottomright: 15px;
 border-top-right-radius: 15px;
 -moz-border-radius-topright: 15px;
}
.mccheck {
    width : 0.7em;
 height :0.7em;
 padding: 0px;
 margin: 0px;
}
.mcstatus {
 display: inline;
 font-family: sans-serif;
 font-size: 0.7em;
 border: 1px solid Gray;
 border-radius: 5px;
 -moz-border-radius: 5px;
 float: right;
}
.mcready {
 color: WhiteSmoke;
 background-color: Teal;
}
.mcbusy {
 color: WhiteSmoke;
 background-color: FireBrick;
}
.mctable {
 font-family: sans-serif;
 font-size: 0.7em;
 border: 1px solid Gray;
}
.mcearth {
    width:240px;
    height:180px;
    border: 1px solid gray;
}
.mctableheader {
 font-family: sans-serif;
 font-size: 0.6em;
 background-color: Azure;
 border: 1px solid Gray;
}
.mctweetheader {
 font-family: sans-serif;
 font-size: 1em;
 background-color: gainsboro;
 color:darkslategrey;
 align:left;
 vertical-align:top;
}
.mctweet {
 font-family: sans-serif;
 font-size: 1em;
 background-color:WhiteSmoke;
 color:DarkSlateGrey;
 align:left;
 vertical-align:top;
}
.mchide {
 display: none;
}
.mcshow {
 display: block;
}
There are a few of these you need to be very careful with. mcshow and mchide are used to hide or display items and should be left alone. If you are changing mcli, mcselected and mctabselected, be aware that the border elements are very carefully selected so as to emulate Tabs (which are not a native capability of Google InfoWindows) so its best to leave those borders alone too.
Status element
You may notice a small status reporting element on the top right. It reports on what is going on and is red when working and green when idle. I found it useful when debugging and decided to just leave it there.
![]()
It is also controlled by Css classes ( mcstatus, mcready, mcbusy). You can adapt those if you want. If you do not want this status bar to be shown you can either change their css attribute to display:none , or you can delete the element they use from the body of the html file .. which we will come to in the next section.
Changing the parameter sheet styles permanently
Once you are happy with the results, you can commit your changes to the parameter sheet. First find the parameter block as below
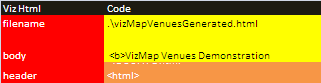
You need to change the code associated with the Header parameter. By default it looks like this. You can make your style changes as required, being careful to leave everything else intact.
<!DOCTYPE html>
<html>
<head>
<style type="text/css">
html {
 height: 100%
}
body {
 height: 100%;
 margin: 0;
 padding: 0
}
#map_canvas {
 height: 100%
}
.mcinfo {
 margin: 0px;
 font-family: sans-serif;
 font-size: 0.7em;
 padding: 0px;
 background-color: #0;
 vertical-align: top;
}
.mcelementtd {
 vertical-align:top;
 align-text:left;
}
.mcli {
 display: inline;
 border: 1px solid Teal;
 padding: .2em;
 padding-bottom: 0px;
 background-color: Azure;
 border-top-left-radius: 5px;
 -moz-border-radius-topleft: 5px;
 border-top-right-radius: 5px;
 -moz-border-radius-topright: 5px;
}
.mctabselected {
 background-color: WhiteSmoke;
 border-bottom: 1px solid WhiteSmoke;
}
.mchover:hover {
 background-color: LightSeaGreen;
}
.mcselected {
 background-color: WhiteSmoke;
 margin: 0px;
 padding: .3em;
 border: 1px solid Teal;
 border-bottom-left-radius: 15px;
 -moz-border-radius-bottomleft: 15px;
 border-bottom-right-radius: 15px;
 -moz-border-radius-bottomright: 15px;
 border-top-right-radius: 15px;
 -moz-border-radius-topright: 15px;
}
.mccheck {
    width : 0.7em;
 height :0.7em;
 padding: 0px;
 margin: 0px;
}
.mcstatus {
 display: inline;
 font-family: sans-serif;
 font-size: 0.7em;
 border: 1px solid Gray;
 border-radius: 5px;
 -moz-border-radius: 5px;
 float: right;
}
.mcready {
 color: WhiteSmoke;
 background-color: Teal;
}
.mcbusy {
 color: WhiteSmoke;
 background-color: FireBrick;
}
.mctable {
 font-family: sans-serif;
 font-size: 0.7em;
 border: 1px solid Gray;
}
.mcearth {
    width:240px;
    height:180px;
    border: 1px solid gray;
}
.mctableheader {
 font-family: sans-serif;
 font-size: 0.6em;
 background-color: Azure;
 border: 1px solid Gray;
}
.mctweetheader {
 font-family: sans-serif;
 font-size: 1em;
 background-color: gainsboro;
 color:darkslategrey;
 align:left;
 vertical-align:top;
}
.mctweet {
 font-family: sans-serif;
 font-size: 1em;
 background-color:WhiteSmoke;
 color:DarkSlateGrey;
 align:left;
 vertical-align:top;
}
.mchide {
 display: none;
}
.mcshow {
 display: block;
}
</style>
From now on every time you generate this application it will have your changes built into the generated html. file.
Summary
Next we’ll take a look at how to modify the body of the application, if you want to surround this with content. For help or advice, please visit our forum.