In a recent article Puppeteer, Cloud Run and GraphQL together I covered a GraphQL API for Pupeteer hosted on Google Cloud Run. This is publicly available for you try out. This article will cover all you need to know to get your own version running in your own Cloud Project.
You’ll find scripts here in the shells folder of the repo for every step, and of course you can repurpose them for any service you want to setup.
What you’ll need
You can clone the code from github here, and use npm to install the dependencies.
What you’ll learn
How to do the following general gcloud operations
- Create GCP projects
- Assign billing accounts to projects
- Create service accounts and assign permissions
- Create and manage secrets
- Build an image with Cloud Build
- Deploy to cloud run and consume secrets in your service
- Consume secrets in your own ephemeral terminal sessions
In addition, you’ll learn about how to create your own Cloud Run Service with the sample Puppeteer, Cloud Run and GraphQL together app, as well as how to integrate with Redis and execute GraphQL queries and use the GraphIQL UI.
Initial steps
GCP project
Best to create a new GCP project to run this in so you can ensure you enable the minimal permissions and APIS. For the sake of this article, I’m going to call the project gql-puppet-zero and set up all services to run in location europe-west2 under organization mcpher.com
Rather than go through the dashboard, I’ll give the gcloud command for these steps, but of course you can use the cloud dashboard UI if you prefer.
You’ll find these scripts in the shells folder in the github repo but you may want to tweak them with your own names etc.
Billing
I’m assuming you have already installed the gcloud api, and set up billing. Cloud Run has a fairly generous free tier, but you do need to enable billing with at least one billing account available. Secrets manager and artifact registry (which we’ll use to store the built images) are not free, but they are very cheap for the minimal usage we’ll need. Cloud build is not free either, but it does have a generous free tier.
For more info on GCP pricing for theses services visit the links I’ve given above.
Login
Create the project
Tweak this script to use your preferred organization, projectID, Billing account name and default region.
Create a service account
When we deploy the app to Cloud Run, we should minimize the permissions we give to the app’s service account. By default, Cloud Build uses one with excess permissions. For this app the only thing we need is to be able to read from GCP secrets manager, so we’ll create a new service account to deploy with later on.
Redis
gql-puppet uses Redis for caching, usage tracking and most importantly rate limiting (to minimize the chance of runaway GCP platform costs). You’ll need to create a Redis database with whatever your favorite method is. If you don’t already have one you can get a free one (30mb limit but that should be plenty for now) at redis.io. Google also offers a Redis compatible memory store which may work for you if you’re already using it (it’s not free).
You’ll need to find the port, endpoint and password for your redis instance (in the dashboard if you’re using the free redis.io solution) – and store it in GCP secret manager.
GCP Secret
Now we’re almost ready to commit your secrets to Secret manager – in addition to the redis stuff you’ll need to come up with a couple of random secrets of your own.
- DIGEST_SALT – used for creating redacted api digests in redis.
- KEY_ISSUER – a special key passed in the header of a client request accessing your api (in addition to the personal API key). This allows the API caller to create new personal API keys and various other role privileges.
These can be any values you want, but I usually use something like an online hasher where you can type in some random text and get a hashed value back. Use the resultant hash to provide values for these, and create a temporary JSON file as below, – lets call it delete-me-soon.json which we’ll upload to secret manager then get rid of.
Creating the secret
If you haven’t already enabled secret manager in your project, gcloud will enable it for you when you issue gcloud secrets commands.
If it all went well, it’ll show you what the secret is set to. Don’t forget to delete your temp json file now. You’ll never need it again.
Building the image
We’ll use Cloud build to create the image that cloud run will be running, but first we have to create an entry in the artifact registry. This is where Cloud Build stores the built image, and where Cloud Run will pick it up from. If you haven’t already enabled the artifact registry api, it will ask if it’s okay to enable it for you.
Docker file
We’ll need a Docker file to build the image from. It’s quite a convoluted one because of the Chrome dependencies of Puppeteer – I won’t bother reproducing it here – I derived it from information I found in the puppeteer repository. We’ll just use the Dockerfile in the gql-puppet repo you cloned earlier exactly as is.
Cloud build file
Next we need a cloudbuild.yaml. Cloud Build uses this to build and deploy the image to the artifact registry. This contains a number of steps from building the image from the source code an Dockerfile through to deploying and enabling the built image for cloud Run. You can probably use the one in the repo just as is, since it’s parameterized.
Note the maximum memory an max instances – cloud run pricing includes a charge for memory requested, and max-instances can help to avoid runaway instances. It’s easy to forget that after the free tier, charging silently kicks in, so remember to set budget alerts on your billing account.
Deploying
deploy.sh has the commands for building and deploying, and is reproduced below. It’s in the top level folder along with the cloudbuild.yaml and Dockerfile. You’ll notice that the substitutions referred to in the cloudbuild.yaml are passed over from here. You’ll need to tweak this shell with your own values if you’ve modified any of them in previous steps.
If you haven’t yet enabled the cloudbuild api, it will prompt and enable it for you.
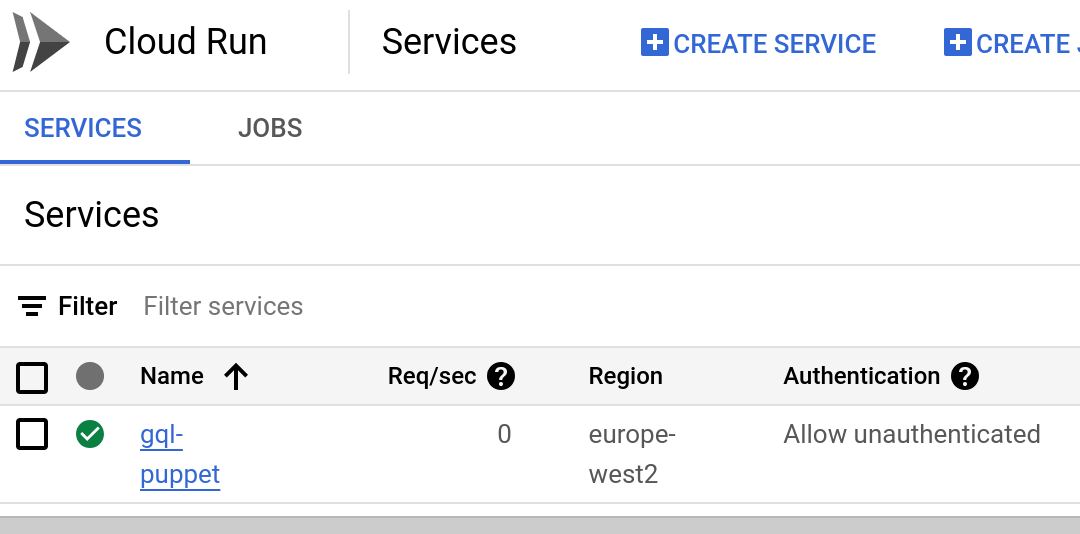
Check the cloud console
If all that worked you should have a viable cloud run service. Visit the cloud console. You should see something like this. Go to the revisions tab to get your service endpoint.
Creating an initial api key
One more thing. You don’t actually have an api key yet. The API won’t let you access it if you don’t have one. Here’s how to create one.
- Goto the admin folder and look at seed.mjs – reproduced below, and set your email.
- Get the secret values into your shell – exactly as below – the extra dot is intentional. You of course need to be log into the gcp project hosting the secret for authorization.
Run node seed.mjs. That’ll give you an API key you can use in the header – for usage tips see Puppeteer, Cloud Run and GraphQL together
Testing
You’ll need the api key you created with seed.mjs, which you’ll pass as a header “x-gql-puppet-api-key’
Go to the graphiql endpoint –
YOUR-CLOUD-RUN-ENDPOINT/graphiql
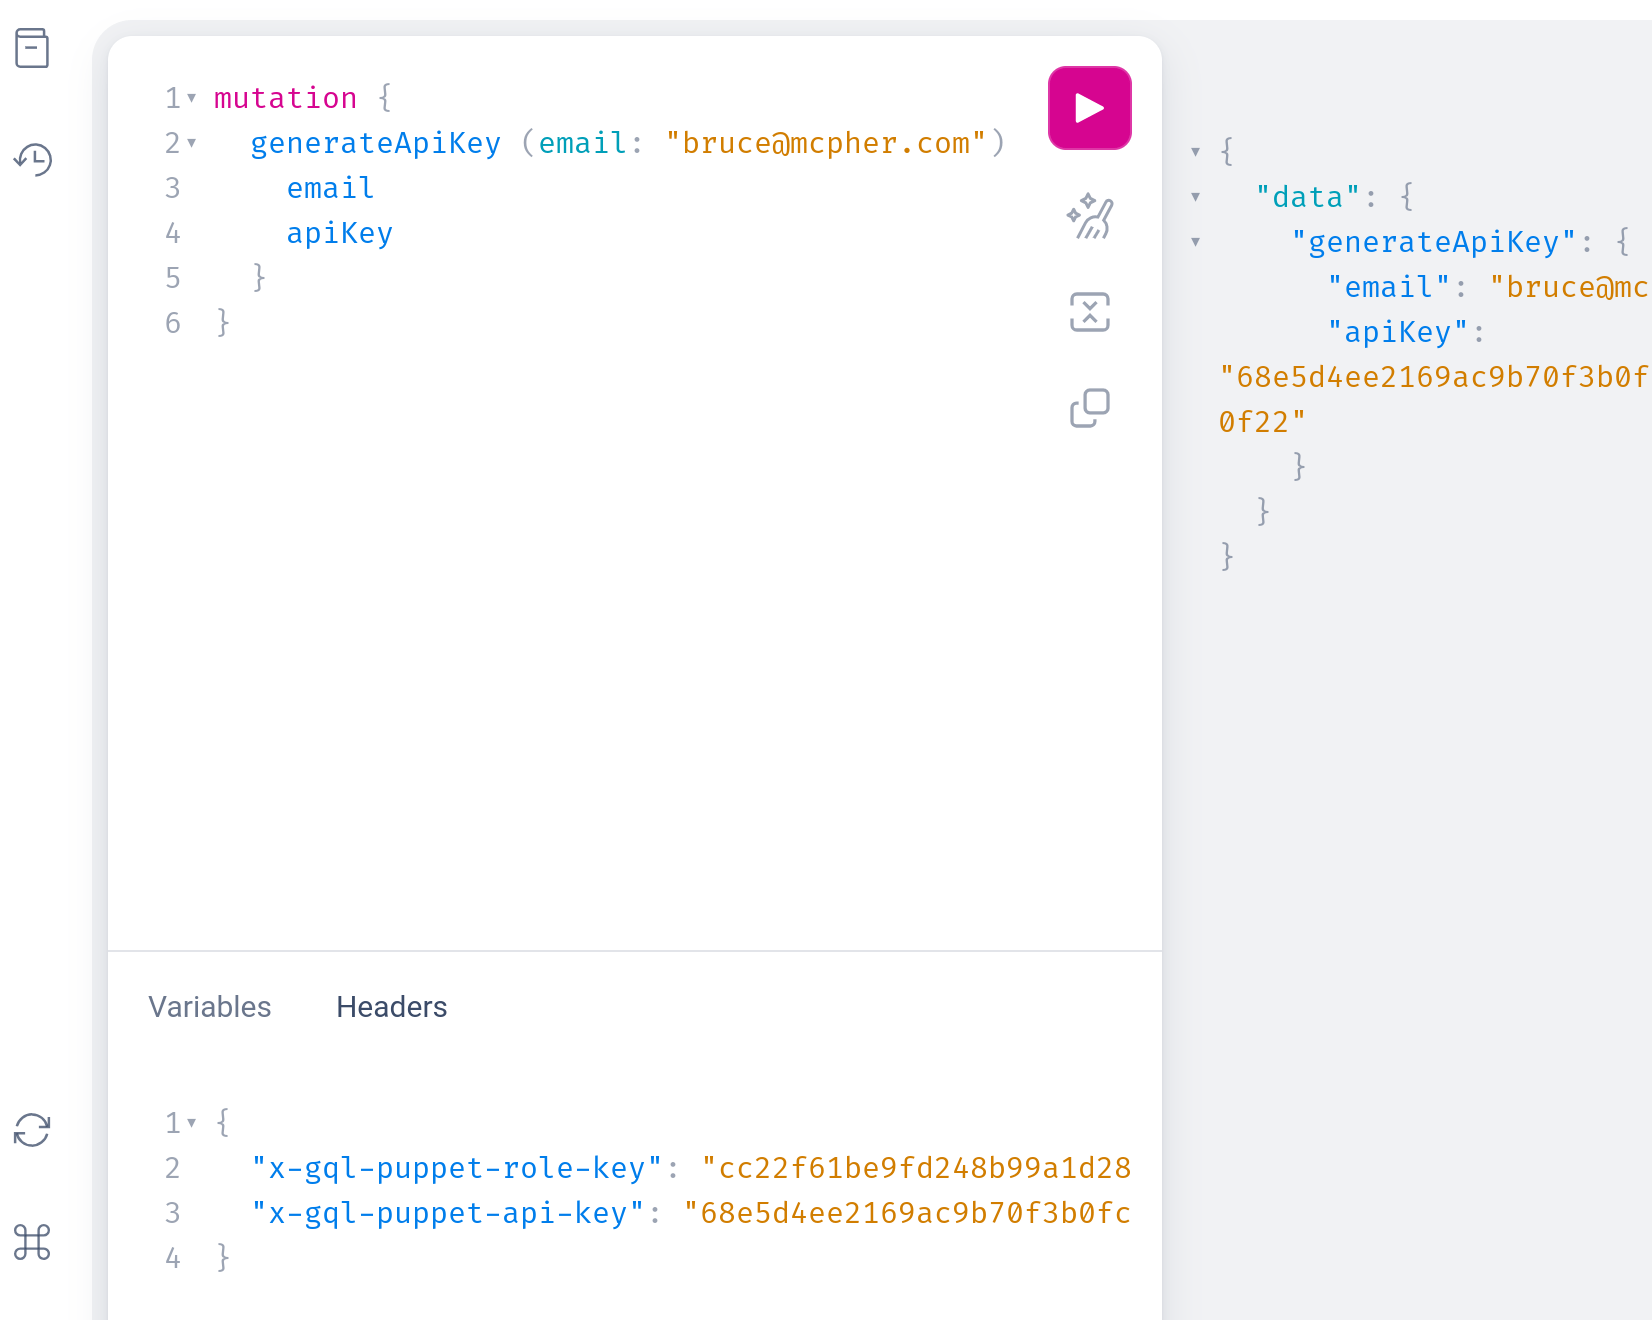
Enter the api key in the header section – and try some query like this.
In the admin folder, take a look at writepdf.mjs, and modify with your cloud endpoint, as well as your api key.
Take a look at the file it creates – GCP web page as a multi page pdf.
For plenty more usage examples, including for Google Apps Script, see Puppeteer, Cloud Run and GraphQL together
Allocating API keys for your users
Earlier we used seed.mjs to create a one off api key for you to use for yourself to get started. You could use that ongoing, but perhaps you want to build a portal to automatically issue keys. There’s a graphQL mutation for that.
How API keys are built and validated
In the Secret associated with your cloud Run instance, the value in DIGEST_SALT is hashed with the email address of the user to create a unique api key. So the same email address will generate the same api key for any instances you choose to run that share the same DIGEST_SALT. This gives you the flexibility to use the same redis store for multiple instances but partition usage by using a different salt value if you need to. These keys are stored in redis, and are validated against the header of any requests.
Generating an API key via GraphQL
To execute a mutation to create (and register) a new API key, client requests need both a normal user api key, plus the KEY_ISSUER value you’ve stored in the configuration secret. This goes in the ‘x-gql-puppet-role-key’ header.
If you have the secret values in your terminal session, you can see the current secret values with echo ${CONFIG} – or better still if you have jq installed
Or you can get them straight from gcp with
Here’s a mutation to generate an api key. It’s ok to rerun the generate multiple time. It’ll always return the same value given the same email address and salt.
Testing locally
Before deploying to cloud run, you can do some local tests. Just run node main.mjs and point your graphiql or client at localhost:8080/graphql (or /graphiql). You will need to have registered the secrets in the environment of the terminal session you are using, as described previously, by executing
Usage
Any user can see their own usage with this query
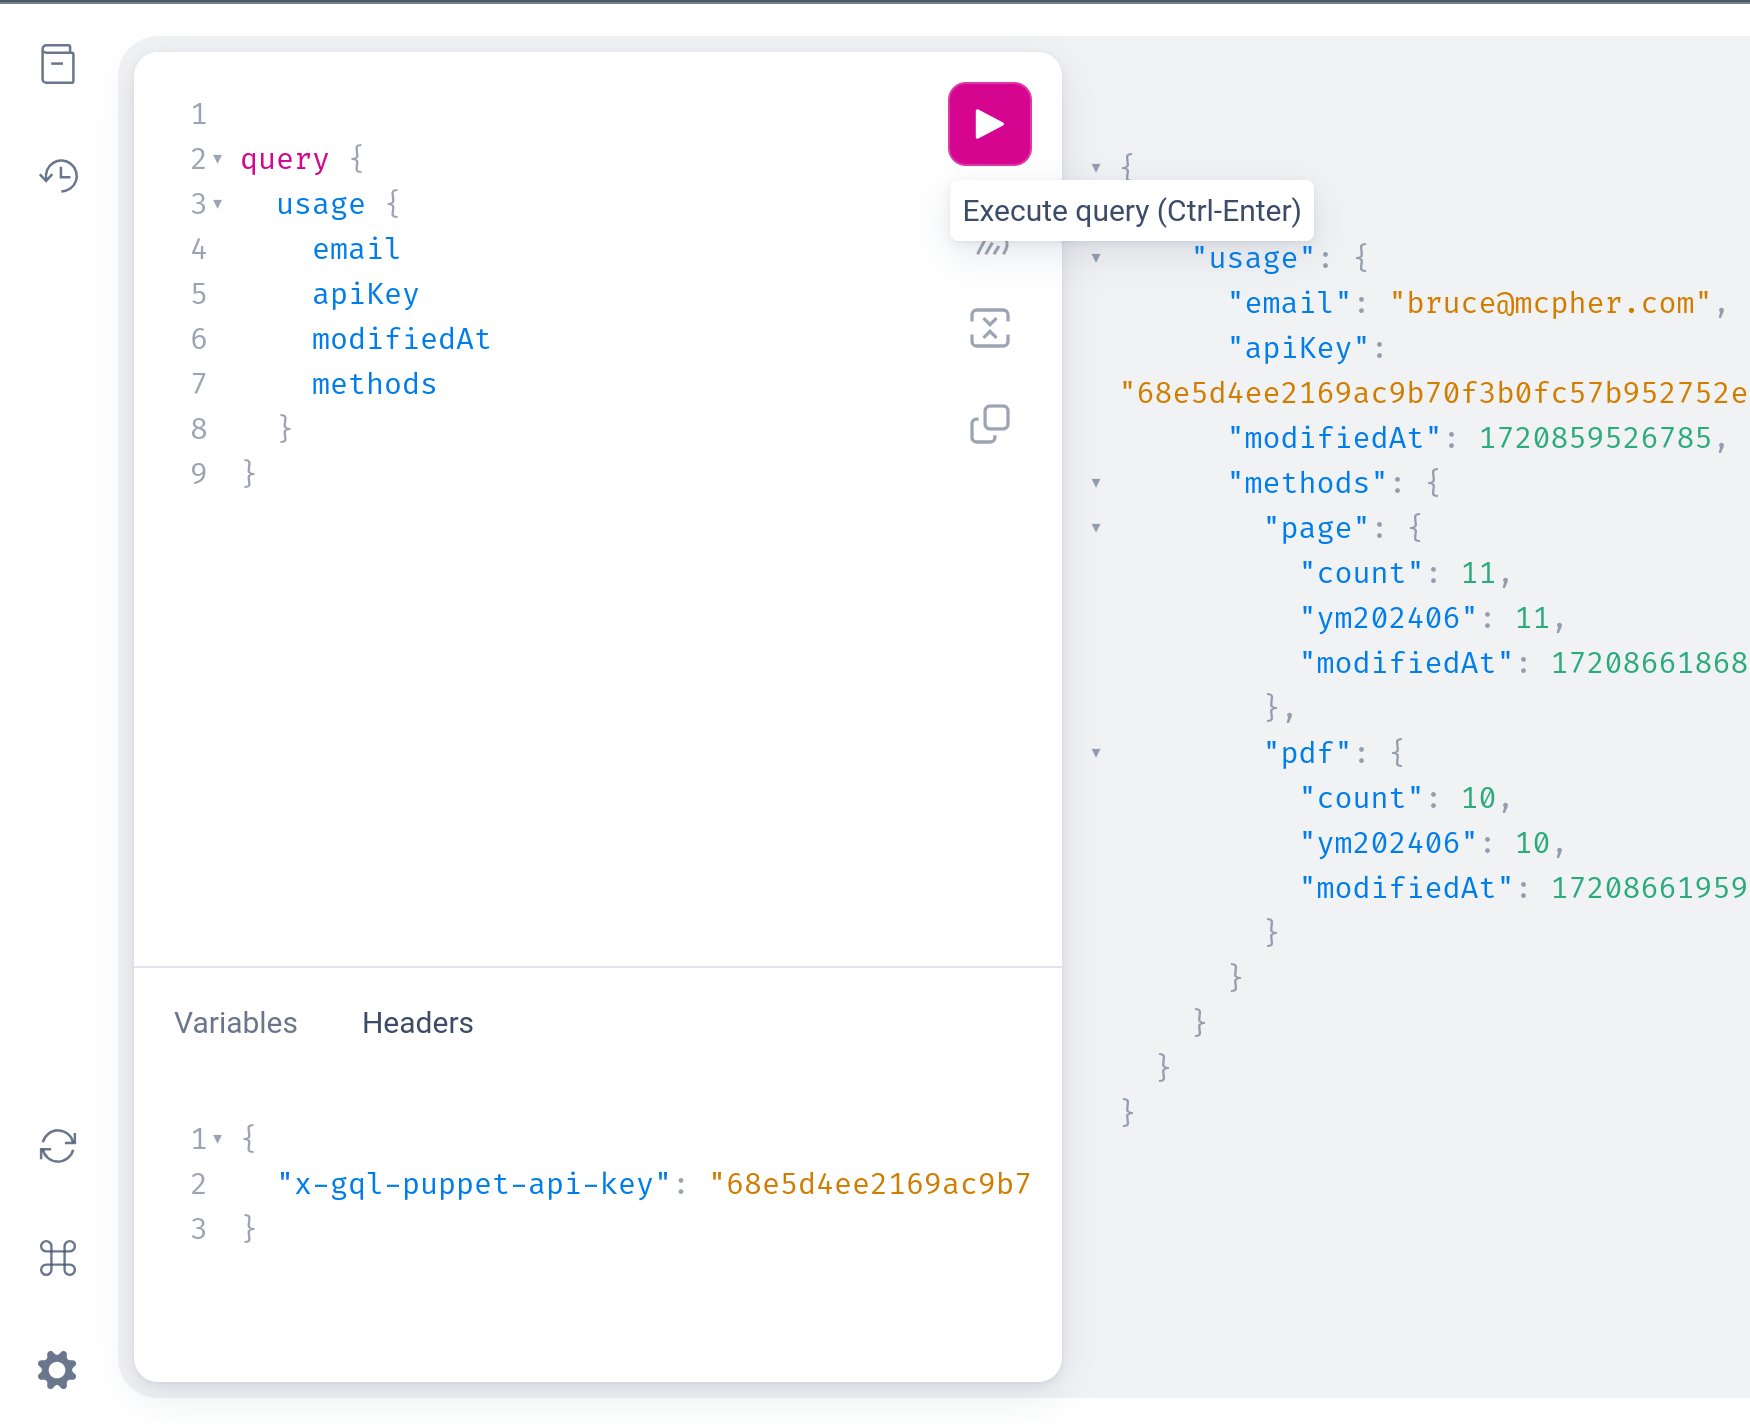
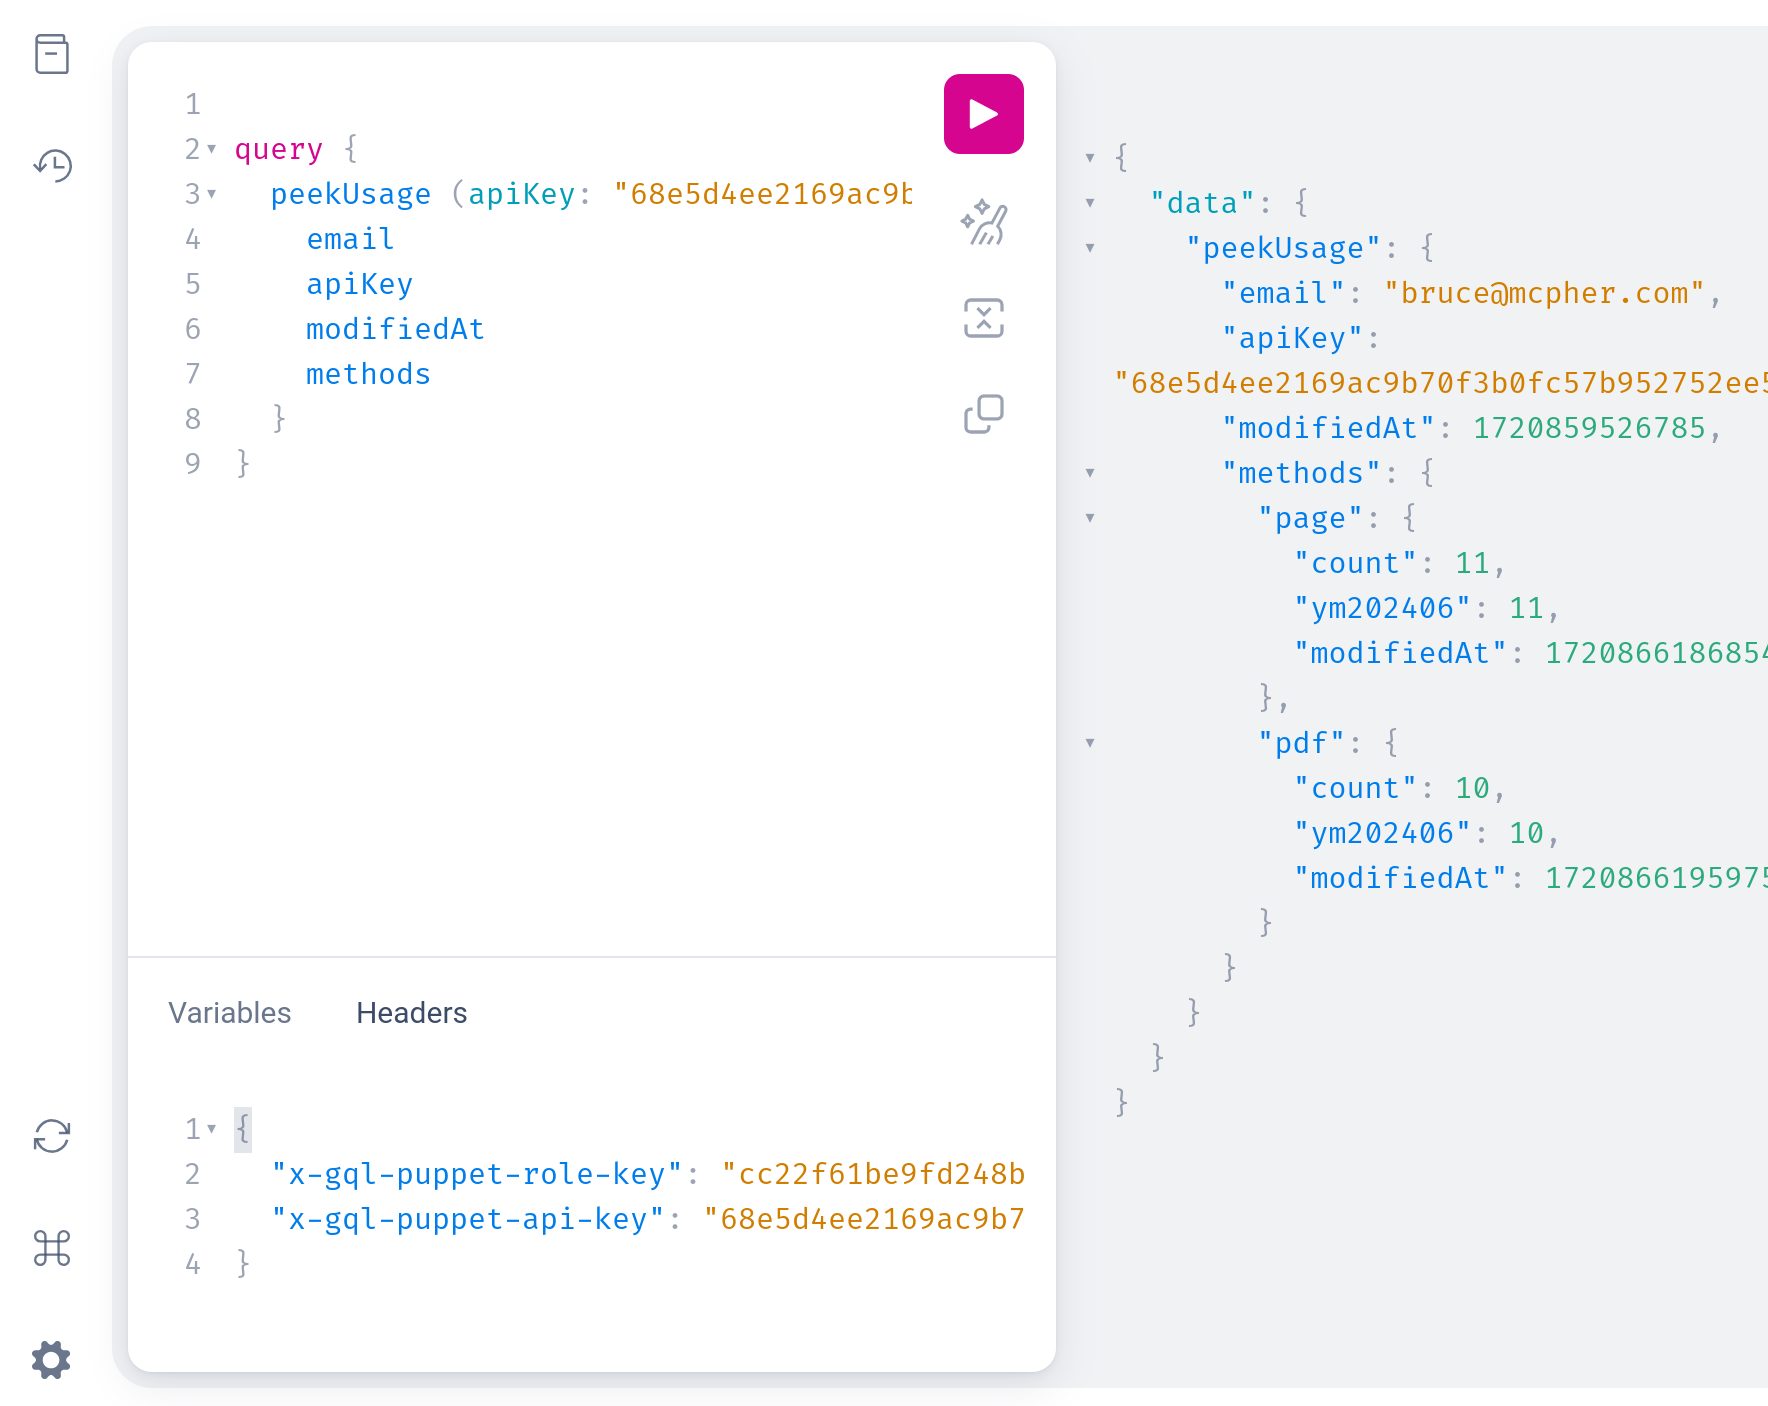
A user with the key issuer role, can peek at any user’s usage given their apiKey
Next
Deleting the gcp project will remove everything you created here and of course avoid any billing. All the keys etc on here are specific to the DIGEST_SALT I used for this article so of course won’t work on any other instances that have a different SALT.
Now you have an end point for your cloud run, but you’ll probably want to assign that to a custom domain, perhaps put some load balancing on the end point and maybe add authentication. That’ll be the subject of the next post.
Links
- gql-puppet github here
- redis.io
- Redis compatible memory store
- Puppeteer, Cloud Run and GraphQL together
- an online hasher
- cloud console for cloud run.
- jq
- mercurius/fastify
- graphql
- Cloud Run pricing
- budget alerts
- Secrets manager pricing
- artifact registry pricing
- Cloud build pricing