I come back to D3 about once every 6 months, and every single time I’ve forgotten how joins work. To avoid that next time, I’m writing it down to explain to myself, and hopefully you might find it useful too. This pattern will work for all circumstances, so I plan to stick to it in future.
What are D3 joins
When you make a selection in D3, you use something like
container.selectAll (querySelector)
The container is the parent selection that you are searching, and the querySelector is anything you normally use to select DOM elements. I tend to stick to using classes as a selector – so would use something like this
const selection = container.selectAll (".my-boxes");
At that point, the selection may be empty – a static visualization for example, would not have any previous elements created, or if you are updating an existing container, there may already be some items you want to retain, but perhaps update.
A join is created when you attach some data to a selection. The number of items in the join will be the number of items already existing or the number of items in the data you’ve attached – whichever is the greater. So in this example , the selection “boxes” has now been joined with its data
const boxes = selection
.selectAll(".demo-group")
.data(data);
Knowing what to do when you update that with new data is the thing that many have trouble with. Let’s walk through how to do it.
An example
Let’s visualize this data as a series of rectangles with the name in the center. Later on we’ll be changing the names, taking some away and adding others.
["john","george","paul","pete"]
In other words, this.
![]()
Initializing
The first step is to do the things that you’ll only want to do once. This selects a parent element to hold the visualization, and appends an svg element of a given width and height. This element will be accessed by the variable “selection” in future. We only have to do this once, so I’ve moved it to its own function that will be called at the beginning of the app.
// the size of our viz
const height = 40, width = 400;
let selection;
ns.init = ()=> {
// you can use any querySelector
// start with a dom container
container = d3.select ("#d3-select-div");
// we'll need an svg element
// with a group below it to contain whatever items we're going to add
selection = container
.append("svg")
.attr("width", width)
.attr("height", height);
return ns;
};
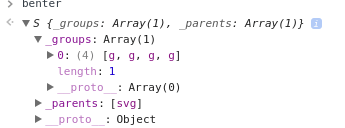
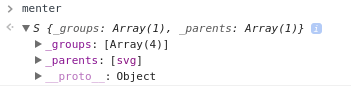
Here’s what selection looks like at this stage. It has one item – an svg element.

which has been marked up by D3 to this
![]()
Preparing the data
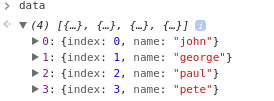
Occasionally you need to do a bit of data preparation, as it’s handy to carry around index information with each item, so the first step when receiving new data is generally to fiddle with it. Here I’m simply adding an index number to each item. ns.joins = (displayData)=> { // prepare the data // I always store the index for convenience const data = displayData.map ((d,i)=>{ return { index:i,
name:d } }); // the size of each box
const boxHeight = height;
const boxWidth = width / data.length;Here’s the data that D3 will see
Joining the data to the selection
Assigning the data to the selection does the join magic.
// I usually use class names for d3 elements // some people use element types const boxes = selection .selectAll(".demo-group")
.data(data)
;
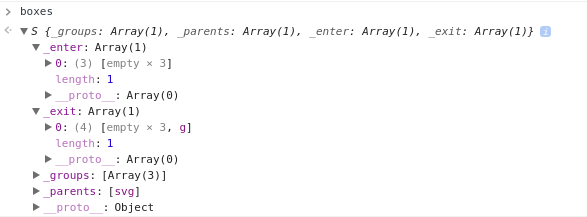
Notice that the selection now contains _enter and _exit properties.

_enter contains the data that it’s seeing for the first time, and _exit would contain any surplus items (if the data just received was smaller than the last time). This is the most important join concept, and although it seems simple, the mechanics of dealing with it are what usually trip people up.
Exiting surplus
In this case, since it’s the first time called, there are no items to exit – but when future data arrives, there may well be.
// get rid of any we dont need any more
boxes.exit().remove();
This didn’t change a thing – there was nothing to exit

Entering the new
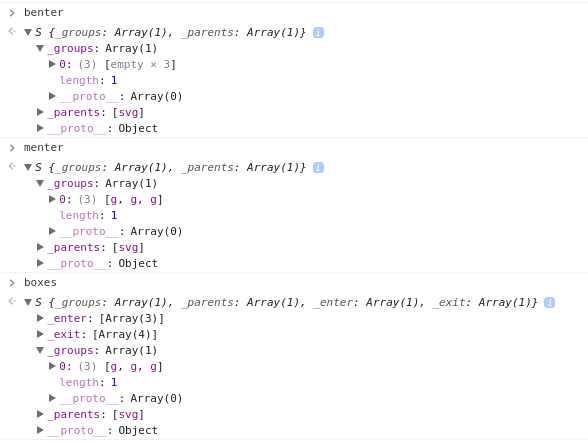
Notice that the _enter property contains 4 items – one for each data item. We now need to “accept” them and create 4 new svg groups.
const benter = boxes.enter()
.append("g")
.attr("class", "demo-group");
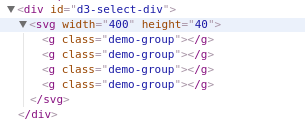
Adding a class to each of the groups will enable them to be found again (look back at how the initial select was done by looking for items with this class). The result of the enter method will be the 4 groups that were added.
Which D3 has marked up as
Adding new items
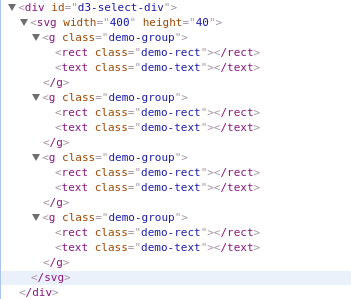
These groups will become the parents of a rectangle and text for each item. Note that although the text seems to be “in” the rectangle, only groups can be parents, so the rectangle and text are actually siblings – both children of a group.
// add a rectangle and some text in each group
benter.append("rect").attr("class", "demo-rect");
benter.append("text").attr("class", "demo-text");
At this stage these have no attributes. If there was any special attributes that would be set for new items (as opposed to updating existing ones), then this would be the place to chain them. The only attributes I’ve added is to assign a class to each of these so they can be found later. The markup is now filled out out to it’s final shape.
Merging existing items
Since I want to apply updated attributes to both new and updated items, I can now merge the newly entered items, with any that were already there (this is the step I always forgot to do when starting with D3).
const menter = benter.merge (boxes);
Since all items were new, in this case, “menter” looks exactly the same as “benter”
Updating all the items
Now that all the items have been merged, their attributes can be updated in one go
The rectangles
// to do an update
menter.select (".demo-rect")
.attr ("width", boxWidth)
.attr ("height", boxHeight)
// we are working in svg rather than css/html here
// the style names are different
.style ("fill","#ff0000")
.style ("stroke", "#dadada")
.style ("stroke-width", 3)
// dont forget that this will be greating a whole bunch of
// rectangles, and they will all be positioned at different places
// we can use an "accessor" to get to the data and apply it to
// each one of the generated rectangles
.attr ("x", function (d) {
return boxWidth*d.index;
})
.attr ("y", function (d) {
return 0;
});Now each rectangle has dimensions and position
![]()
![]()
the textmenter.select (".demo-text") // we are working in svg rather than css/html here // the style names are different .style ("fill","#eeeeee") .text (d=>d.name) .attr ("x", function (d) { return boxWidth*d.index; }) .attr ("y", function (d) { return 0; }) // we can use dx and dx to relatively offset the text by some amount // get to the center of the box .attr("dy", boxHeight/2) .attr("dx", boxWidth/2) // and align the text at the middle of its position horizontally .style("text-anchor","middle") // and finally vertically .attr("alignment-baseline", "middle")And each text has a position some properties and some content
![]()
![]()
Accessor functions
When setting an attribute, you’ll sometime see this, when you want the same value to apply to all items in the selection
.attr ("width", boxWidth)
but you’ll also see this, when you want a different value, based on the data for each item to be applied
.attr ("x" , d=>d.index * boxWidth)
This is called an accessor function and is called for each data item. You simply return the value to be used for that attribute for that specific data item.
Doing an update
Here’s a test updating the visualization with different data after waiting a bit.
d3Explain.init();
setTimeout (()=> d3Explain.joins(["john","george","paul","pete"]), 0);
setTimeout (()=> d3Explain.joins(["john","george","paul"]), 5000);
setTimeout (()=> d3Explain.joins(["john","george","paul","ringo"]), 10000);
setTimeout (()=> d3Explain.joins(["george","paul","ringo"]), 15000);
setTimeout (()=> d3Explain.joins(["paul","ringo"]), 20000);
The whole sequence will show each of these in turn
![]()
![]()
![]()
![]()
Exiting
This time, the second time it runs we should see an exit, as “pete” goes away.
Notice that _exit still contains 4 items, 3 of which are empty. .remove() will remove the non empty items (in other words the 4th one that used to contain “pete”, and _enter contains 3 items, all of which are empty (which means it won’t attempt to enter any new items).
Updating
This time, “benter” has no items to process, but when merged with the groups from “boxes” we now correctly have 3 items to update.
The code
You’ll need
![]()
Here is the full pattern
const d3Explain = (function (ns) { // the size of our viz const height = 40, width = 400; let selection; ns.init = ()=> { // you can use any querySelector // start with a dom container container = d3.select ("#d3-select-div"); // we'll need an svg element // with a group below it to contain whatever items we're going to add selection = container .append("svg") .attr("width", width) .attr("height", height); return ns; }; /** * explain join */ ns.joins = (displayData)=> { // prepare the data // I always store the index for convenience const data = displayData.map ((d,i)=>{ return { index:i, name:d } }); // the size of each box const boxHeight = height; const boxWidth = width / data.length; // I usually use class names for d3 elements // some people use element types const boxes = selection // selection contains nothing at this point // but if there were any items with that class name it would contain them // so now associate some data with this selection .selectAll(".demo-group") .data(data); // get rid of any we dont need any more boxes.exit().remove(); // entering the data creates a number of 'empty' elements to match the number o data items const benter = boxes.enter() // and we now need a group for each one .append("g") // so we can find thm again .attr("class", "demo-group"); // add a rectangle and some text in each group benter.append("rect").attr("class", "demo-rect"); benter.append("text").attr("class", "demo-text"); // notice that I did this in 2 steps // because so far all we've done is add new items. // update part is like this const menter = benter.merge (boxes); // to do an update menter.select (".demo-rect") .attr ("width", boxWidth) .attr ("height", boxHeight) // we are working in svg rather than css/html here // the style names are different .style ("fill","#ff0000") .style ("stroke", "#dadada") .style ("stroke-width", 3) // dont forget that this will be greating a whole bunch of // rectangles, and they will all be positioned at different places // we can use an "accessor" to get to the data and apply it to // each one of the generated rectangles .attr ("x", function (d) { return boxWidth*d.index; }) .attr ("y", function (d) { return 0; }); // now add some text // note that we have to add text to a group - we cant add it to a rectangle // the groups were created to so that rects and text could be associated menter.select (".demo-text") // we are working in svg rather than css/html here // the style names are different .style ("fill","#eeeeee") .text (d=>d.name) .attr ("x", function (d) { return boxWidth*d.index; }) .attr ("y", function (d) { return 0; }) // we can use dx and dx to relatively offset the text by some amount // get to the center of the box .attr("dy", boxHeight/2) .attr("dx", boxWidth/2) // and align the text at the middle of its position horizontally .style("text-anchor","middle") // and finally vertically .attr("alignment-baseline", "middle") } return ns;})({}); d3Explain.init();setTimeout (()=> d3Explain.joins(["john","george","paul","pete"]), 0);setTimeout (()=> d3Explain.joins(["john","george","paul"]), 5000);setTimeout (()=> d3Explain.joins(["john","george","paul","ringo"]), 10000);setTimeout (()=> d3Explain.joins(["george","paul","ringo"]), 15000);setTimeout (()=> d3Explain.joins(["paul","ringo"]), 20000);