In Borrowing an access token from Apps Scripts I demonstrated the simplest way to get a token to use with a Google API, by borrowing one from Apps Script. Next up, was Using a service account where could generate a token by knowing the appropriate credentials for project. This was used in the context of accessing resources belonging to a project. Using OAUTH2 with a webapp published ‘as me’ showed how to create tokens in the context of a webapp which accessed resources belonging to me (the script owner). This would be useful in the case where I was giving other users access to my resources via my webapp, without needing to give them them permission to access the resources directly. The next scenario, is where the webapp needs to access resources belong to the user that is running it. In this case, every user who runs the webapp will not only need to give the webapp authorization (for example to access files on his Drive), but the webapp will will also need to maintain a separate token refresh environment for each individual user. There’s a video version of this post if you prefer. The code for the video demo is on githubhttps://youtu.be/S1AjiVvPalkIn effect, the Oauth2 process is exactly the same as in Using OAUTH2 with a webapp published ‘as me’, except that
- Goa should be instructed to store the token infrastructure in the userPropertyStore rather that the scriptPropertyStore.
- The project credentials are stored in the scriptPropertyStore and Goa will clone them to the userPropertyStore as required (if they change .. for example a new scope, or on the first time a particular user is encountered).
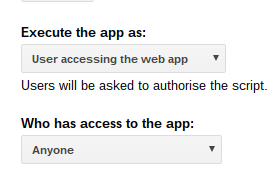
- The webapp will be published as follows.
All the demo code is available on github. Note that I’m using the same code for all these examples, so the final source on github will have evolved in some details from the writeup here.
The example
In order to make this example a little more realistic for the scenario, I’ll show you how to use the googlePicker in this webapp, which will allow the user to select folders on their Drive for processing by the webapp. Although this makes it more complicated to compare the two scenarios, I think it’s important to demonstrate why there would be a need for the different scenarios, and accessing the user’s drive (as as user) versus the script owners (as me) drive is a good illustration. The webapp now looks like this ;
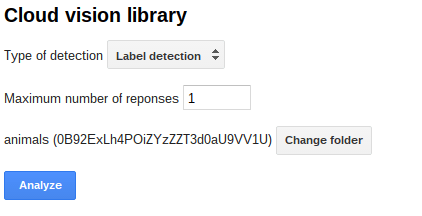
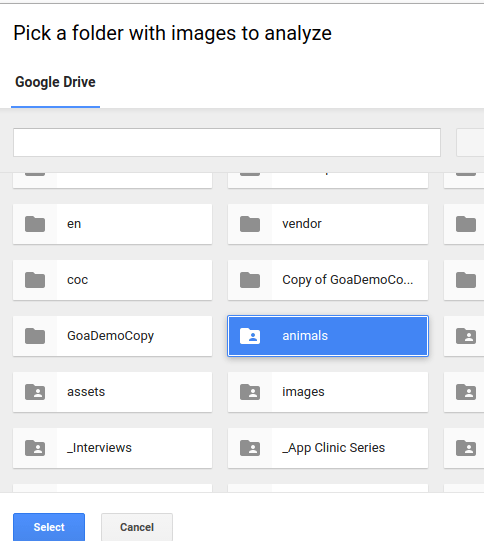
where the ‘Change folder’ buttons launches the googlePicker, from which the user can select the folder to process,as below.
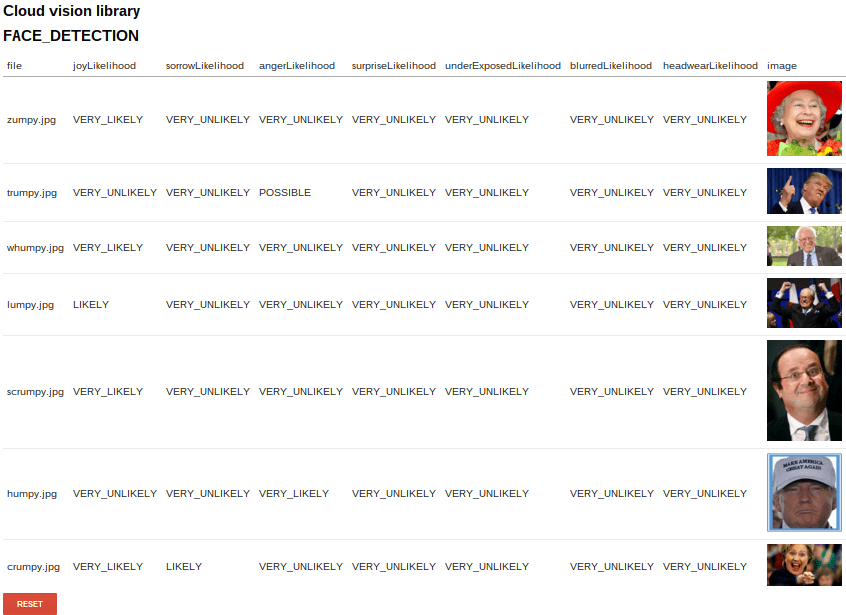
After that, the app works in exactly the same was as Using OAUTH2 with a webapp published ‘as me’, and will pass the images in the user’s folder to the cloud vision API for processing according to the type of detection selected, producing a result like this;
All the demo code is available on github.
Include cGoa
You’ll need the cGoa library to manage the interactions with the Google token infrastructure. It’s here
MZx5DzNPsYjVyZaR67xXJQai_d-phDA33
or if you prefer, you can get the source from github.
Creating credentials
The credentials are the same as the ones used in Using OAUTH2 with a webapp published ‘as me’. No changes are required.
Storing the credentials.
The credentials are stored in the same way as the ones used in Using OAUTH2 with a webapp published ‘as me’, except that the oneoff function to initially create them has a couple of changes – not related to running as ‘user’ as opposed to running as ‘me’, but needed because I want to be able to use the Picker API to enhance the example.
cGoa.GoaApp.setPackage (propertyStore ,
    cGoa.GoaApp.createPackageFromFile (DriveApp , {
      packageName: 'cloudvision',
      fileId:'0B92xxxxxxFreTVPdjQ',
      scopes : cGoa.GoaApp.scopesGoogleExpand (['cloud-platform','drive']),
      service:'google',
      apiKey:'AIzxxxxxxGvZKbdg'  // you can store arbirary properties in goa too.
    }));
I’ve added the drive scope, and also a new property called apiKey. Picker doesn’t have any scope of its own, but will need Drive scope to be able to access the user’s drive. The picker needs an API key in addition to Oauth2 authorization. An API key can be created in the developers console in the cloud vision project, as described below. Goa is able to retrieve any arbitrary properties in addition to the ones it needs for working with tokens, so I’ll store the API key here too and get it later when needed.
Creating an API key
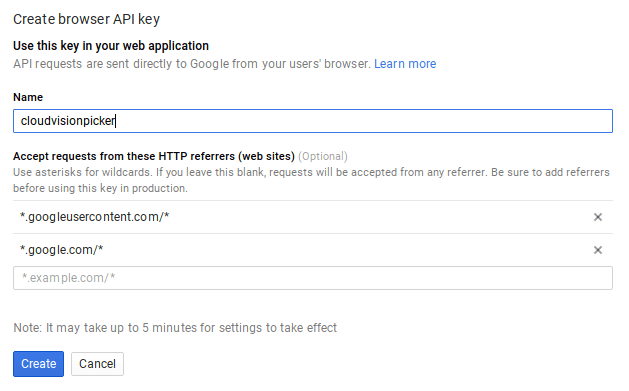
Some APIs need an API key to measure usage. An API key can also be assigned a domain from which to expect requests using this key- which means that if someone gets hold of your key he would need to issue requests from a registered domain to be able to use it. Of course, in the case of Apps Script, all requests come from Google, so it doesn’t help too much. In any case, here’s how to create an API Key.
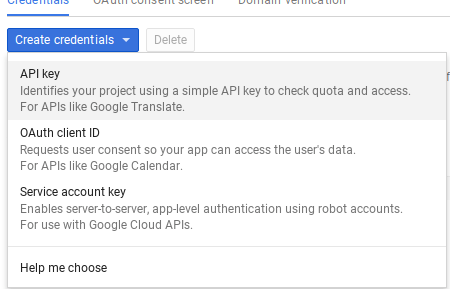
In the credentials area of your developer console entry for the cloud vision project (the one you enabled the cloudvision API in).
Store the API key in the goa one off script and execute it to write the whole thing away for later.
cGoa.GoaApp.setPackage (propertyStore ,
    cGoa.GoaApp.createPackageFromFile (DriveApp , {
      packageName: 'cloudvision',
      fileId:'0B92xxxxxxFreTVPdjQ',
      scopes : cGoa.GoaApp.scopesGoogleExpand (['cloud-platform','drive']),
      service:'google',
      apiKey:'AIzxxxxxxGvZKbdg'  // you can store arbirary properties in goa too.
    }));
Enabling the API
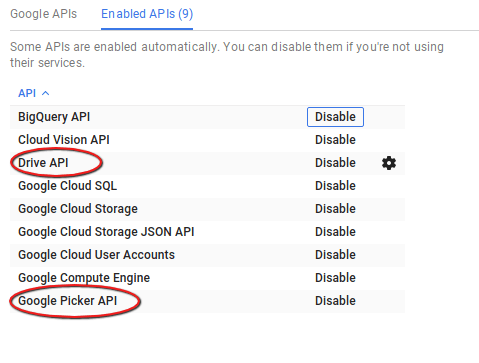
Since I want to enhance this project by including the Picker, I also need to enable the Drive API and the Picker API in the developers console in the project created for this cloudvision project.
The webApp
The entire code for the web app is too long to publish here, but all the examples for each of the scenarios are on github. I’ll just focus on the key points in this post. Since I’m using the same webApp for the ‘as me’ version, and the enhanced ‘as user’ version, I’ll need to introduce some parameterization. Here’s the updated doGet function from the webApp in full.
/**
 * this is how  to do a webapp which needs authentication
 * @param {*} e - parameters passed to doGet
 * @return {HtmlOurput} for rendering
 */
// since Im using the same webapp for multiplt purposes
// these describe what each do
// change TYPE to the run required
var PARAMS = {
  TYPE:'asuser',              // or asme
  PACKAGE_NAME:'cloudvision',     // always this
  asuser: {
    props:PropertiesService.getUserProperties(),
    clone:true,
    html:'asuser'
  },
  asme: {
    props:PropertiesService.getScriptProperties(),
    clone:false,
    html:'asme'
  }
};
function doGet (e) {
  // this is pattern for a WebApp.
  // passing the doGet parameters (or anything else)
  // will ensure they are preservered during the multiple oauth2 processes
  // im using this same for each, so need a way to swicth between
  var demo = PARAMS[PARAMS.TYPE];
  if (!demo) {
    throw 'set PARAMS.TYPE to match one of the properties of PARAMS';
  }
  // it may need cloning if user props required
  if (demo.clone) {
    cGoa.GoaApp.userClone(
      PARAMS.PACKAGE_NAME,
      PropertiesService.getScriptProperties() ,
      demo.props
    );
  }
  // get the goa
  var goa = cGoa.GoaApp.createGoa(
    PARAMS.PACKAGE_NAME,
    demo.props
  ).execute(e);
  // it's possible that we need consent - this will cause a consent dialog
  if (goa.needsConsent()) {
    return goa.getConsent();
  }
  // if we get here its time for your webapp to run
  // and we should have a token, or thrown an error somewhere
  if (!goa.hasToken()) {
    throw 'something went wrong with goa - did you check if consent was needed?';
  }
  // now return the evaluated page
  return HtmlService
  .createTemplateFromFile(demo.html)
  .evaluate()
  .setSandboxMode(HtmlService.SandboxMode.IFRAME)
  .setTitle('Web app Oauth2 ' + demo.html)
}
Webapp walkthrough
Here’s the parameterization, for the two flavors of webapp. Of course you wouldn’t normally need this. The key difference between the two versions is that I’m using a different html file – largely because the ‘as user’ version uses the picker to identify which folder to access.
// since Im using the same webapp for multiplt purposes
// these describe what each do
// change TYPE to the run required
var PARAMS = {
  TYPE:'asuser',              // or asme
  PACKAGE_NAME:'cloudvision',     // always this
  asuser: {
    props:PropertiesService.getUserProperties(),
    clone:true,
    html:'asuser'
  },
  asme: {
    props:PropertiesService.getScriptProperties(),
    clone:false,
    html:'asme'
  }
};
Aside from the parametrization, the only difference between this pattern and the one used in Using OAUTH2 with a webapp published ‘as me’ is that I am using the userPropertyStore to keep the token infrastructure in. That means I need to handle cloning the credentials as new users come along. Goa takes care of all of that by cloning the package from the scriptProperties to the userProperties as needed. This code needs to be at the start of the pattern to make that happen. From then on, all interaction is with the UserProperties.
// it may need cloning if user props required
  if (demo.clone) {
    cGoa.GoaApp.userClone(
      PARAMS.PACKAGE_NAME,
      PropertiesService.getScriptProperties() ,
      demo.props
    );
  }
The Picker
The picker runs client side, and is included in the asuser html file as follows. The Google jsapi library is also needed.
<!-- javascript. --> <?!= requireJs(['mainasuser']); ?> <?!= requireGs(['Client','Server','App','Render','Picker']); ?>
The mainasuser.js html file is also slightly different as it loads the picker code from the Google API as follows, then initializes the App when it is completely loaded.
// this version uses the picker to get at the users drive
google.load('picker', '1');
google.setOnLoadCallback(function () {
  App.init();
});
The picker code itself is actually quite simple, although it could be improved by playing around with the (very complicated) extensive options that the picker API offers.
var Picker = (function myFunction(ns) {
  /**
  * get a picker
  * @param {string} accessToken
  * @param {string} developerKey
  * @param {function} callback when picked
  */
  ns.getFolderPicker = function (accessToken, developerKey , callback) {
    var docsView = new google.picker.DocsView()
    .setIncludeFolders(true)
    .setMimeTypes('application/vnd.google-apps.folder')
    .setSelectFolderEnabled(true);
    var picker = new google.picker.PickerBuilder()
    .addView(docsView)
    .setOAuthToken(accessToken)
    .setCallback(callback)
    .setDeveloperKey(developerKey)
    .setOrigin(google.script.host.origin)
    .setTitle('Pick a folder with images to analyze')
    .build();
    picker.setVisible(true);
  };
  return ns;
})(Picker || {});
Since the picker is invoked client side, it needs a way to get the api key and oauth token from the server and ensure they are fresh. This method is in the Client namespace.
/**
  * for the picker we need to get the access token
  * @param {function} func what to do after we have it
  */
  ns.getPickerKeys = function (func) {
    google.script.run
    .withFailureHandler ( function (err) {
      App.reportMessage (err);
    })
    /**
    * called back from server
    */
    .withSuccessHandler ( function (result) {
      return func (result);
    })
    .expose('Server','pickerKeys');
  };
Which as usual, asks the Server namespace to do something on its behalf – namely to get a token and an apikey that can be used with the picker.
/**
   * return s tokens and keys needed for pcier
   * @return {object}
   */
  ns.pickerKeys = function () {
    return {
      token:Goth.getToken(PARAMS.PACKAGE_NAME, PARAMS[PARAMS.TYPE].props),
      key:Goth.getGoa (PARAMS.PACKAGE_NAME, PARAMS[PARAMS.TYPE].props).getProperty ('apiKey')
    }
  };
All this is kicked off by listening for a click on the Change folder button, and the selected folder details are displayed and stored in the folder controls.
// handle a picker to get a different folder
    listen (ns.globals.divs.getFolder , "click" , function (e) {
      // first get the token and the developer key from the server
      Client.getPickerKeys (function (keys) {
        // then do a picker, passing them
        Picker.getFolderPicker (keys.token, keys.key , function (pickerData) {
          // couple of shortcuts
          var p = google.picker;
          var g = ns.globals.divs;
          // see if we got something picked;
          if (pickerData[p.Response.ACTION] === p.Action.PICKED) {
            // the first one
            var folder = pickerData[p.Response.DOCUMENTS][0];
            // show what was picked
            g.folderId.value = folder[p.Document.ID];
            g.folderLabel.innerHTML = folder[p.Document.NAME] + ' (' + folder[p.Document.ID] + ')';
          }
        });
      });
    });
Why not join our forum, follow the blog or follow me on Twitter to ensure you get updates when they are available.

