This section contains some different methods of getting an access token for use with Google APIS that are not built in or advanced services. All the demo code for the full app used in these examples is available on github. Note that I’m using the same code for all these examples, so the final source on github will have evolved in some details from the writeup here.
Using the apps script token
The first example is the simplest, where we reuse the Apps Script token. Here’s an example using the Native Drive API, but borrowing an access token from Apps Script..
Using Goa
For the next examples, we’ll need the cGoa library which is available under this project key, or on github. All the tests described for this topic are also available on github.
MZx5DzNPsYjVyZaR67xXJQai_d-phDA33
There is a tutorial and complete documentation on Goa available here.
Using a service account
The next simplest method is to use a service account. This is most suitable if you are accessing resources associated with a project as opposed to an individual. Here’s an example using the Cloud Vision API with a service account.
Using a regular OAUTH2 flow
This is the most complex, but the Goa library actually makes it fairly straightforward too. You should decide whether to use the UserProperties or ScriptProperties based on whether the application is using your resources (running as you), or who ever is using its resources. For more information on that, see Accessing as the user running the script First up is a discussion on Using OAUTH2 with a webapp published ‘as me’ Next, Using OAuth2 when published as ‘user accessing the webapp’ enhances the example by adding Google Picker to be able to look at a user’s Drive files. Finally here’s a completed app with all kinds of scenarios built in. Comparing Google and Microsoft – image emotion detection
Using Goa for Firebase custom authentication
This uses JSON web tokens and is not actually OAuth2, but goa can also be used as described in Firebase custom authentication with goa.
Goa Tutorial slides
https://youtu.be/6fpDFBcyAMs
My opinion
The Google one allows you to do more things at once, but the result is that it’s more complicated to use. It also returns categorized emotional scores, whereas Microsoft sticks its neck out and gives you an actual value. Microsoft is also more ambitious in its emotional analysis range, attempting to detect more subtle emotions. Although neither are perfect, I think the Microsoft one gives more balanced and subtle results, and its easier to use. So for once, it’s Microsoft for me. Let me know what you think from the examples below.
Results
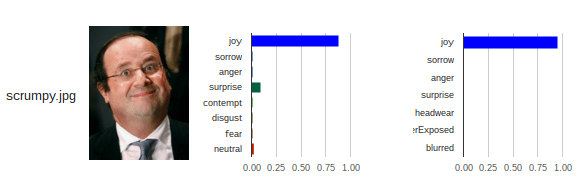
Before I get into the details, here are the side by side results of emotion analysis on a couple of images.

Some notes on results
The emotions detected (they are called slightly different things, but I’ve normalized them for comparison), are a little different. Both detect joy, sorrow, anger and surprise, but Microsoft go a little further and try to look for contempt, disgust, fear and neutrality. Google offer some functional type measures such as headwear detection, underexposed and blurred.
Measures
Whereas Microsoft returns values between 0 and 1 (actually there are a couple of results that were very tiny negative numbers),
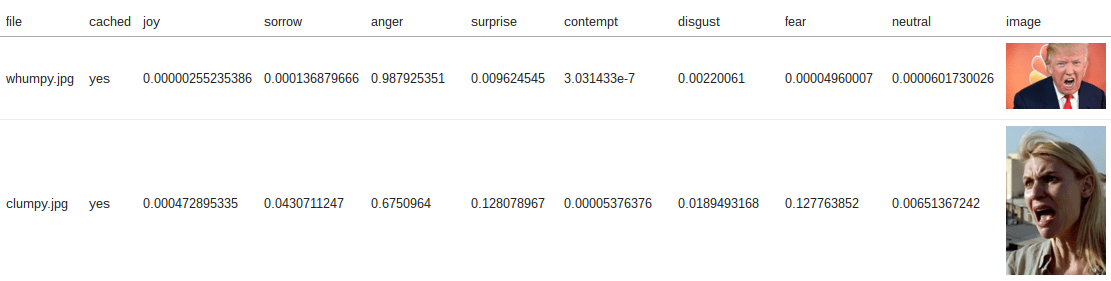
Google return a classification.

So that I could compare them as a chart, I assigned these weights to the categorizations.
scales: {
      "VERY_LIKELY":0.95,
      "VERY_UNLIKELY":0,
      "POSSIBLE":0.5,
      "LIKELY":0.7,
      "UNLIKELY":0.3,
      "UNKNOWN":0
    }
Some more results
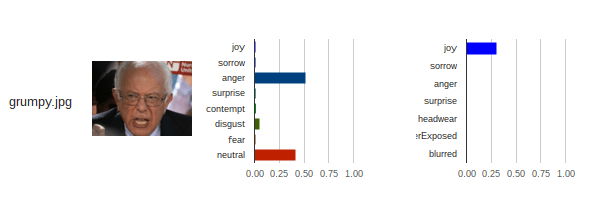
Let’s take a look at a few more comparisons. Google (on the right) got this one completely wrong – Bernie doesn’t look too happy to me in this picture. He looks angry and somewhat disgusted – Microsoft got it right.
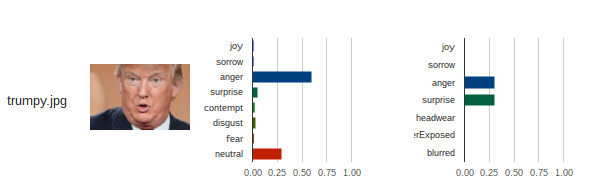
Google did better in this one, capturing both the surprise and anger in this Trump image.
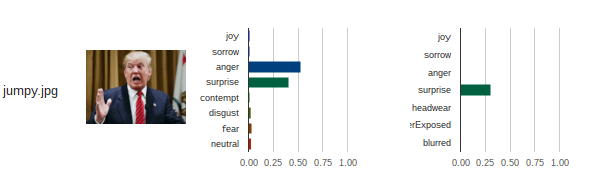
In this image Microsoft did better – picking up the Trump trademark surprise and anger
I love this photo, which is 100% joy, recognized by both. Strangely, Google didn’t detect she was wearing a hat.

There really isn’t a category to describe this dopey image of Francois Hollande, but they both concluded he was happy, with Microsoft throwing in some surprise.
Google completely failed to notice any emotion in this Trump picture, whereas Microsoft picked up the clear sorrow, anger and even contempt in the expression. Google just focused on the hat. In fact it often thinks people are wearing hats when they are not (see the picture from homeland at the beginning of this post)

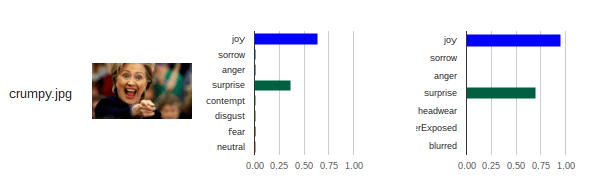
Both did well in this Hillary image, picking up both the surprise and joy.
Face and label detection
I’ve covered Google label detection in other posts in Some OAUTH2 walkthroughs, but it’s interesting that Google certainly likes to detect hair or headwear.

even giving first classification of hair to Trump when he’s wearing a hat.

I haven’t tried Microsoft label detection. Face detection is of course a pre-cursor to being able to analyze emotion. The Google face detection and emotion detection are wrapped up – both are returned from the same query. Microsoft has a separate api call for each.
Some implementation notes.
Since the main purpose of this app was about authentication scenarios, it’s a bit rough for a finished app. For example it will not handle cases where no emotion can be detected, nor with multiple faces in the same photo, so make sure your folder contains images appropriate for the type of analysis being done. If you decide to use the code and enhance it, I’d love to host your write up in my guest post section of this site. Please let me know if you’d like to do this. All the code for this is on Github This is what has been implemented in the app as it stands today.
Using Cache
I would recommend you always use cache, since this avoids a call to the API. It will be faster, and might avoid some charges. Google allows you to send multiple queries in one request, whereas Microsoft needs a query for each request. I’ve cached each result separately , so the only queries that are actually made are for new or changed images (or if cache has expired for that image).
Setting up authentication
I’ve covered this a number of times in Some OAUTH2 walkthroughs, and all flavors of that are in this example. Once you have your credentials create and run a one off function that looks like this, substituting your credentials and ids as appropriate.
// web account for cloud vision - taken from downloaded credentials
  cGoa.GoaApp.setPackage (propertyStore ,
    cGoa.GoaApp.createPackageFromFile (DriveApp , {
      packageName: 'cloudvision',
      fileId:'0B92ExLh4POiZUjIzbXFreTVPdjQ',
      scopes : cGoa.GoaApp.scopesGoogleExpand (['cloud-platform','drive']),
      service:'google',
      apiKey:'AIzaxxxxh632MbPE',
      msEmotionKey:'e9xxxxxxxxxab2' // you can store arbirary properties in goa too.
    }));
Folder of Images
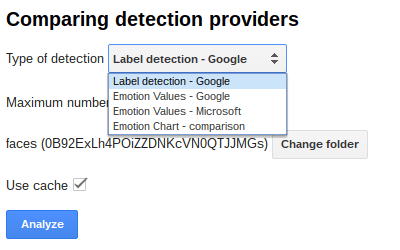
You should put the images you want to analyze in a folder and select it in the App. I put a limit on the number of images it will analyze to avoid accidentally generating potential charges. You’ll find that maxFiles property in the Cloudvision namespace.
Why not join our forum, follow the blog or follow me on Twitter to ensure you get updates when they are available.
Sub pages